fbpx
Learn to build large language model applications: vector databases, langchain, fine tuning and prompt engineering. Learn more

Data Visualization

Data visualization tools are used to gain meaningful insights from data. Learn how to build visualization tools with examples.

The content of this blog is based on examples/notes/experiments related to the material presented in the “Building Data Visualization Tools” module of the “Mastering Software Development in R” Specialization (Coursera) created by Johns Hopkins University [1].

Required data visualization packages

  • ggplot2, a system for “declaratively” creating graphics, based on “The Grammar of Graphics.”
  • gridExtra, provides a number of user-level functions to work with “grid” graphics.
  • dplyr, a tool for working with data frame-like objects, both in and out of memory.
  • viridis, the Viridis color palette.
  • ggmap, a collection of functions to visualize spatial data and models on top of static maps from various online sources (e.g Google Maps)
    # If necessary to install a package run
    # install.packages("packageName")
    
    # Load packages
    library(ggplot2)
    library(gridExtra)
    library(dplyr)
    library(viridis)
    library(ggmap)
    

Data

The ggplot2 package includes some datasets with geographic information. The ggplot2::map_data() function allows to get map data from the maps package (use ?map_data form more information).

Specifically the <code class="highlighter-rouge">italy dataset [2] is used for some of the examples below. Please note that this dataset was prepared around 1989 so it is out of date, especially information pertaining to provinces (see ?maps::italy).

# Get the italy dataset from ggplot2
# Consider only the following provinces "Bergamo" , "Como", "Lecco", "Milano", "Varese"
# and arrange by group and order (ascending order)
italy_map <- ggplot2::map_data(map = "italy")
italy_map_subset <- italy_map %>%
filter(region %in% c("Bergamo" , "Como", "Lecco", "Milano", "Varese")) %>%
arrange(group, order)

Each observation in the dataframe defines a geographical point with some extra information:

  • long & lat, longitude and latitude of the geographical point
  • group, an identifier connected with the specific polygon points are part of – a map can be made of different polygons (e.g. one polygon for the mainland and one for each island, one polygon for each state, …)
  • order, the order of the point within the specific group– how all of the points are part of the same group should be connected in order to create the polygon
  • region, the name of the province (Italy) or state (USA)
    head(italy_map, 3)
    ##       long      lat group order        region subregion
    ## 1 11.83295 46.50011     1     1 Bolzano-Bozen      
    ## 2 11.81089 46.52784     1     2 Bolzano-Bozen      
    ## 3 11.73068 46.51890     1     3 Bolzano-Bozen
    

How to work with maps

Having spatial information in the data gives the opportunity to map the data or, in other words, visualizing the information contained in the data in a geographical context. R has different possibilities to map data, from normal plots using longitude/latitude as x/y to more complex spatial data objects (e.g. shapefiles).

Mapping with ggplot2 package

The most basic way to create maps with your data is to use ggplot2, create a ggplot object and then, add a specific geom mapping longitude to x aesthetic and latitude to y aesthetic [4] [5]. This simple approach can be used to:

  • create maps of geographical areas (states, country, etc.)
  • map locations as points, lines, etc.

Create a map showing “Bergamo,” Como,” “Varese,” and “Milano” provinces in Italy using simple points…

When plotting simple points the geom_point function is used. In this case the polygon and order of the points is not important when plotting.

italy_map_subset %>%
 ggplot(aes(x = long, y = lat)) +
geom_point(aes(color = region))

Create a map showing “Bergamo,” Como,” “Varese,” and “Milano” provinces in Italy using lines…

The geom_path function is used to create such plots. From the R documentation, geom_path “… connects the observation in the order in which they appear in the data.” When plotting using geom_path is important to consider the polygon and the order within the polygon for each point in the map.

The points in the dataset are grouped by region and ordered by order. If information about the region is not provided then the sequential order of the observations will be the order used to connect the points and, for this reason, “unexpected” lines will be drawn when moving from one region to the other.

On the other hand if information about the region is provided using the group or color aesthetic, mapping to region, the “unexpected” lines are removed (see example below).

plot_1 <- italy_map_subset %>%
 ggplot(aes(x = long, y = lat)) +
geom_path() +
ggtitle("No mapping with 'region', unexpected lines")

plot_2 <- italy_map_subset %>%
 ggplot(aes(x = long, y = lat)) +
 geom_path(aes(group = region)) +
ggtitle("With 'group' mapping")

plot_3 <- italy_map_subset %>%
 ggplot(aes(x = long, y = lat)) +
geom_path(aes(color = region)) +
ggtitle("With 'color' mapping")

grid.arrange(plot_1, plot_2, plot_3, ncol = 2, layout_matrix = rbind(c(1,1), c(2,3)))

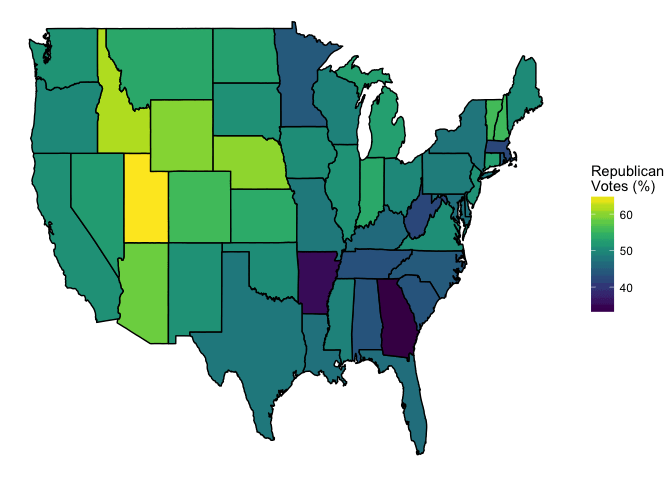
Mapping with ggplot2 is possible to create more sophisticated maps like choropleth maps [3]. The example below, extracted from [1], shows how to visualize the percentage of Republican votes in 1976 by states.

# Get the USA/ state map from ggplot2
us_map <- ggplot2::map_data("state")

# Use the 'votes.repub' dataset (maps package), containing the percentage of
# republican votes in the 1900 elections by state. Note
# - the dataset is a matrix so it needs to be converted to a dataframe
# - the row name defines the relevant state

votes.repub %>%
tbl_df() %>%
mutate(state = rownames(votes.repub), state = tolower(state)) %>%
 right_join(us_map, by = c("state" = "region")) %>%
ggplot(mapping = aes(x = long, y = lat, group = group, fill = `1976`)) +
geom_polygon(color = "black") +
theme_void() +
scale_fill_viridis(name = "RepublicannVotes (%)")

Maps with ggmap package, Google Maps API and others


republican map- visualization


Another way to create maps is to use the ggmap[4] package (see Google Maps API Terms of Service). As stated in the package description…

“A collection of functions to visualize spatial data and models on top of static maps from various online sources (e.g Google Maps). It includes tools common to those tasks, including functions for geolocation and routing.” R Documentation

The package allows to create/plot maps using Google Maps and few other service providers, and perform some other interesting tasks like geocoding, routing, distance calculation, etc. The maps are actually ggplot objects making possible to reuse the ggplot2 functionality like adding layers, modify the theme, etc…

“The basic idea driving ggmap is to take a downloaded map image, plot it as a context layer using ggplot2, and then plot additional content layers of data, statistics, or models on top of the map. In ggmap this process is broken into two pieces – (1) downloading the images and formatting them for plotting, done with get_map, and (2) making the plot, done with ggmap. qmap marries these two functions for quick map plotting (c.f. ggplot2’s ggplot), and qmplot attempts to wrap up the entire plotting process into one simple command (c.f. ggplot2’s qplot).” [4]

How to create and plot a map…

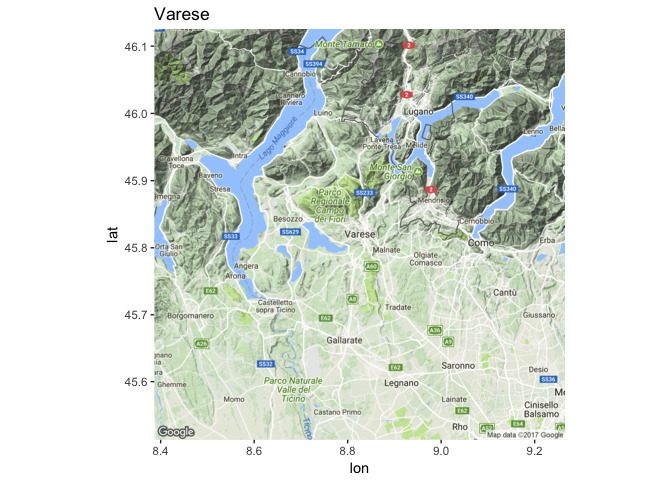
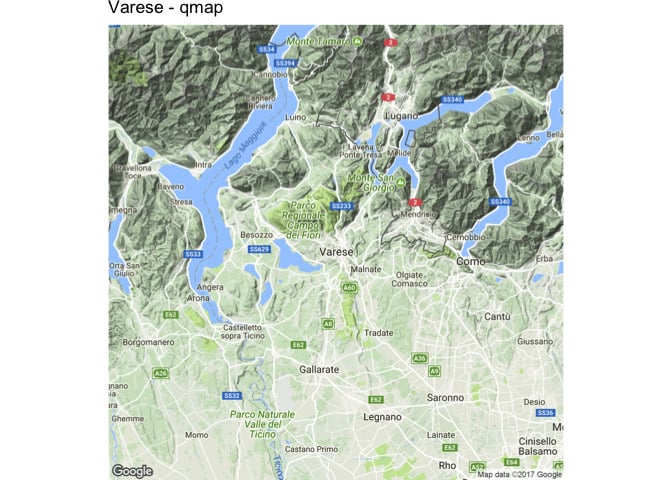
The ggmap::get_mapfunction is used to get a base map (a ggmap object, a raster object) from different service providers like Google Maps, OpenStreetMap, Stamen Maps or Naver Maps (default setting is Google Maps). Once the base map is available, then it can been plotted using the ggmap::ggmap function. Alternatively the ggmap::qmap function (quick map plot) can be used.

# When querying for a base map the location must be provided
# name, address (geocoding)
# longitude/latitude pair
base_map <- get_map(location = "Varese")
ggmap(base_map) + ggtitle("Varese")

# qmap is a wrapper for
# `ggmap::get_map` and `ggmap::ggmap` functions.
qmap("Varese") + ggtitle("Varese - qmap")


plot map - data visualization


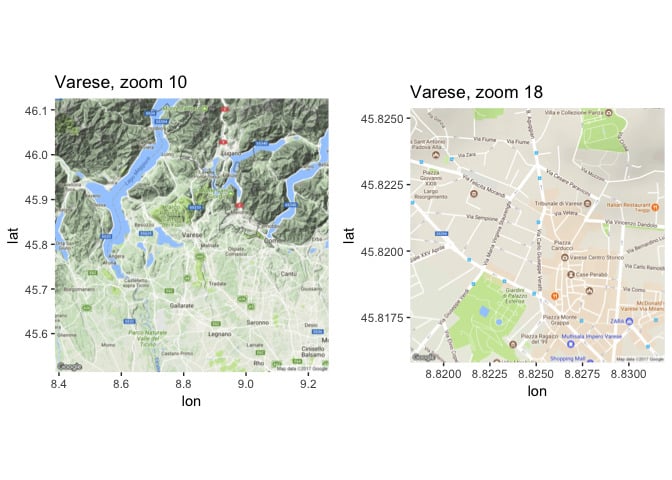
How to change the zoom in the map…

The zoom argument (default value is auto) in ggmap::get_map the function can be used to control the zoom of the returned base map (see ?get_map for more information). Please note that the possible values/range for the zoom argument changes with the different sources.

# An example using Google Maps as a source
# Zoom is an integer between 3 - 21 where
# zoom = 3 (continent)
# zoom = 10 (city)
# zoom = 21 (building)

base_map_10 <- get_map(location = "Varese", zoom = 10)
base_map_18 <- get_map(location = "Varese", zoom = 16)

grid.arrange(ggmap(base_map_10) + ggtitle("Varese, zoom 10"),
         ggmap(base_map_18) + ggtitle("Varese, zoom 18"),
         nrow = 1)


Google map - data


How to change the type of map…

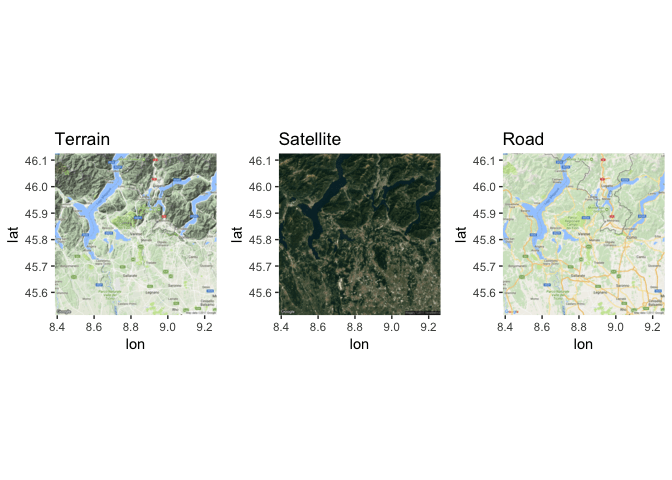
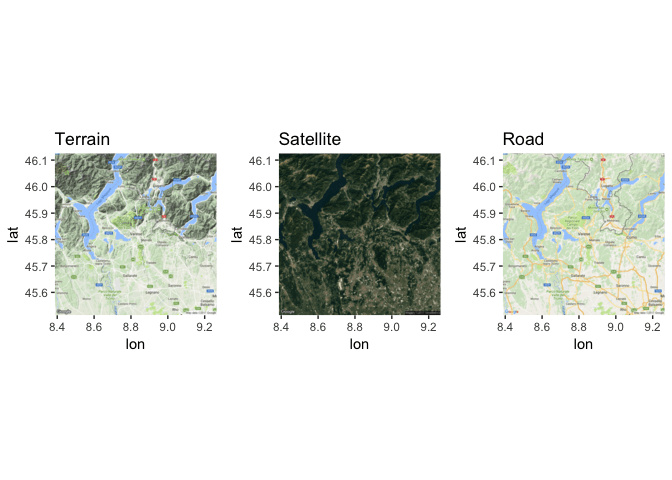
The maptype argument in ggmap::get_map the function can be used to change the type of map aka map theme. Based on the R documentation (see ?get_map for more information)

‘[maptype]… options available are “terrain”, “terrain-background”, “satellite”, “roadmap”, and “hybrid” (google maps), “terrain”, “watercolor”, and “toner” (stamen maps)…’.

# An example using Google Maps as a source
# and different map types

base_map_ter <- get_map(location = "Varese", maptype = "terrain")
base_map_sat <- get_map(location = "Varese", maptype = "satellite")
base_map_roa <- get_map(location = "Varese", maptype = "roadmap")

grid.arrange(ggmap(base_map_ter) + ggtitle("Terrain"),
         ggmap(base_map_sat) + ggtitle("Satellite"),
         ggmap(base_map_roa) + ggtitle("Road"),
         nrow = 1)
 

google map data visualization


How to change the source for maps…

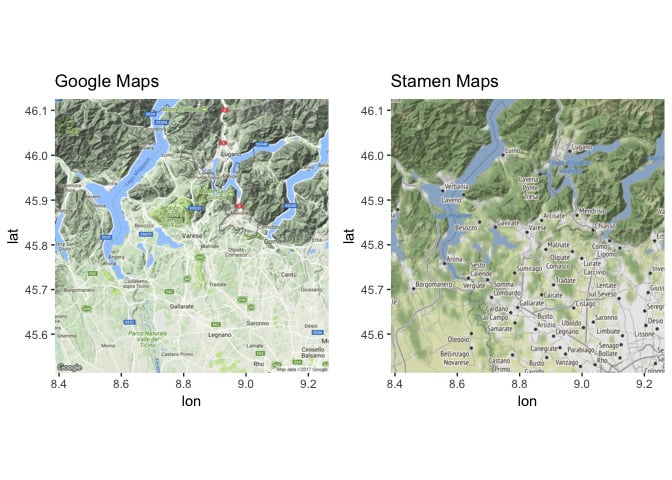
While the default source for maps with ggmap::get_map is Google Maps, it is possible to change the map service using the source argument. The supported map services/sources are Google Maps, OpenStreeMaps, Stamen Maps, and CloudMade Maps (see ?get_map for more information).

# An example using different map services as a source

base_map_google <- get_map(location = "Varese", source = "google", maptype = "terrain")
 base_map_stamen <- get_map(location = "Varese", source = "stamen", maptype = "terrain")

grid.arrange(ggmap(base_map_google) + ggtitle("Google Maps"),
         ggmap(base_map_stamen) + ggtitle("Stamen Maps"),
         nrow = 1)


Google map types


How to geocode a location…

The ggmap::geocode function can be used to find latitude and longitude of a location based on its name (see ?geocode for more information). Note that Google Maps API limits the possible number of queries per day, geocodeQueryCheck can be used to determine how many queries are left.

# Geocode a city
geocode("Sesto Calende")
##        lon     lat
## 1 8.636597 45.7307
# Geocode a set of cities
geocode(c("Varese", "Milano"))
##        lon     lat
## 1 8.825058 45.8206
## 2 9.189982 45.4642

# Geocode a location
geocode(c("Milano", "Duomo di Milano"))
##        lon     lat
## 1 9.189982 45.4642
## 2 9.191926 45.4641
geocode(c("Roma", "Colosseo"))
##        lon      lat
## 1 12.49637 41.90278
## 2 12.49223 41.89021

How to find a route between two locations…

The ggmap::route function can be used to find a route from Google using different possible modes, e.g. walking, driving, … (see ?ggmap::route for more information).

“The route function provides the map distances for the sequence of “legs” which constitute a route between two locations. Each leg has a beginning and ending longitude/latitude coordinate along with a distance and duration in the same units as reported by mapdist. The collection of legs in sequence constitutes a single route (path) most easily plotted with geom_leg, a new exported ggplot2 geom…” [4]

route_df <- route(from = "Somma Lombardo", to = "Sesto Calende", mode = "driving")
head(route_df)
##      m    km     miles seconds   minutes       hours startLon startLat
## 1  198 0.198 0.1230372      52 0.8666667 0.014444444 8.706770 45.68277
 ## 2  915 0.915 0.5685810     116 1.9333333 0.032222222 8.705170 45.68141
## 3  900 0.900 0.5592600      84 1.4000000 0.023333333 8.702070 45.68835
## 4 5494 5.494 3.4139716     390 6.5000000 0.108333333 8.691054 45.69019
## 5  205 0.205 0.1273870      35 0.5833333 0.009722222 8.648636 45.72250
## 6  207 0.207 0.1286298      25 0.4166667 0.006944444 8.649884 45.72396
##     endLon   endLat leg
## 1 8.705170 45.68141   1
## 2 8.702070 45.68835   2
## 3 8.691054 45.69019   3
## 4 8.648636 45.72250   4
## 5 8.649884 45.72396   5
## 6 8.652509 45.72367   6

route_df <- route(from = "Via Gerolamo Fontana 32, Somma Lombardo",
              to = "Town Hall, Somma Lombardo", mode = "walking")

qmap("Somma Lombardo", zoom = 16) +
 geom_leg(
aes(x = startLon, xend = endLon, y = startLat, yend = endLat),  colour = "red",
size = 1.5, alpha = .5,
data = route_df) +
 geom_point(aes(x = startLon, y = startLat), data = route_df) +
geom_point(aes(x = endLon, y = endLat), data = route_df)


Google map - Stamen map


How to find the distance between two locations…

The ggmap::mapdist function can be used to compute the distance between two location using different possible modes, e.g. walking, driving, … (see ?ggmap::mapdist for more information).

finding distance between 2 locations

Pro tip: Learn to use data to drive decision making

More on mapping

  • Using the choroplethr and choroplethrMaps packages, see “Mapping US counties and states” section in [1]
  • Working with spatial objects and shapefiles, see “More advanced mapping – Spatial objects” section in [1]
  • Using htmlWidgets for mapping in R using leaflet [5]

References

[1] Peng, R. D., Kross, S., & Anderson, B. (2016). Lean Publishing.

[2] Unesco. (1987). [Italy Map]. Unpublished raw data.

[3] Choropleth map. (2017, October 17).

[4] Kahle, D., & Wickham, H. (2013). Ggmap: Spatial Visualization with ggplot2. The R Journal,5(1), 144-161.

[5] Agafonkin, V. (2010). RStudio, Inc. Leaflet for R. Retrieved from https://rstudio.github.io/leaflet/

[6] Paracchini, P. L. (2017, July 05). Building Data Visualization Tools: basic plotting with R and ggplot2.

[7] Paracchini, P. L. (2017, July 14). Building Data Visualization Tools: ‘ggplot2’, essential concepts.

[8] Paracchini, P. L. (2017, July 18). Building Data Visualization Tools: guidelines for good plots.

August 19, 2022

Data Science Dojo has launched Jupyter Hub for Data Visualization using Python offering to the Azure Marketplace with pre-installed data visualization libraries and pre-cloned GitHub repositories of famous books, courses, and workshops which enable the learner to run the example codes provided.

What is data visualization?

It is a technique that is utilized in all areas of science and research. We need a mechanism to visualize the data so we can analyze it because the business sector now collects so much information through data analysis. By providing it with a visual context through maps or graphs, it helps us understand what the information means. As a result, it is simpler to see trends, patterns, and outliers within huge data sets because the data is easier for the human mind to understand and pull insights from the data.

Data visualization using Python

It may assist by conveying data in the most effective manner, regardless of the industry or profession you have chosen. It is one of the crucial processes in the business intelligence process, takes the raw data, models it, and then presents the data so that conclusions may be drawn. Data scientists are developing machine learning algorithms in advanced analytics to better combine crucial data into representations that are simpler to comprehend and interpret.

Given its simplicity and ease of use, Python has grown to be one of the most popular languages in the field of data science over the years. Python has several excellent visualization packages with a wide range of functionality for you whether you want to make interactive or fully customized plots.

PRO TIP: Join our 5-day instructor-led Python for Data Science training to enhance your visualization skills.

Data visualization using Python
Using Python to visualize Data

Challenges for individuals

Individuals who want to visualize their data and want to start visualizing data using some programming language usually lack the resources to gain hands-on experience with it. A beginner in visualization with programming language also faces compatibility issues while installing libraries.

What we provide

Our Offer, Jupyter Hub for Visualization using Python solves all the challenges by providing you with an effortless coding environment in the cloud with pre-installed Data Visualization python libraries which reduces the burden of installation and maintenance of tasks hence solving the compatibility issues for an individual.

Additionally, our offer gives the user access to repositories of well-known books, courses, and workshops on data visualization that include useful notebooks which is a helpful resource for the users to get practical experience with data visualization using Python. The heavy computations required for applications to visualize data are not performed on the user’s local machine. Instead, they are performed in the Azure cloud, which increases responsiveness and processing speed.   

Listed below are the pre-installed data visualization using python libraries and the sources of repositories of a book to visualize data, a course, and a workshop provided by this offer:

Python libraries:

  • NumPy
  • Matplotlib
  • Pandas
  • Seaborn
  • Plotly
  • Bokeh
  • Plotnine
  • Pygal
  • Ggplot
  • Missingno
  • Leather
  • Holoviews
  • Chartify
  • Cufflinks

Repositories:

  • GitHub repository of the book Interactive Data Visualization with Python, by author Sharath Chandra Guntuku, AbhaBelorkar, Shubhangi Hora, Anshu Kumar.
  • GitHub repository of Data Visualization Recipes in Python, by Theodore Petrou.
  • GitHub repository of Python data visualization workshop, by Stefanie Molin (Author of “Hands-On Data Analysis with Pandas”).
  • GitHub repository Data Visualization using Matplotlib, by Udacity.

Conclusion:

Because the human brain is not designed to process such a large amount of unstructured, raw data and turn it into something usable and understandable form, we require techniques to visualize data. We need graphs and charts to communicate data findings so that we can identify patterns and trends to gain insight and make better decisions faster. Jupyter Hub for Data Visualization using Python provides an in-browser coding environment with just a single click, hence providing ease of installation. Through our offer, a user can explore various application domains of data visualizations without worrying about the configuration and computations.

At Data Science Dojo, we deliver data science education, consulting, and technical services to increase the power of data. We are therefore adding a free Jupyter Notebook Environment dedicated specifically for Data Visualization using Python. The offering leverages the power of Microsoft Azure services to run effortlessly with outstanding responsiveness. Make your complex data understandable and insightful with us and Install the Jupyter Hub offer now from the Azure Marketplace by Data Science Dojo, your ideal companion in your journey to learn data science!

Try Now!

August 18, 2022

There is so much to explore when it comes to spatial visualization using Python’s Folium library.

Spatial visualization

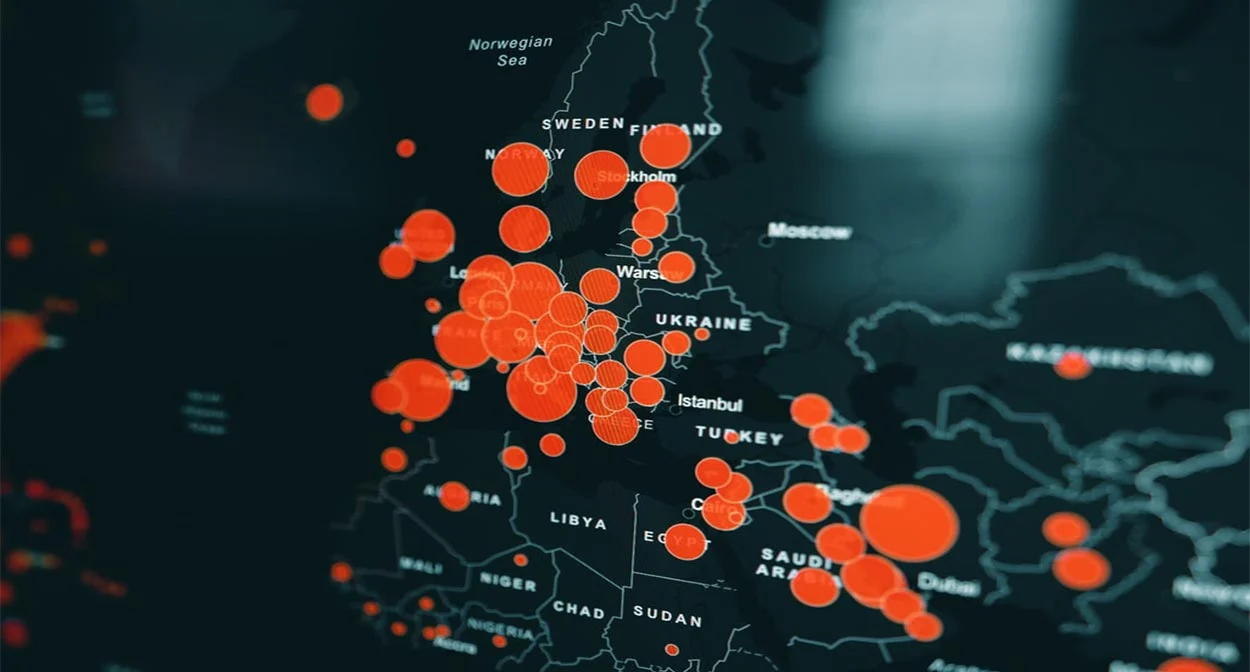
For problems related to crime mapping, housing prices, or travel route optimization, spatial visualization could be the most resourceful tool for getting a glimpse of how the instances are geographically located. This is beneficial as we are getting massive amounts of data from several sources, such as cellphones, smartwatches, trackers, etc. In this case, patterns and correlations, which otherwise might go unrecognized, can be extracted visually.

This blog will attempt to show you the potential of spatial visualization using the Folium library with Python. This tutorial will give you insights into the most important visualization tools that are extremely useful while analyzing spatial data.

Introduction to folium

Folium is an incredible library that allows you to build Leaflet maps. Using latitude and longitude points, Folium can allow you to create a map of any location in the world. Furthermore, Folium creates interactive maps that may allow you to zoom in and out after the map is rendered.

We’ll get some hands-on practice building a few maps using the Seattle Real-time Fire 911 Calls dataset. This dataset provides Seattle Fire Department 911 dispatches, and every instance of this dataset provides information about the address, location, date/time and type of emergency of a particular incident. It’s extensive, and we’ll limit the dataset to a few emergency types for the purpose of explanation.

Let’s begin

Folium can be downloaded using the following commands:.

Using pip:

$ pip install folium

Using conda:

$ conda install -c conda-forge folium

Start by importing the required libraries.

import pandas as pd
import numpy as np
import folium

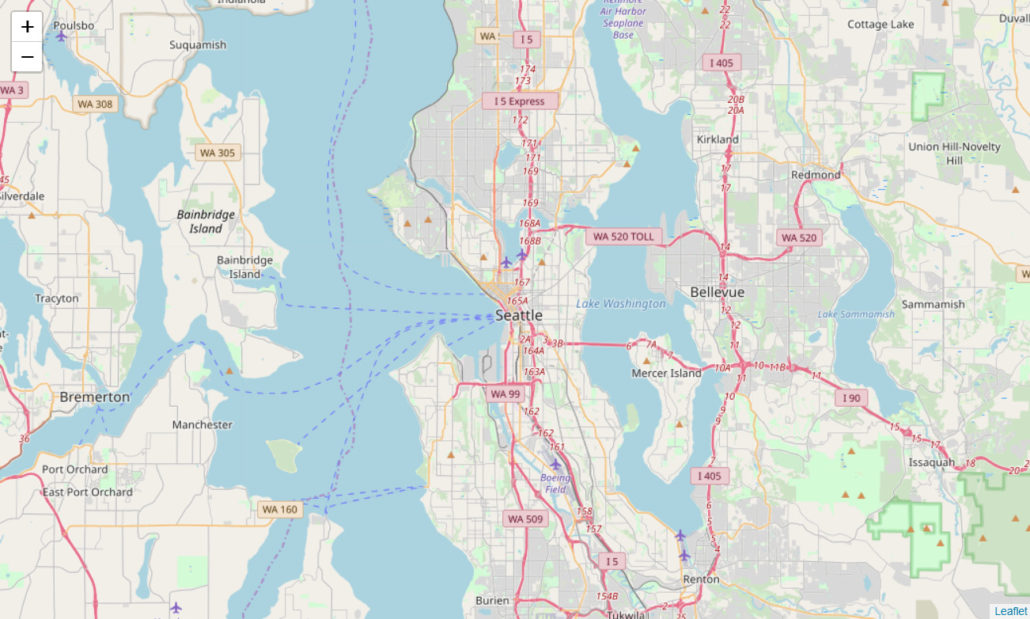
Let us now create an object named ‘seattle_map’ which is defined as a folium.Map object. We can add other folium objects on top of the folium.Map to improve the map rendered. The map has been centered to the longitude and latitude points in the location parameters. The zoom parameter sets the magnification level for the map that’s going to be rendered. Moreover, we have also set the tiles parameter to ‘OpenStreetMap’ which is the default tile for this parameter. You can explore more tiles such as StamenTerrain or Mapbox Control in Folium‘s documentation.

seattle_map = folium. Map
(location = [47.6062, -122.3321],
tiles = 'OpenStreetMap',
 zoom_start = 11)
seattle_map
Geospatial visualization of Seattle map
Seattle map centered to the longitude and latitude points in the location parameters.

We can observe the map rendered above. Let’s create another map object with a different tile and zoom_level. Through the ‘Stamen Terrain’ tile, we can visualize the terrain data, which can be used for several important applications.

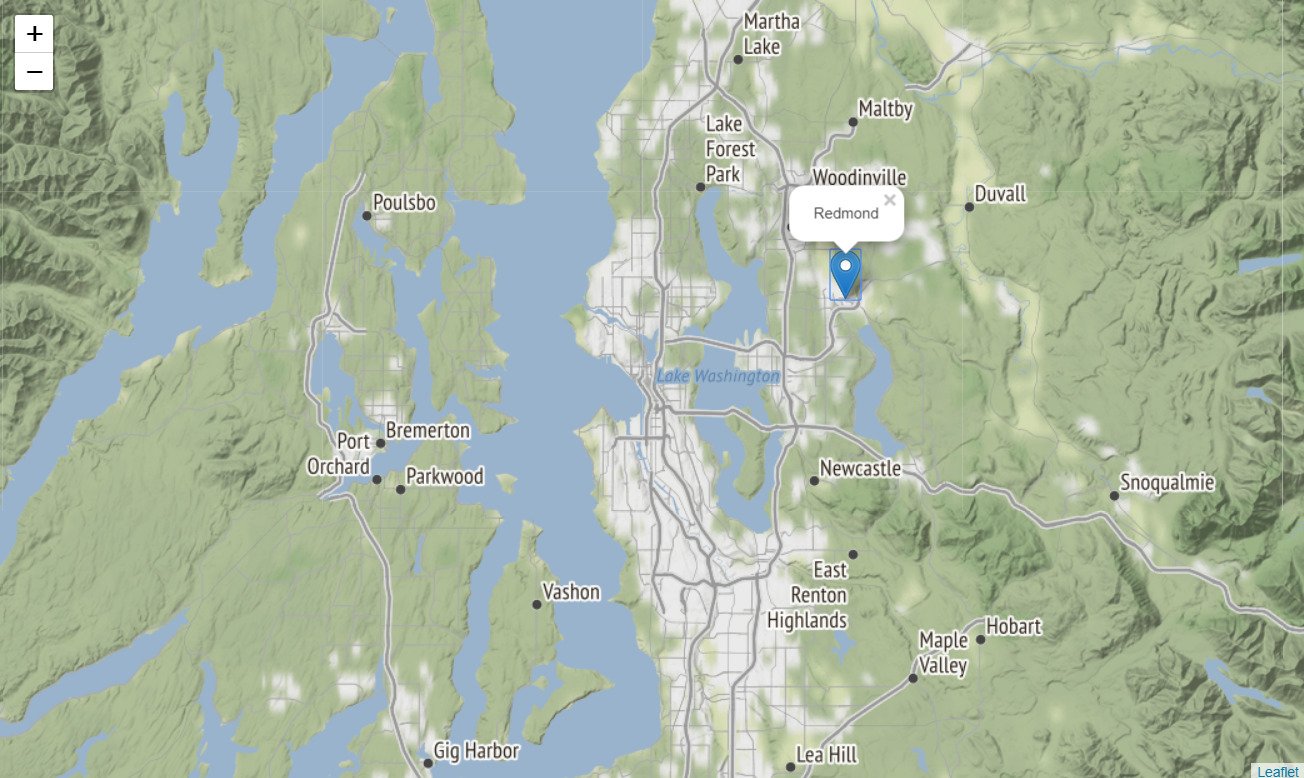
We’ve also inserted a folium. Marker to our ‘seattle_map2’ map object below. The marker can be placed at any location specified in the square brackets. The string mentioned in the popup parameter will be displayed once the marker is clicked, as shown below.
seattle_map2 = folium. Map
(location=[47.6062, -122.3321],
    tiles = 'Stamen Terrain',
    zoom_start = 10)
#inserting marker
folium.Marker(
    [47.6740, -122.1215],
    popup = 'Redmond'
).add_to(seattle_map2)
seattle_map2
Folium Seattle map
Folium marker inserted into Seattle map

We are interested to use the Seattle 911 calls dataset to visualize the 911 calls in the year 2019 only. We are also limiting the emergency types to 3 specific emergencies that took place during this time.

We will now import our dataset, which is available through this link (in CSV format). The dataset is huge, therefore, we’ll only import the first 10,000 rows using the Pandasread_csv method. We’ll use the head method to display the first 5 rows.

(This process will take some time because the data-set is huge. Alternatively, you can download it to your local machine and then insert the file path below)

path = "https://data.seattle.gov/api/views/kzjm-xkqj/rows.csv?accessType=DOWNLOAD"
seattle911 = pd.read_csv(path, nrows = 10000)
seattle911.head()
Imported dataset of Seattle
Seattle dataset for visualization with longitude and latitude

Using the code below, we’ll convert the datatype of our Datetime variable to Date-time format and extract the year, removing all other instances that occurred before 2019.

seattle911['Datetime'] = pd.to_datetime(seattle911['Datetime'], 
                                        format='%m/%d/%Y %H:%M', utc=True)
seattle911['Year'] = pd.DatetimeIndex(seattle911['Datetime']).year
seattle911 = seattle911[seattle911.Year == 2019]

We’ll now limit the Emergency type to ‘Aid Response Yellow’, ‘Auto Fire Alarm’ and ‘MVI – Motor Vehicle Incident’. The remaining instances will be removed from the ‘seattle911’ dataframe.

seattle911 = seattle911[seattle911.Type.isin(['Aid Response Yellow', 
                                              'Auto Fire Alarm', 
                                              'MVI - Motor Vehicle Incident'])]

We’ll remove any instance that has a missing longitude or latitude coordinate. Without these values, the particular instance cannot be visualized and will cause an error while rendering.

#drop rows with missing latitude/longitude values
seattle911.dropna(subset = ['Longitude', 'Latitude'], inplace = True)

seattle911.head()

Geospatial visualization: Upbeat your AI superpowers | Data Science Dojo

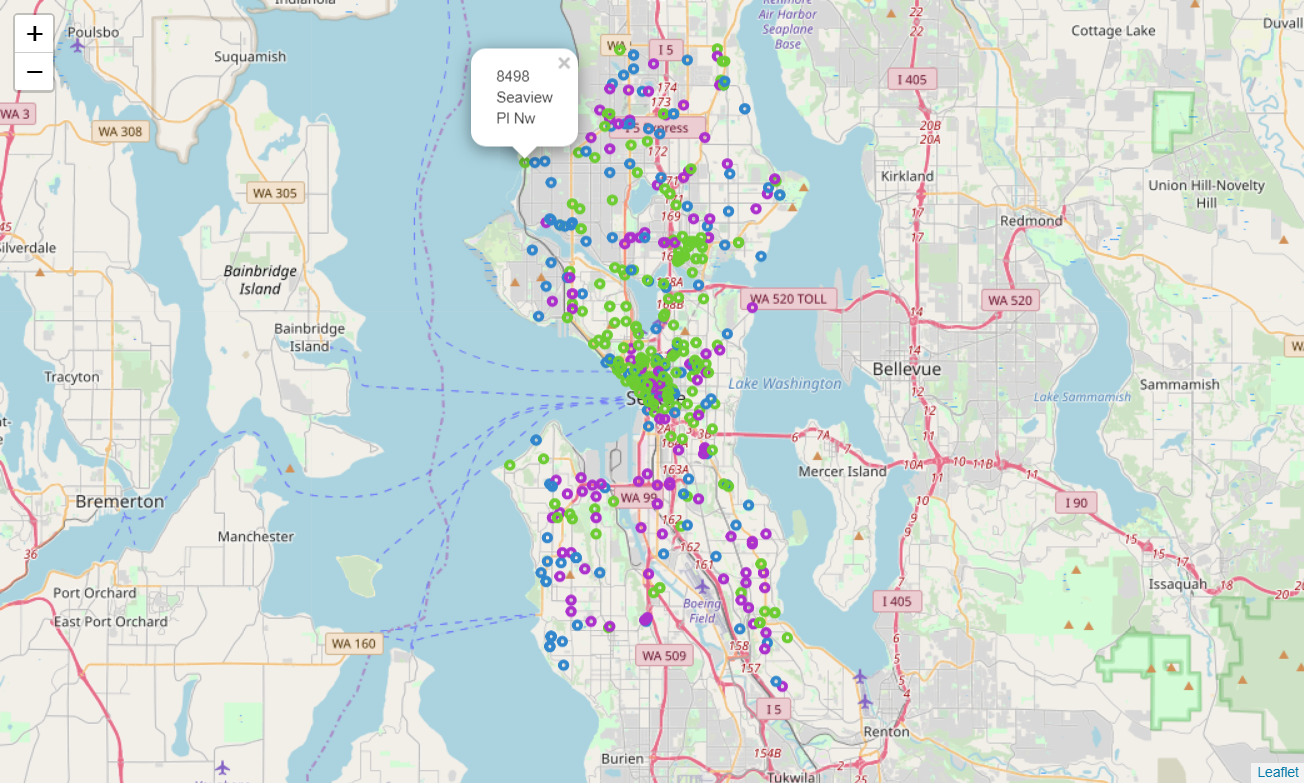
Now let’s step towards the most interesting part. We’ll map all the instances onto the map object we created above, ‘seattle_map’. Using the code below, we’ll loop over all our instances up to the length of the dataframe. Following this, we will create a folium.CircleMarker (which is similar to the folium.Marker we added above). We’ll assign the latitude and longitude coordinates to the location parameter for each instance. The radius of the circle has been assigned to 3, whereas the popup will display the address of the particular instance.

As you can notice, the color of the circle depends on the emergency type. We will now render our map.

for i in range(len(seattle911)):

    folium.CircleMarker( location = [seattle911.Latitude.iloc[i], seattle911.Longitude.iloc[i]],
        radius = 3,
        popup = seattle911.Address.iloc[i],
        color = '#3186cc' if seattle911.Type.iloc[i] == 'Aid Response Yellow' else '#6ccc31' 
        if seattle911.Type.iloc[i] =='Auto Fire Alarm' else '#ac31cc',).add_to(seattle_map) 
seattle_map
Seattle emergency map
The map gives us insights about where the emergency takes place across Seattle during 2019
Voila! The map above gives us insights about where and what emergencies took place across Seattle during 2019. This can be extremely helpful for the local government to more efficiently place its emergency combat resources.

Advanced features provided by folium

Let us now move towards the slightly advanced features provided by Folium. For this, we will use the National Obesity by State dataset which is also hosted on data.gov. There are 2 types of files we’ll be using, a csv file containing the list of all states and the percentage of obesity in each state, and a geojson file (based on JSON) that contains geographical features in form of polygons.

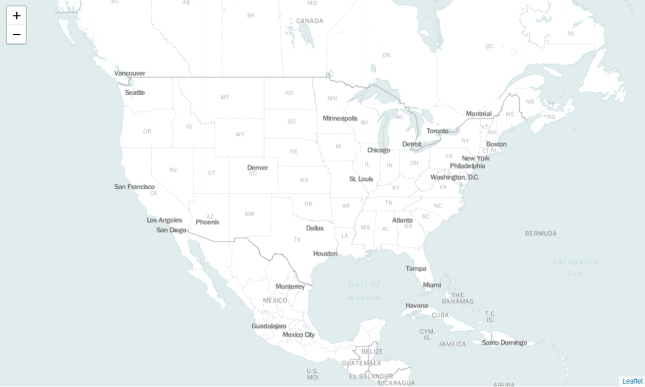
Before using our dataset, we’ll create a new folium.map object with location parameters including coordinates to center the US on the map, whereas, we’ve set the ‘zoom_start’ level to 4 to visualize all the states.

usa_map = folium.Map(
    location=[37.0902, -95.7129],
    tiles = 'Mapbox Bright',
    zoom_start = 4)
usa_map
USA map
Location parameters with US on the map

We will assign the URLs of our datasets to ‘obesity_link’ and ‘state_boundaries’ variables, respectively.

obesity_link = 'http://data-lakecountyil.opendata.arcgis.com/datasets/3e0c1eb04e5c48b3be9040b0589d3ccf_8.csv'
state_boundaries = 'http://data-lakecountyil.opendata.arcgis.com/datasets/3e0c1eb04e5c48b3be9040b0589d3ccf_8.geojson'

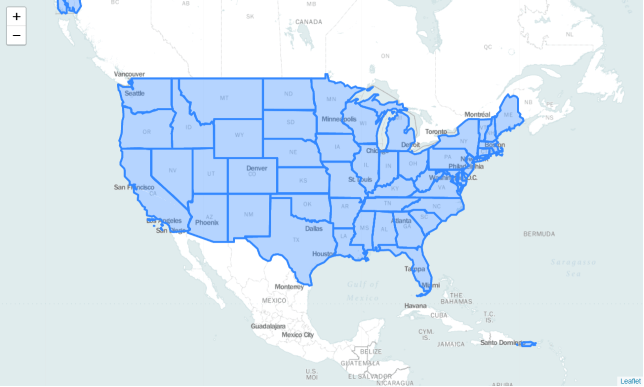
We will use the ‘state_boundaries’ file to visualize the boundaries and areas covered by each state on our folium.Map object. This is an overlay on our original map and similarly, we can visualize multiple layers on the same map. This overlay will assist us in creating our choropleth map that is discussed ahead.

folium.GeoJson(state_boundaries).add_to(usa_map)
usa_map
USA map
USA map with state boundaries

The ‘obesity_data’ dataframe can be viewed below. It contains 5 variables. However, for the purpose of this demonstration, we are only concerned with the ‘NAME’ and ‘Obesity’ attributes.

obesity_data = pd.read_csv(obesity_link)
obesity_data.head()

Obesity data frame (Geospatial analysis)

Choropleth map

Now comes the most interesting part! Creating a choropleth map. We’ll bind the ‘obesity_data’ data frame with our ‘state_boundaries’ geojson file. We have assigned both the data files to our variables ‘data’ and ‘geo_data’ respectively. The columns parameter indicates which DataFrame columns to use, whereas, the key_on parameter indicates the layer in the GeoJSON on which to key the data.

We have additionally specified several other parameters that will define the color scheme we’re going to use. Colors are generated from Color Brewer’s sequential palettes.

By default, linear binning is used between the min and the max of the values. Custom binning can be achieved with the bins parameter.

folium. Choropleth( geo_data = state_boundaries,
    name = 'choropleth',
    data = obesity_data,
    columns = ['NAME', 'Obesity'],
    key_on = 'feature.properties.NAME',
    fill_color = 'YlOrRd',
    fill_opacity = 0.9,
    line_opacity = 0.5,
    legend_name = 'Obesity Percentage').add_to(usa_map)
folium.LayerControl().add_to(usa_map)
usa_map

Choropleth map using folium function

Awesome! We’ve been able to create a choropleth map using a simple set of functions offered by Folium. We can visualize the obesity pattern geographically and uncover patterns not visible before. It also helped us in gaining clarity about the data, more than just simplifying the data itself.

You might now feel powerful enough after attaining the skill to visualize spatial data effectively. Go ahead and explore Folium‘s documentation to discover the incredible capabilities that this open-source library has to offer.

Thanks for reading! If you want more datasets to play with, check out this blog post. It consists of 30 free datasets with questions for you to solve.

References:

August 16, 2022

Power BI and R can be used together to achieve analyses that are difficult or impossible to achieve.

It is a powerful technology for quickly creating rich visualizations. It has many practical uses for the modern data professional including executive dashboards, operational dashboards, and visualizations for data exploration/analysis.

Microsoft has also extended Power BI with support for incorporating R visualizations into its projects, enabling a myriad of data visualization use cases across all industries and circumstances. As such, it is an extremely valuable tool for any Data Analyst, Product/Program Manager, or Data Scientist to have in their tool belt.

At the meetup for this topic presenter David Langer showed how it can be using R visualizations to achieve analyses that are difficult, or not possible, to achieve with out-of-the-box features.

A primary focus of the talk was a number of “gotchas” to be aware of when using R Visualizations within the projects:

  • It limits data passed to R visualizations to 150,000 rows.
  • It automatically removes duplicate rows before passing data to it.
  • It allows for permissive column names that can cause difficulties in R code.

David also covered best practices for using R visualizations within its projects, including using R tools like RStudio or Visual Studio R Tools to make R visualization development faster. A particularly interesting aspect of the talk was how to engineer R code to allow for copy-and-paste from RStudio into Power BI.

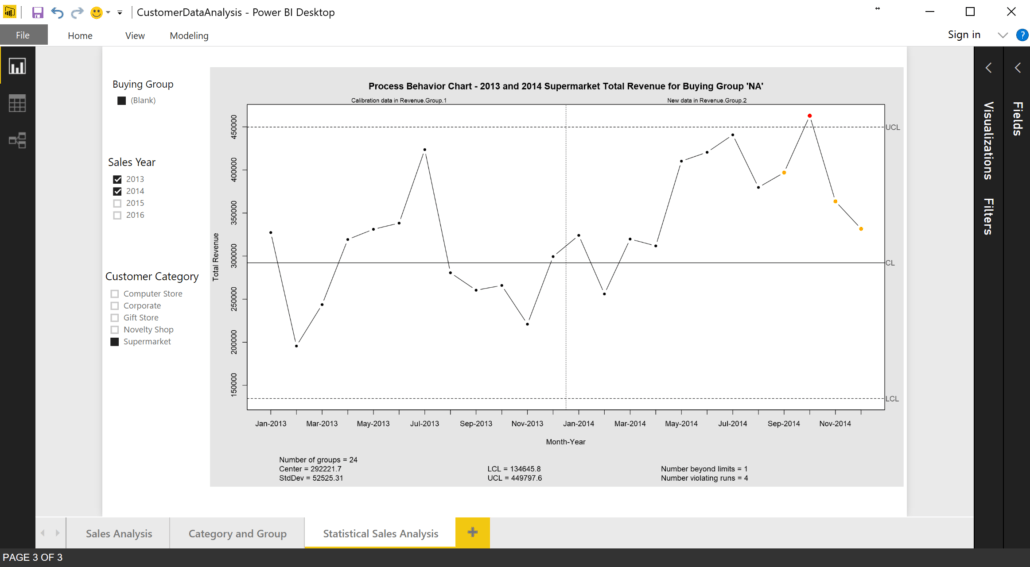
The talk concluded with examples of how R visualizations can be incorporated into a project to allow for robust, statistically valid analyses of aggregated business data. The following visualization is an example from the talk:

Power BI Process Behavior graph
Power BI Process Behavior

Enjoy the video of Power BI!

Learn more about Power BI with Data Science Dojo

June 15, 2022

Designers don’t need to use data-driven decision-making, right? Here are 5 common design problems you can solve with the data science basics.

What are the common design problems we face every day?

Design is a busy job. You have to balance both artistic and technical skills and meet the needs of bosses and clients who might not know what they want until they ask you to change it. You have to think about the big picture, the story, and the brand, while also being the person who spots when something is misaligned by a hair’s width.

The ‘real’ artists think you sold out, and your parents wish you had just majored in business. When you’re juggling all of this, you might think to yourself, “at least I don’t have to be a numbers person,” and you avoid complicated topics like data analytics at all costs.

If you find yourself thinking along these lines, this article is for you. Here are a few common problems you might encounter as a designer, and how some of the basic approaches of data science can be used to solve them. It might actually take a few things off your plate.

1. The person I’m designing for has no idea what they want

Frustrated
A worried man sitting in front of a laptop

If you have any experience with designing for other people, you know exactly what this really means. You might be asked to make something vague such as “a flyer that says who we are to potential customers and has a lot of photos in it.” A dozen or so drafts later, you have figured out plenty of things they don’t like and are no closer to a final product.

What you need to look for are the company’s needs. Not just the needs they say they have; ask them for the data. The company might already be keeping their own metrics, so ask what numbers most are concerning to them, and what goals they have for improvement. If they say they don’t have any data like that – FALSE!

Every organization has some kind of data, even if you have to be the one to put it together. It might not even be in the most obvious of places like an Excel file. Go through the customer emails, conversations, chats, and your CRM, and make a note of what the most usual questions are, who asks them, and when they get sent in. You just made your own metrics, buddy!

Now that you have the data, gear your design solutions to improve those key metrics. This time when you design the flyer, put the answers to the most frequent questions at the top of the visual hierarchy. Maybe you don’t need a ton of photos but select one great photo that had the highest engagement on their Instagram. No matter how picky a client is, there’s no disagreeing with good data.

visual_hierarchy-small

2. I have too much content and I don’t know how to organize it

This problem is especially popular in digital design. Whether it’s an app, an email, or an entire website, you have a lot of elements to deal with, and need to figure out how to navigate the audience through all of it. For those of you who are unaware, this is the basic concept of UX, short for ‘User Experience.’

The dangerous trap people fall into is asking for opinions about UX. You can ask 5 people or 500 and you’re always going to end up with the same conclusion: people want to see everything, all at once, but they want it to be simple, easy to navigate and uncrowded.

The perfect UX is basically impossible, which is why you instead need to focus on getting the most important aspects and prioritizing them. While people’s opinions claim to prioritize everything, their actual behavior when searching for what they want is much more telling.

Capturing this behavior is easy with web analytics tools. There are plenty of apps like Google Analytics to track the big picture parts of your website, but for the finer details of a single web page design, there are tools like Hotjar. You can track how each user (with cookies enabled) travels through your site, such as how far they scroll and what elements they click on.

If users keep leaving the page without getting to the checkout, you can find out where they are when they decide to leave, and what calls to action are being overlooked.

hotjar2.0
Hotjar logo
Google Analytics
Logo of Google Analytics

When you really get the hang of it, UX will transform from a guessing game about making buttons “obvious” and instead you will understand your site as a series of pathways through hierarchies of story elements. As an added bonus, you can apply this same knowledge to your print media and make uncrowded brochures and advertisements too!

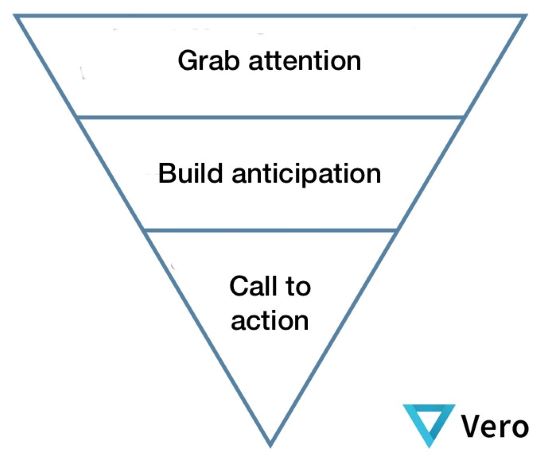
Inverted-Pyramid-small

3. I’m losing my mind to a handful of arbitrary choices

Should the dress be pink, or blue? Unfortunately, not all of us can be Disney princesses with magic wands to change constantly back and forth between colors. Unless, of course, you are a web designer from the 90’s, and in that case, those rainbow shifting gifs on your website are wicked gnarly, dude.

red_VS_green_Question
A/B testing with 2 different CTAs

For the rest of us, we have to make some tough calls about design elements. Even if you’re used to making these decisions, you might be working with other people who are divided over their own ideas and have no clue who to side with. (Little known fact about designers: we don’t have opinions on absolutely everything.)

This is where a simple concept called “A/B testing” comes in handy. It requires some coding knowledge to pull it off yourself or you can ask your web developer to install the tracking pixel, but some digital marketing tools have built-in A/B testing features. (You can learn more about A/B testing in Data Science Dojo’s comprehensive bootcamps cough cough)

Other than the technical aspect, it’s beautifully simple. You take a single design element, and narrow it down to two options, with a shared ultimate goal you want that element to contribute to. Half your audience will see the pink dress, and half will see the blue, and the data will show you not only which dress was liked by the princesses, but exactly how much more they liked it. Just like magic.

Obama_A_Btesting
A/B testing with 2 different landing pages

4. I’m working with someone who is using Comic Sans, Papyrus, or (insert taboo here) unironically

This is such a common problem, so well understood that the inside jokes about it between designer’s risk flipping all the way around the scale into a genuine appreciation of bad design elements. But what do you do when you have a person who sincerely asks you what’s wrong with using the same font Avatar used in their logo?

Mercedes-Benz
Logo of Mercedes Benz

The solution to this is kind of dirty and cheap from the data science perspective, but I’m including it because it follows the basic principle of evidence > intuition. There is no way to really explain a design faux-pas because it comes from experience. However, sometimes when experience can’t be described, it can be quantified.

Ask this person to look up the top competitors in their sector. Then ask them to find similar businesses using this design element you’re concerned about. How do these organizations compare? How many followers do they have on social media? When was the last time they updated something? How many reviews do they have?

If the results genuinely show that Papyrus is the secret ingredient to a successful brand, then wow, time to rethink that style guide.

giphy

5. How can I prove that my designs are “good”?

Unless you have skipped to the end of this article, you already know the solution to this one. No matter what kind of design you do, it’s meant to fulfill a goal. And where do data scientists get goals? Metrics! Some good metrics for UX that you might want to consider when designing a website, email, or ad campaign are click-through-rate (CTR), session time, page views, page load, bounce rate, conversions, and return visits.

This article has already covered a few basic strategies to get design related metrics. Even if the person you’re working for doesn’t have the issues described above (or maybe you’re working for yourself) it’s a great idea to look at metrics before and after your design hits the presses.

If the data doesn’t shift how, you want it to, that’s a learning experience. You might even do some more digging to find data that can tell you where the problem came from, if it was a detail in your design or a flaw in getting it delivered to the audience.

When you do see positive trends, congrats! You helped further your organization’s goals and validated your design skills. Attaching tangible metrics to your work is a great support to getting more jobs and pay raises, so you don’t have to eat ramen noodles forever.

If nothing else, it’s a great way to prove that you didn’t need to major in accounting to work with fancy numbers, dad.

June 14, 2022

When it comes to using data for social responsibility, one of the most effective ways of dispensing information is through data visualization.

It’s getting harder and harder to ignore big data. Over the past couple of years, we’ve all seen a spike in the way businesses and organizations have ramped up harvesting pertinent information from users and using them to make smarter business decisions. But big data isn’t just for capitalistic purposes — it can also be utilized for social good.

Nathan Piccini discussed in a previous blog post how data scientists could use AI to tackle some of the world’s most pressing issues, including poverty, social and environmental sustainability, and access to healthcare and basic needs. He reiterated how data scientists don’t always have to work with commercial applications and that we all have a social responsibility to put together models that don’t hurt society and its people.

Data visualization and social responsibility

When it comes to using data for social responsibility, one of the most effective ways of dispensing information is through data visualization. The process involves putting together data and presenting it in a form that would be more easily comprehensible for the viewer.

No matter how complex the problem is, visualization converts data and displays it in a more digestible format, as well as laying out not just plain information, but also the patterns that emerge from data sets. Maryville University explains how data visualization has the power to affect and inform business decision-making, leading to positive change.

With regards to the concept of income inequality, data visualization can clearly show the disparities among varying income groups. Sociology professor Mike Savage also reiterated this in the World Social Science Report, where he revealed that social science has a history of being dismissive of the impact of visualizations and preferred textual and numerical formats. Yet time and time again, visualizations proved to be more powerful in telling a story, as it reduces the complexity of data and depicts it graphically in a more concise way.

Take this case study by computational scientist Javier GB, for example. Through tables and charts, he was able to effectively convey how the gap between the rich, the middle class, and the poor has grown over time. In 1984, a time when the economy was booming and the unemployment rate was being reduced, the poorest 50% of the US population had a collective wealth of $600 billion, the middle class had $1.5 trillion, and the top 0.001% owned $358 billion.

Three decades later, the gap has stretched exponentially wider: the poorest 50% of the population had negative wealth that equaled $124 billion, the middle class owned wealth valued $3.3 trillion, while the 0.001% had a combined wealth of $4.8 trillion. By having a graphical representation of income inequality, more people can become aware of class struggles than when they only had access to numerical and text-based data.

The New York Times also showed how powerful data visualization could be in their study of a pool of black boys raised in America and how they earned less than their white peers despite having similar backgrounds. The outlet displayed data in a more interactive manner to keep the reader engaged and retain the information better.

The study followed the lives of boys who grew up in wealthy families, revealing that even though the black boys grew up in well-to-do neighborhoods, they are more likely to remain poor in adulthood than to stay wealthy. Factors like the same income, similar family structures, similar education levels, and similar levels of accumulated wealth don’t seem to matter, either. Black boys were still found to fare worse than white boys in 99 percent of America come adulthood, a stark contrast from previous findings.

Vox also curated different charts collected from various sources to highlight the fact that income inequality is an inescapable problem in the United States. The richest demographic yielded a disproportional amount of economic growth, while wages for the middle class remained stagnant. In one of the charts, it was revealed that in a span of almost four decades, the poorest half of the population has seen its income plummet steadily, while the top 1 percent have only earned more. Painting data in these formats adds more clarity to the issue compared to texts and numbers.

There’s no doubt about it, data visualization’s ability to summarize highly complex information into more comprehensible displays can help with the detection of patterns, trends, and outliers in various data sets. It makes large numbers more relatable, allowing everyone to understand the issue at hand more clearly. And when there’s a better understanding of data, the more people will be inclined to take action.

June 13, 2022

Instead of loading clients up with bullet points and long-winded analysis, firms should use data visualization tools to illustrate their message.

Every business is always looking for a great way to talk to their customers. Communication between the company’s management team and customers plays an important role. However, the hardest part is finding the best way to communicate with users.

Although it is visible in many companies, many people do not understand the power of visualization in the customer communication industry. This article sheds light on several aspects of how data visualization plays an important role in interacting with clients.

Any interaction between businesses and consumers indicates signs of success between the two parties. Communicating with the customer through visualization is one of the best communication channels that strengthens the relationship between buyers and sellers.

Aspects of data visualization

While data visualization is the best way to communicate, many industry players still don’t understand the power of this aspect. The display helps the commercial teams improve the operating mode of your customer and create an exceptional business environment. Additionally, visualization saves 78% of the time spent capturing customer information to improve services within the enterprise environment.

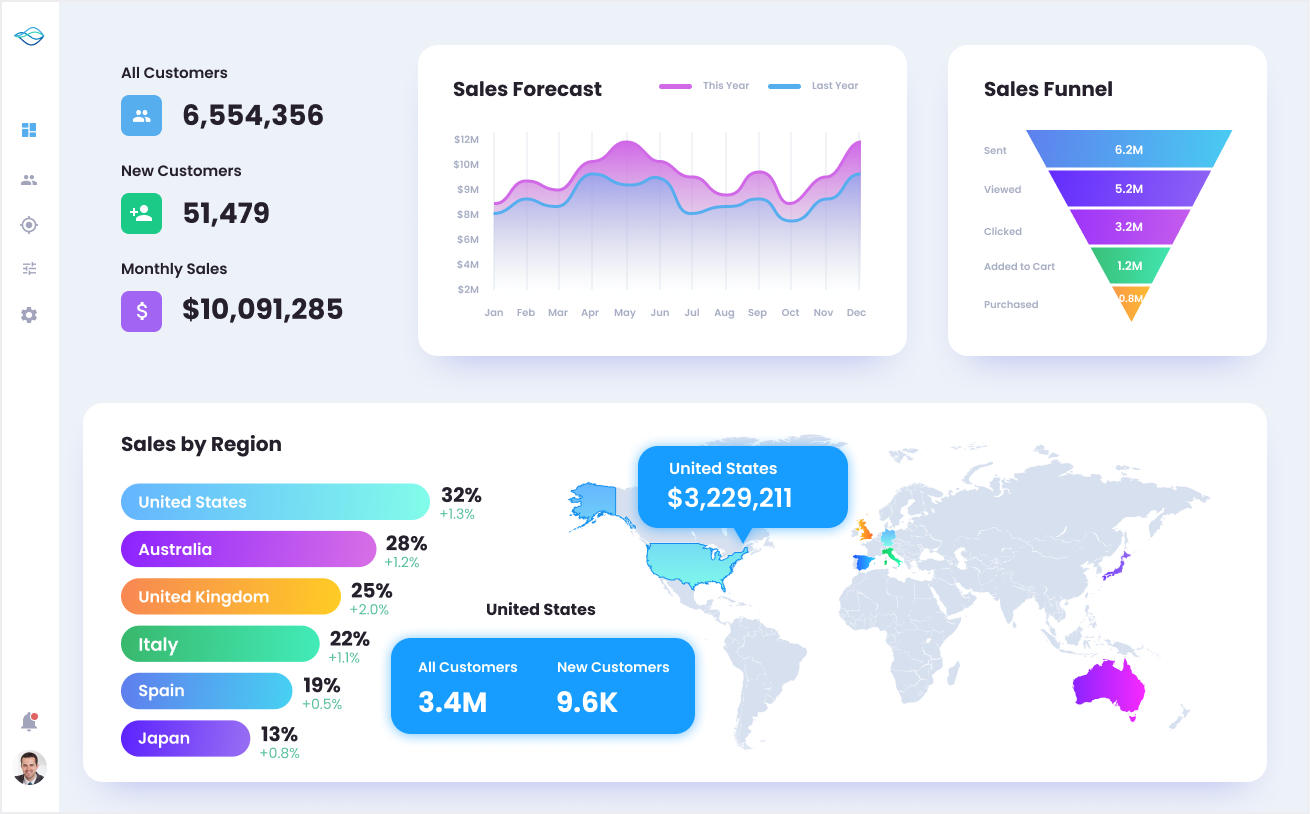
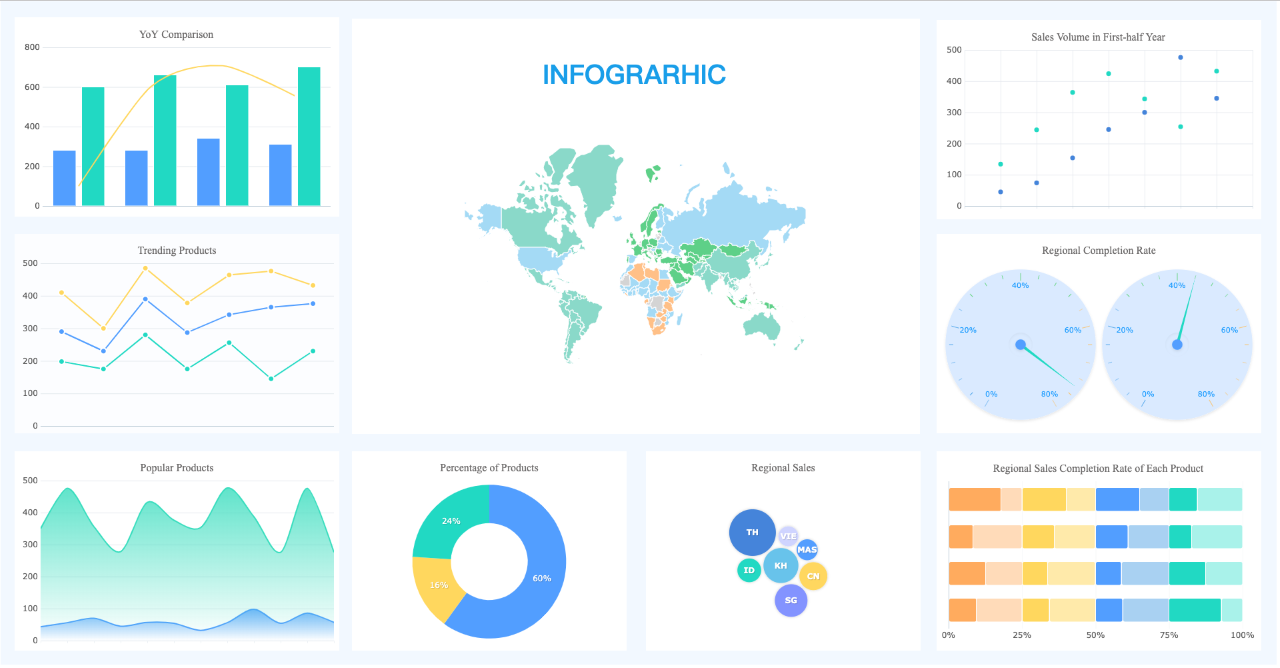
Data Visualization
Example of Data Visualization

Customer Interactivity

Any business that intends to succeed in the industry needs to have a compelling for customers.

Currently, big data visualization in business has dramatically changed how business talks to clients. The most exciting aspect is that you can use different kinds of visualization.

While using visualization to enhance communication and the entire customer experience, you need to maintain the brand’s image. Also, you can use visualization in marketing your products and services.

To enhance customer interaction, data visualization (Sankey Chart, Radial Bar Chart, Pareto Chart, and Survey Chart, etc.) is used to create dashboards and live sessions that improve the interaction between customers and the business team members. The team members can easily track when customers make changes by using live sessions.

This helps the business management team make the required changes depending on the customer suggestions regarding the business operations. Communication between the two parties continues to create an excellent customer experience by making changes.

Identifying Customers with Repetitive Issues

By creating a good client communication channel, you can easily identify some of the customers who are experiencing problems from time to time. This makes it easier for the technical team to separate customers with recurring issues. 

The technical support team can opt to attach specific codes to the clients with issues to monitor their performance and any other problem. Data visualization helps in separating this kind of data from the rest to enhance clients’ well-being.

It helps when the technical staff communicates with clients individually to identify any problem or if they are experiencing any technical issue. This promotes personalized services and makes customers more comfortable.

Through regular communication between clients and the business management team, the brand gains loyalty making it easier for the business to secure a respectable number of potential customers overall.

Once you have implemented visualization in your business operations, you can solve various problems facing clients using the data you have collected from diverse sources. As the business industry grows, data visualization becomes an integral part in business operations.

This makes the process of solving customer complaints easier and creates a continued communication channel. The data needs to be available in real-time to ensure that the technical support team has everything required to solve any customer problem.

Creating a Mobile Fast Communication Design

The most exciting data visualization application is integrating a dashboard on a website with a mobile fast communication design. This is an exciting innovation that makes it easier for the business to interact with clients from time to time. 

A good number of companies and organizations are slowly catching up with this innovative trend powered by data visualization. A business can easily showcase its stats to its customers on the dashboard to help them understand the milestones attained by the business.

Note that the stats are displayed on the dashboard depending on the customer feedback generated from the business operations. The dashboards have a fast mobile technique that makes communication more convenient.

This aspect is made to help clients access the business website using their mobile phones. An excellent operating mechanism creates a creative and adaptive design that enables mobile phone users to communicate efficiently.

This technique helps showcase information to mobile users, and clients can easily reach out to the business management team and get all their concerns sorted.

Product Performance Analysis

Data visualization is a wonderful way of enhancing the customer experience. Visualization collects data from customers after purchasing products and services to take note of the customer reviews regarding the products and services.

By collecting customer reviews, the business management team can easily evaluate the performance of their products and make the desired changes if the need arises. The data helps reorganize customer behavior and enhance the performance of every product.

The data points recorded from customers are converted into insights vital for the business’s general success. 

Data visuals
Infographic – Data Points into Useful Visuals

Conclusion

Customer communication and experience are major points of consideration for business success. By enhancing customer interaction through charts and other forms of communication, a business makes it easy to flourish and attain its mission in the industry. 

June 10, 2022

Related Topics

Statistics
Resources
Programming
Machine Learning
LLM
Generative AI
Data Visualization
Data Security
Data Science
Data Engineering
Data Analytics
Computer Vision
Career
Artificial Intelligence