In this blog, we are going to discuss the value addition provided by programming languages for data analysts.
Data analysts have one simple goal – to provide organizations with insights that inform better business decisions. And, to do this, the analytical process has to be successful. Unfortunately, as many data analysts would agree, encountering different types of analysis bugs when analyzing data is part of the data analytical process.
However, these bugs don’t have to be many if only preventive measures are taken every step of the way. This is where programming languages prove valuable for data analysts. Programming languages are one such valuable tool that helps data analysts to prevent and solve a number of data problems. These languages contain different bug-preventing attributes that make this possible. Here are some of these characteristics.
Programming languages – Data Analysts
Type safety/strong typing
When there is an inconsistency between varying data types for the variables, methods, and constants, the program behaves undesirably. In other words, type errors occur. For instance, this error can occur when a programmer treats a string as an integer or vice versa.
Type safety is an attribute of programming languages that discourages type errors in a program. Type safety or type soundness demand programmers to define the type of each variable. This means that programmers must declare the data type that is meant to be in the box as well as give the box a variable name. This ensures that the programmer only interprets values as per the rules of the declared data type, which prevents confusion about the data type.
Immutability
If an object is immutable, then its value or state can’t be changed. Immutability in programming languages allows developers to use variables that can’t be muted or changed. This means that users can only create programs using constants. How does this prevent problems? Immutable objects ensure thread safety as compared to mutable objects. In a multithreaded application, a thread doesn’t have to worry about the other threads as it acts on an immutable object.
The reason here is that the thread knows that the object can’t be modified by anyone. The immutable approach in data analysis ensures that the original data set is not modified. In case a bug is identified in the code, the original data helps find a solution faster. In addition, immutability is valuable in creating safer data backups. In immutable data storage, data is safe from data corruption, deletion, and tampering.
Expressiveness
Expressiveness in a programming language can be defined as the extent of ideas that can be communicated and represented in that language. If a language allows users to communicate their intent easily and detect errors early, that language can be termed as expressive. Programming languages that are expressive allow programmers to write shorter codes.
Moreover, a shorter code has less incidental complexity/ boilerplate, which makes it easier to identify errors.Talking of expressiveness, it is important to know that programming languages are English based.
When working with multilingual websites, it would be important to translate the languages to English for successful data analysis. However, there is the risk of distortion or meaning loss when applying analysis techniques to translated data. Working withprofessional translation companies eliminates these risks.
In addition, working in a language that they can understand makes it easy to spot errors.
Static and dynamic typing
These attributes of programming languages are used for error detection. They allow programmers to catch bugs and solve them before they cause havoc. The type-checking process instatic typing happens at compile time.
If there is an error in the code such as invalid type arguments, missing functions or a discrepancy between the type of variable and data value assigned to it, static typing catches these bugs before the program runs the code. This means zero chances of running an erroneous code.
On the other hand, in dynamic typing, type-checking occurs during runtime. However, it gives the programmer a chance to correct the code if it detects any bugs before the worst happens.
Programming learning – Data analysts
Among the tools that data analysts require in their line of work are programming languages. Ideally, programming languages are every programmer’s defense against different types of bugs. This is because they come with characteristics that reduce the chances of writing codes that are prone to errors. These attributes include those listed above and are available in different programming languages such as Java, Python, and Scala, which are best suited for data analysts.
In this blog, we will be learning how to program some basic movements in a drone with the help of Python. The drone we will use is Dji Tello. We will learn drone programming with Scratch, Swift, and even Python.
A step-by-step guide to learning drone programming
We will go step by step through how to issue commands through the Wi-Fi network
Drone – Data Science Dojo
Installing Python libraries
First, we will need some Python libraries installed onto our laptop. Let’s install them with the following two commands:
pip install djitellopy
pip install opencv-python
The djitellopy is a python library making use of the official Tello sdk. The second command is to install opencv which will help us to look through the camera of the drone. Some other libraries this program will make use of are ‘keyboard’ and ‘time’. After installation, we import them into our project
We must first instantiate the Tello class so we can use it afterward. For the following commands to work, we must switch the drone to On and find and connect to the Wi-Fi network generated by it on our laptop. The tel.connect() command lets us connect the drone to our program. After the connection of the drone to our laptop is successful, the following commands can be executed.
tel = tello.Tello()tel.connect()
Sending ending commands to the drone
We will build a function which will send movement commands to the drone.
The drone takes 4 inputs to move so we first take four values and assign a 0 to them. The speed must be set to an initial value for the drone to take off. Now we map the keyboard keys to our desired values and assign those values to the four variables. For example, if the keyboard key is “LEFT” then assign the speed with a value of -50. If the “RIGHT” key is pressed, then assign a value of 50 to the speed variable, and so on. The code block below explains how to map the keyboard keys to the variables:
This program also takes two extra keys for landing and taking off (l and t). A keyboard key “z” is also assigned if we want to take a picture from the drone. As the drone’s video will be on, whenever we click on “z” key, opencv will save the image in a folder specified by us. After providing all the combinations, we must return the values in a 1D array. Also, don’t forget to run tel.streamon() to turn on the video streaming.
We must make the drone take commands until and unless we press the “l” key for landing. So, we have a while True loop in the following code segment:
The get_frame_read() function reads the video frame by frame (just like an image) so we can resize it and show it on the laptop screen. The process will be so fast that it will completely look like a video being displayed.
The last thing we must do is to call the function we created above. Remember, we have a list being returned from it. Each value of the list must be sent as a separate index value to the send_rc_control method of the tel object.
Execution
Before running the code, confirm that the laptop is connected to the drone via Wi-Fi.
Now, execute the python file and then press “t” for the drone to take off. From there, you can press the keyboard keys for it to move in your desired direction. When you want the drone to take pictures, press “z” and when you want it to land, press “l”
Conclusion
In this blog, we learned how to issue basic keyboard commands for the drone to move. Furthermore, we can also add more keys for inbuilt Tello functions like “flip” and “move away”. Videos can be captured from the drone and stored locally on our laptop
Programming has an extremely vast package ecosystem. It provides robust tools to master all the core skill sets of data science.
For someone like me, who has only some programming experience in Python, the syntax of R programming felt alienating, initially. However, I believe it’s just a matter of time before you adapt to the unique logicality of a new language. The grammar of R flows more naturally to me after having to practice for a while. I began to grasp its kind of remarkable beauty, a beauty that has captivated the heart of countless statisticians throughout the years.
If you don’t know what R programming is, it’s essentially a programming language created for statisticians by statisticians. Hence, it easily becomes one of the most fluid and powerful tools in the field of data science.
Here I’d like to walk through my study notes with the most explicit step-by-step directions to introduce you to the world of R.
Why learn R for data science?
Before diving in, you might want to know why should you learn R for Data Science. There are two major reasons:
1. Powerful analytic packages for data science
Firstly, R programming has an extremely vast package ecosystem. It provides robust tools to master all the core skill sets of Data Science, from data manipulation, and data visualization, to machine learning. The vivid community keeps the R language’s functionalities growing and improving.
2. High industry popularity and demand
With its great analytical power, R programming is becoming the lingua franca for data science. It is widely used in the industry and is in heavy use at several of the best companies that are hiring Data Scientists including Google and Facebook. It is one of the highly sought-after skills for a Data Science job.
To start programming with R on your computer, you need two things: R and RStudio.
Install R language
You have to first install the R language itself on your computer (It doesn’t come by default). To download R, go to CRAN, https://cloud.r-project.org/ (the comprehensive R archive network). Choose your system and select the latest version to install.
Install RStudio
You also need a hefty tool to write and compile R code. RStudio is the most robust and popular IDE (integrated development environment) for R. It is available on http://www.rstudio.com/download (open source and for free!).
Overview of RStudio
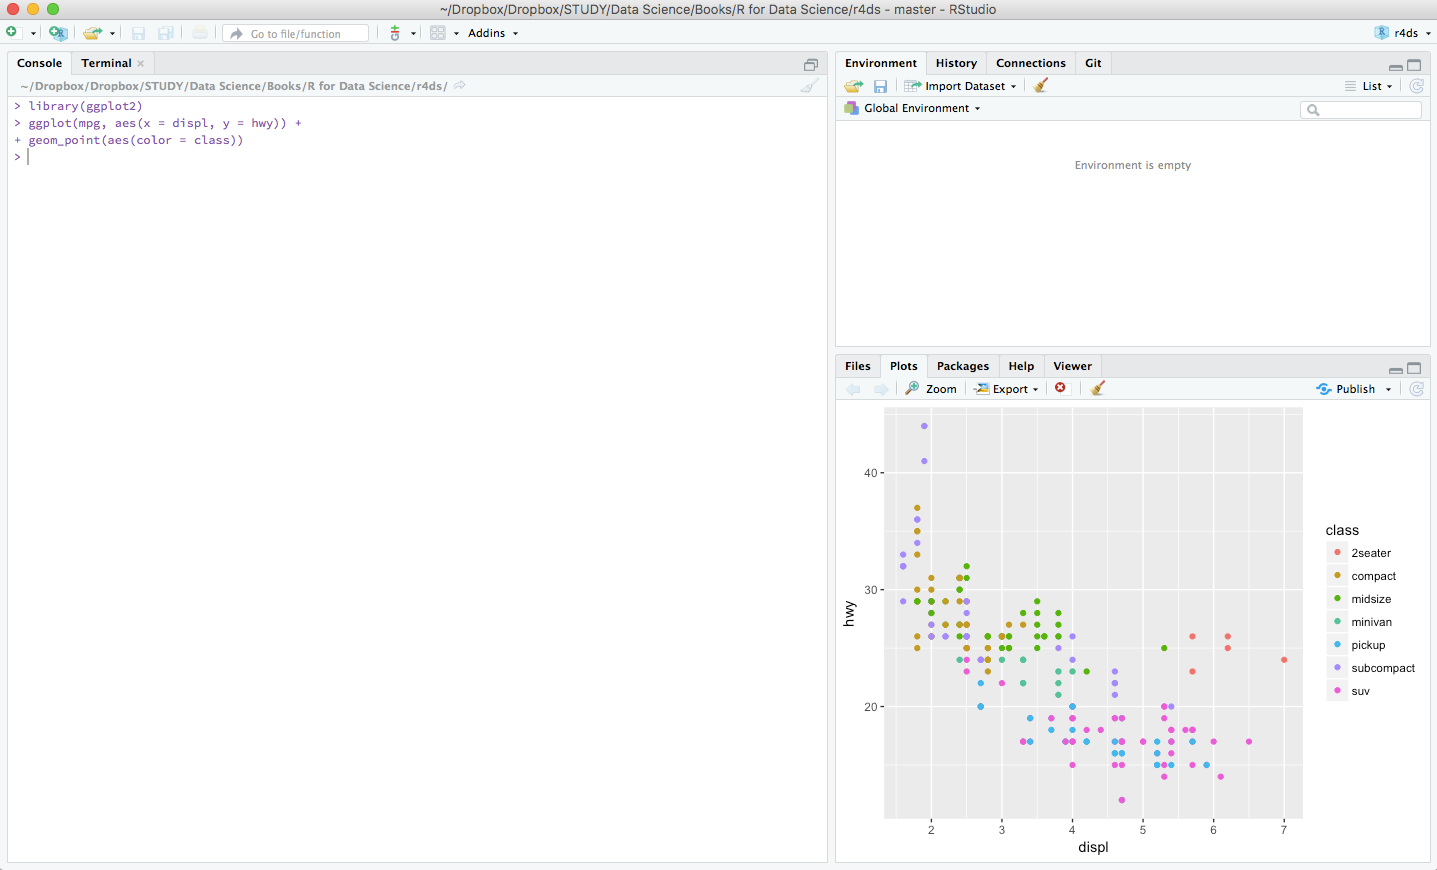
Now you have everything ready. Let’s have a brief overview at RStudio. Fire up RStudio, the interface looks as such:
Go to File > New File > R Script to open a new script file. You’ll see a new section appear at the top left side of your interface. A typical RStudio workspace composes of the 4 panels you’re seeing right now:
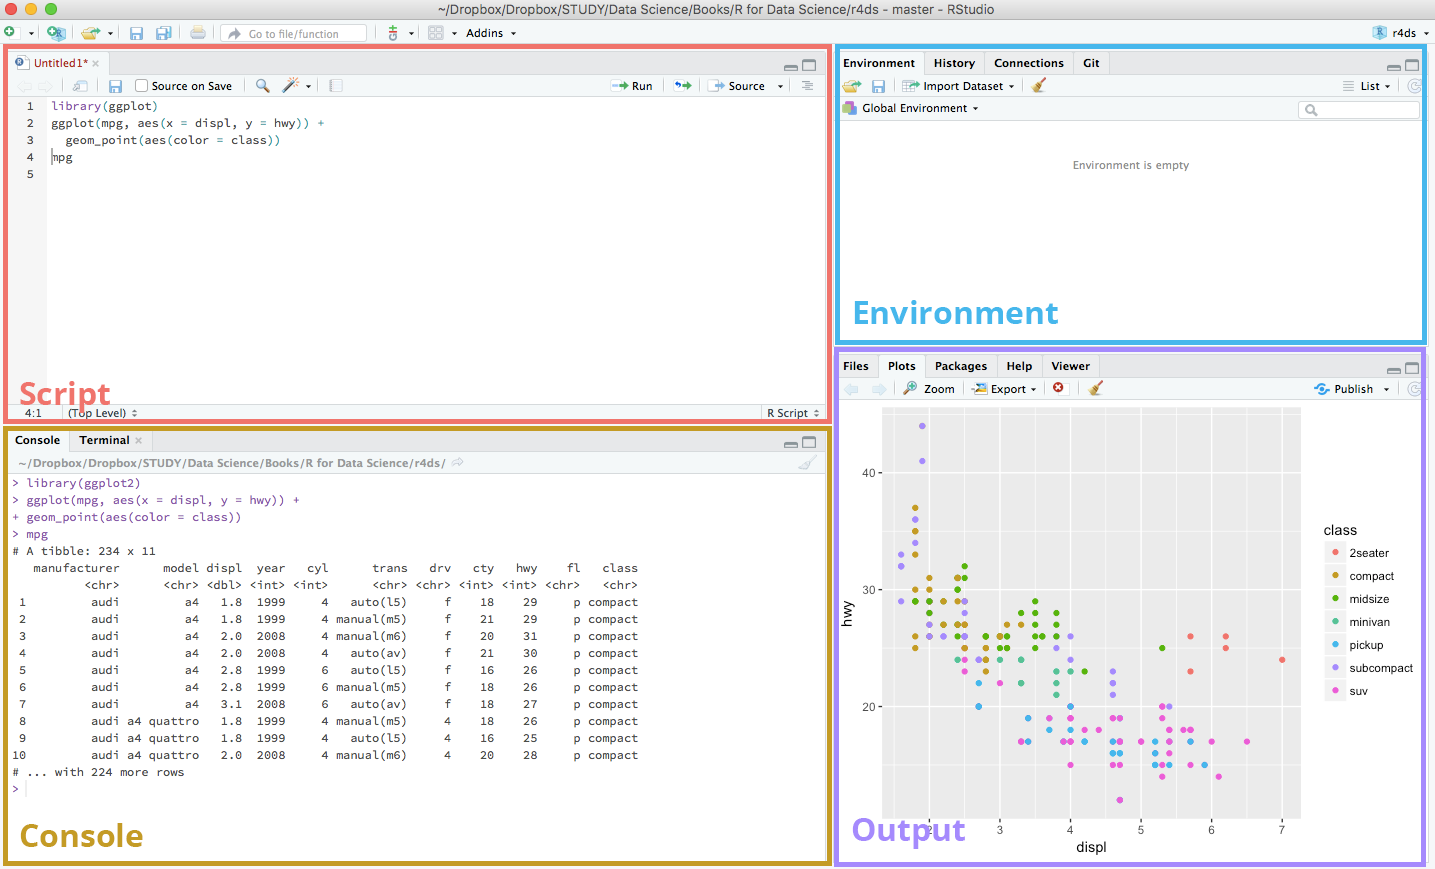
RStudio interface
Here’s a brief explanation of the use of the 4 panels in the RStudio interface:
Script
This is where your main R script located.
Console
This area shows the output of code you run from script. You can also directly write codes in the console.
Environment
This space displays the set of external elements added, including dataset, variables, vectors, functions etc.
Output
This space displays the graphs created during exploratory data analysis. You can also seek help with embedded R’s documentation here.
Running R codes
After knowing your IDE, the first thing you want to do is to write some codes.
Using the console panel
You can use the console panel directly to write your codes. Hit Enter and the output of your codes will be returned and displayed immediately after. However, codes entered in the console cannot be traced later. (i.e. you can’t save your codes) This is where the script comes to use. But the console is good for the quick experiment before formatting your codes in the script.
Using the script panel
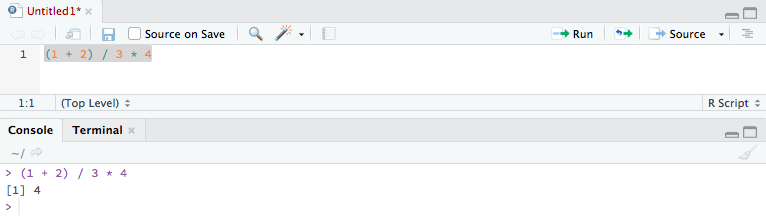
To write proper R programming codes,
you start with a new script by going to File > New File > R Script, or hit Shift + Ctrl + N. You can then write your codes in the script panel. Select the line(s) to run and press Ctrl + Enter. The output will be shown in the console section beneath. You can also click on little Run button located at the top right corner of this panel. Codes written in script can be saved for later review (File > Save or Ctrl + S).
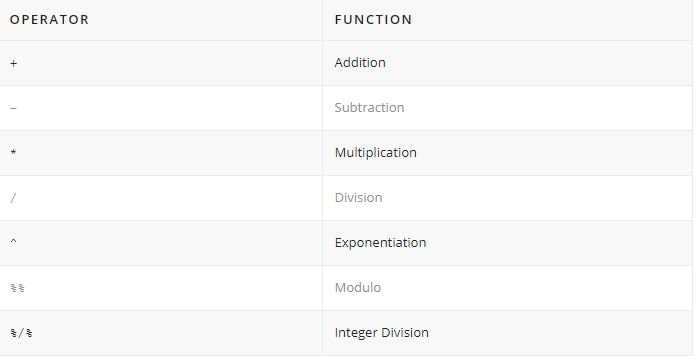
The exponentiation operator ^ raises the number to its left to the power of the number to its right: for example 3 ^ 2 is 9.
# Exponentiation
2 ^ 4
#[1] 16
The modulo operator %% returns the remainder of the division of the number to the left by the number on its right, for example 5 modulo 3 or 5 %% 3 is 2.
# Modulo
5 %% 2
#[1] 1
Lastly, the integer division operator %/% returns the maximum times the number on the left can be divided by the number on its right, the fractional part is discarded, for example, 9 %/% 4 is 2.
# Integer division
5 %/% 2
#[1] 2
You can also add brackets () to change the order of operation. Order of operations is the same as in mathematics (from highest to lowest precedence):
Brackets
Exponentiation
Division
Multiplication
Addition
Subtraction
  # Brackets
  (3 + 5) * 2
  #[1] 16
Variable assignment
A basic concept in (statistical) programming is called a variable.
A variable allows you to store a value (e.g. 4) or an object (e.g. a function description) in R. You can then later use this variable’s name to easily access the value or the object that is stored within this variable.
Create new variables
Create a new object with the assignment operator<-. All R statements where you create objects and assignment statements have the same form: object_name <- value.
num_var <- 10

chr_var <- "Ten"
To access the value of the variable, simply type the name of the variable in the console.
  num_var
  #[1] 10

chr_var
#[1] "Ten"
You can access the value of the variable anywhere you call it in the R script, and perform further operations on them.
Not all kinds of names are accepted in R programming. Variable names must start with a letter, and can only contain letters, numbers, . and _. Also, bear in mind that R is case-sensitive, i.e. Cat would not be identical to cat.
Your object names should be descriptive, so you’ll need a convention for multiple words. It is recommended to snake case where you separate lowercase words with _.
If you’ve been programming in other languages before, you’ll notice that the assignment operator in R programming is quite strange. It uses <- instead of the commonly used equal sign = to assign objects.
Indeed, using = will still work in R, but it will cause confusion later. So you should always follow the convention and use <- for assignment.
<- is a pain to type as you’ll have to make lots of assignments. To make life easier, you should remember RStudio’s awesome keyboard shortcut Alt + – (the minus sign) and incorporate it into your regular workflow.
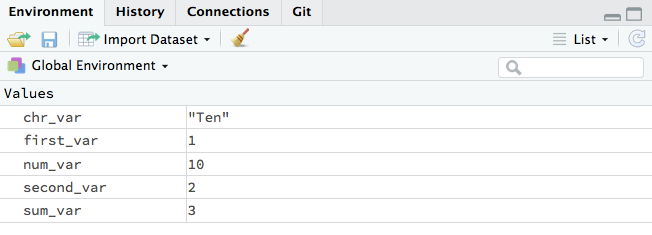
Environments
Look at the environment panel in the upper right corner, you’ll find all of the objects that you’ve created.
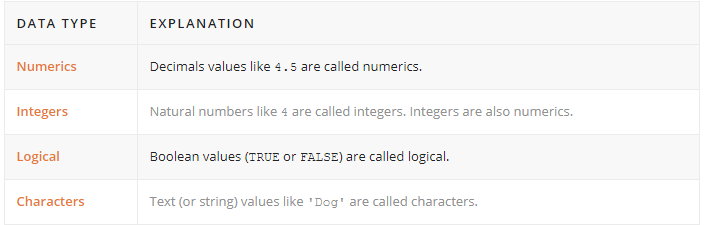
Basic data types
You’ll work with numerous data types in R. Here are some of the most basic ones:
Knowing the data type of an object is important, as different data types work with different functions, and you perform different operations on them. For example, adding a numeric and a character together will throw an error.
To check an object’s data type, you can use the class() function.
# usage class(x)
 # description   Prints the vector of names of classes an object inherits from. # arguments  : An R object.   x
Functions are the fundamental building blocks of R. In programming, a named section of a program that performs a specific task is a function. In this sense, a function is a type of procedure or routine.
R comes with a prewritten set of functions that are kept in a library. (class() as demonstrated in the previous section is a built-in function.) You can use additional functions in other libraries by installing packages.You can also write your own functions to perform specialized tasks.
Here is the typical form of an R function:
function_name(arg1 = val1, arg2 = val2, ...)
function_name is the name of the function. arg1 and arg2 are arguments. They’re variables to be passed into the function. The type and number of arguments depend on the definition of the function. val1 and val2 are values of the arguments correspondingly.
Passing arguments
R can match arguments both by position > and by name. So you don’t necessarily have to supply the names of the arguments if you have the positions of the arguments placed correctly.
Functions are always accompanied with loads of arguments for configurations. However, you don’t have to supply all of the arguments for a function to work.
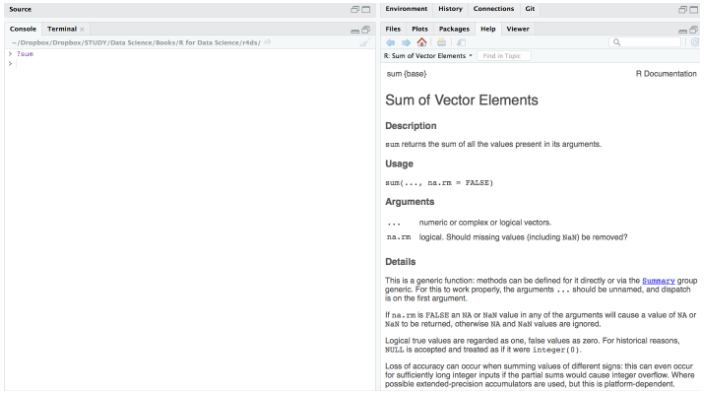
Here is documentation of the sum() function.
# usage
sum(..., na.rm = FALSE)

# description     Returns the sum of all the values present in its arguments. # arguments     ... : Numeric or complex or logical vectors.     na.rm : Logical. Should missing values (including NaN) be removed?
From the documentation, we learned that there are two arguments for the sum() function: ... and na.rm Notice that na.rm contains a default value FALSE. This makes it an optional argument. If you don’t supply any values to the optional arguments, the function will automatically fill in the default value to proceed.
Look how magical it is to show the R documentation directly at the output panel for quick reference.
Last but not least, if you get stuck, Google it! For beginners like us, our confusions must have gone through numerous R learners before and there will always be something helpful and insightful on the web.
Contributors: Cecilia Lee
Cecilia Lee is a junior data scientist based in Hong Kong