Price as low as $4499 | Learn to build custom large language model applications
Introducing Llama 2: 6 methods to access the open-source LLMs

In this blog, we will be getting started with the Llama 2 open-source large language model. We will guide you through various methods of accessing it, ensuring that by the end, you will be well-equipped to unlock the power of this remarkable language model for your projects.

Whether you are a developer, researcher, or simply curious about its capabilities, this blog will equip you with the knowledge and tools you need to get started. 


Understanding Llama 2 

In the ever-evolving landscape of artificial intelligence, language models have emerged as pivotal tools for developers, researchers, and enthusiasts alike. One such remarkable addition to the world of language models is Llama 2. While it may not be the absolute marvel of language models, it stands out as an open-source gem. 

Llama 2, an open-source large language model, opens its doors for both research and commercial use, breaking down barriers to innovation and creativity. It comprises a range of pre-trained and fine-tuned generative text models, varying in scale from 7 billion to a staggering 70 billion parameters.


Read more about – > Llama 2 fine-tuning


Among these, the Llama-2-Chat models, optimized for dialogue, shine as they outperform open-source chat models across various benchmarks. In fact, their helpfulness and safety evaluations rival some popular closed-source models like ChatGPT and PaLM. 

In this blog, we will exploring its training process, improvements over its predecessor, and ways to harness its potential.


If you want to use it in your projects, this guide will get you started.

So, let us embark on this journey together as we unveil the world of Llama 2 and discover how it can elevate your AI (Artificial Intelligence) endeavors. 


Llama 2: The evolution and enhanced features 


It represents a significant leap forward from its predecessor, Llama 1, which garnered immense attention and demand from researchers worldwide. With over 100,000 requests for access, the research community demonstrated its appetite for powerful language models.

Building upon this foundation, Llama 2 emerges as the next generation offering from Meta, succeeding its predecessor, Llama 1. Unlike Llama 1, which was released under a non-commercial license for research purposes, it takes a giant stride by making itself available freely for both research and commercial applications. 

  Large language model bootcamp

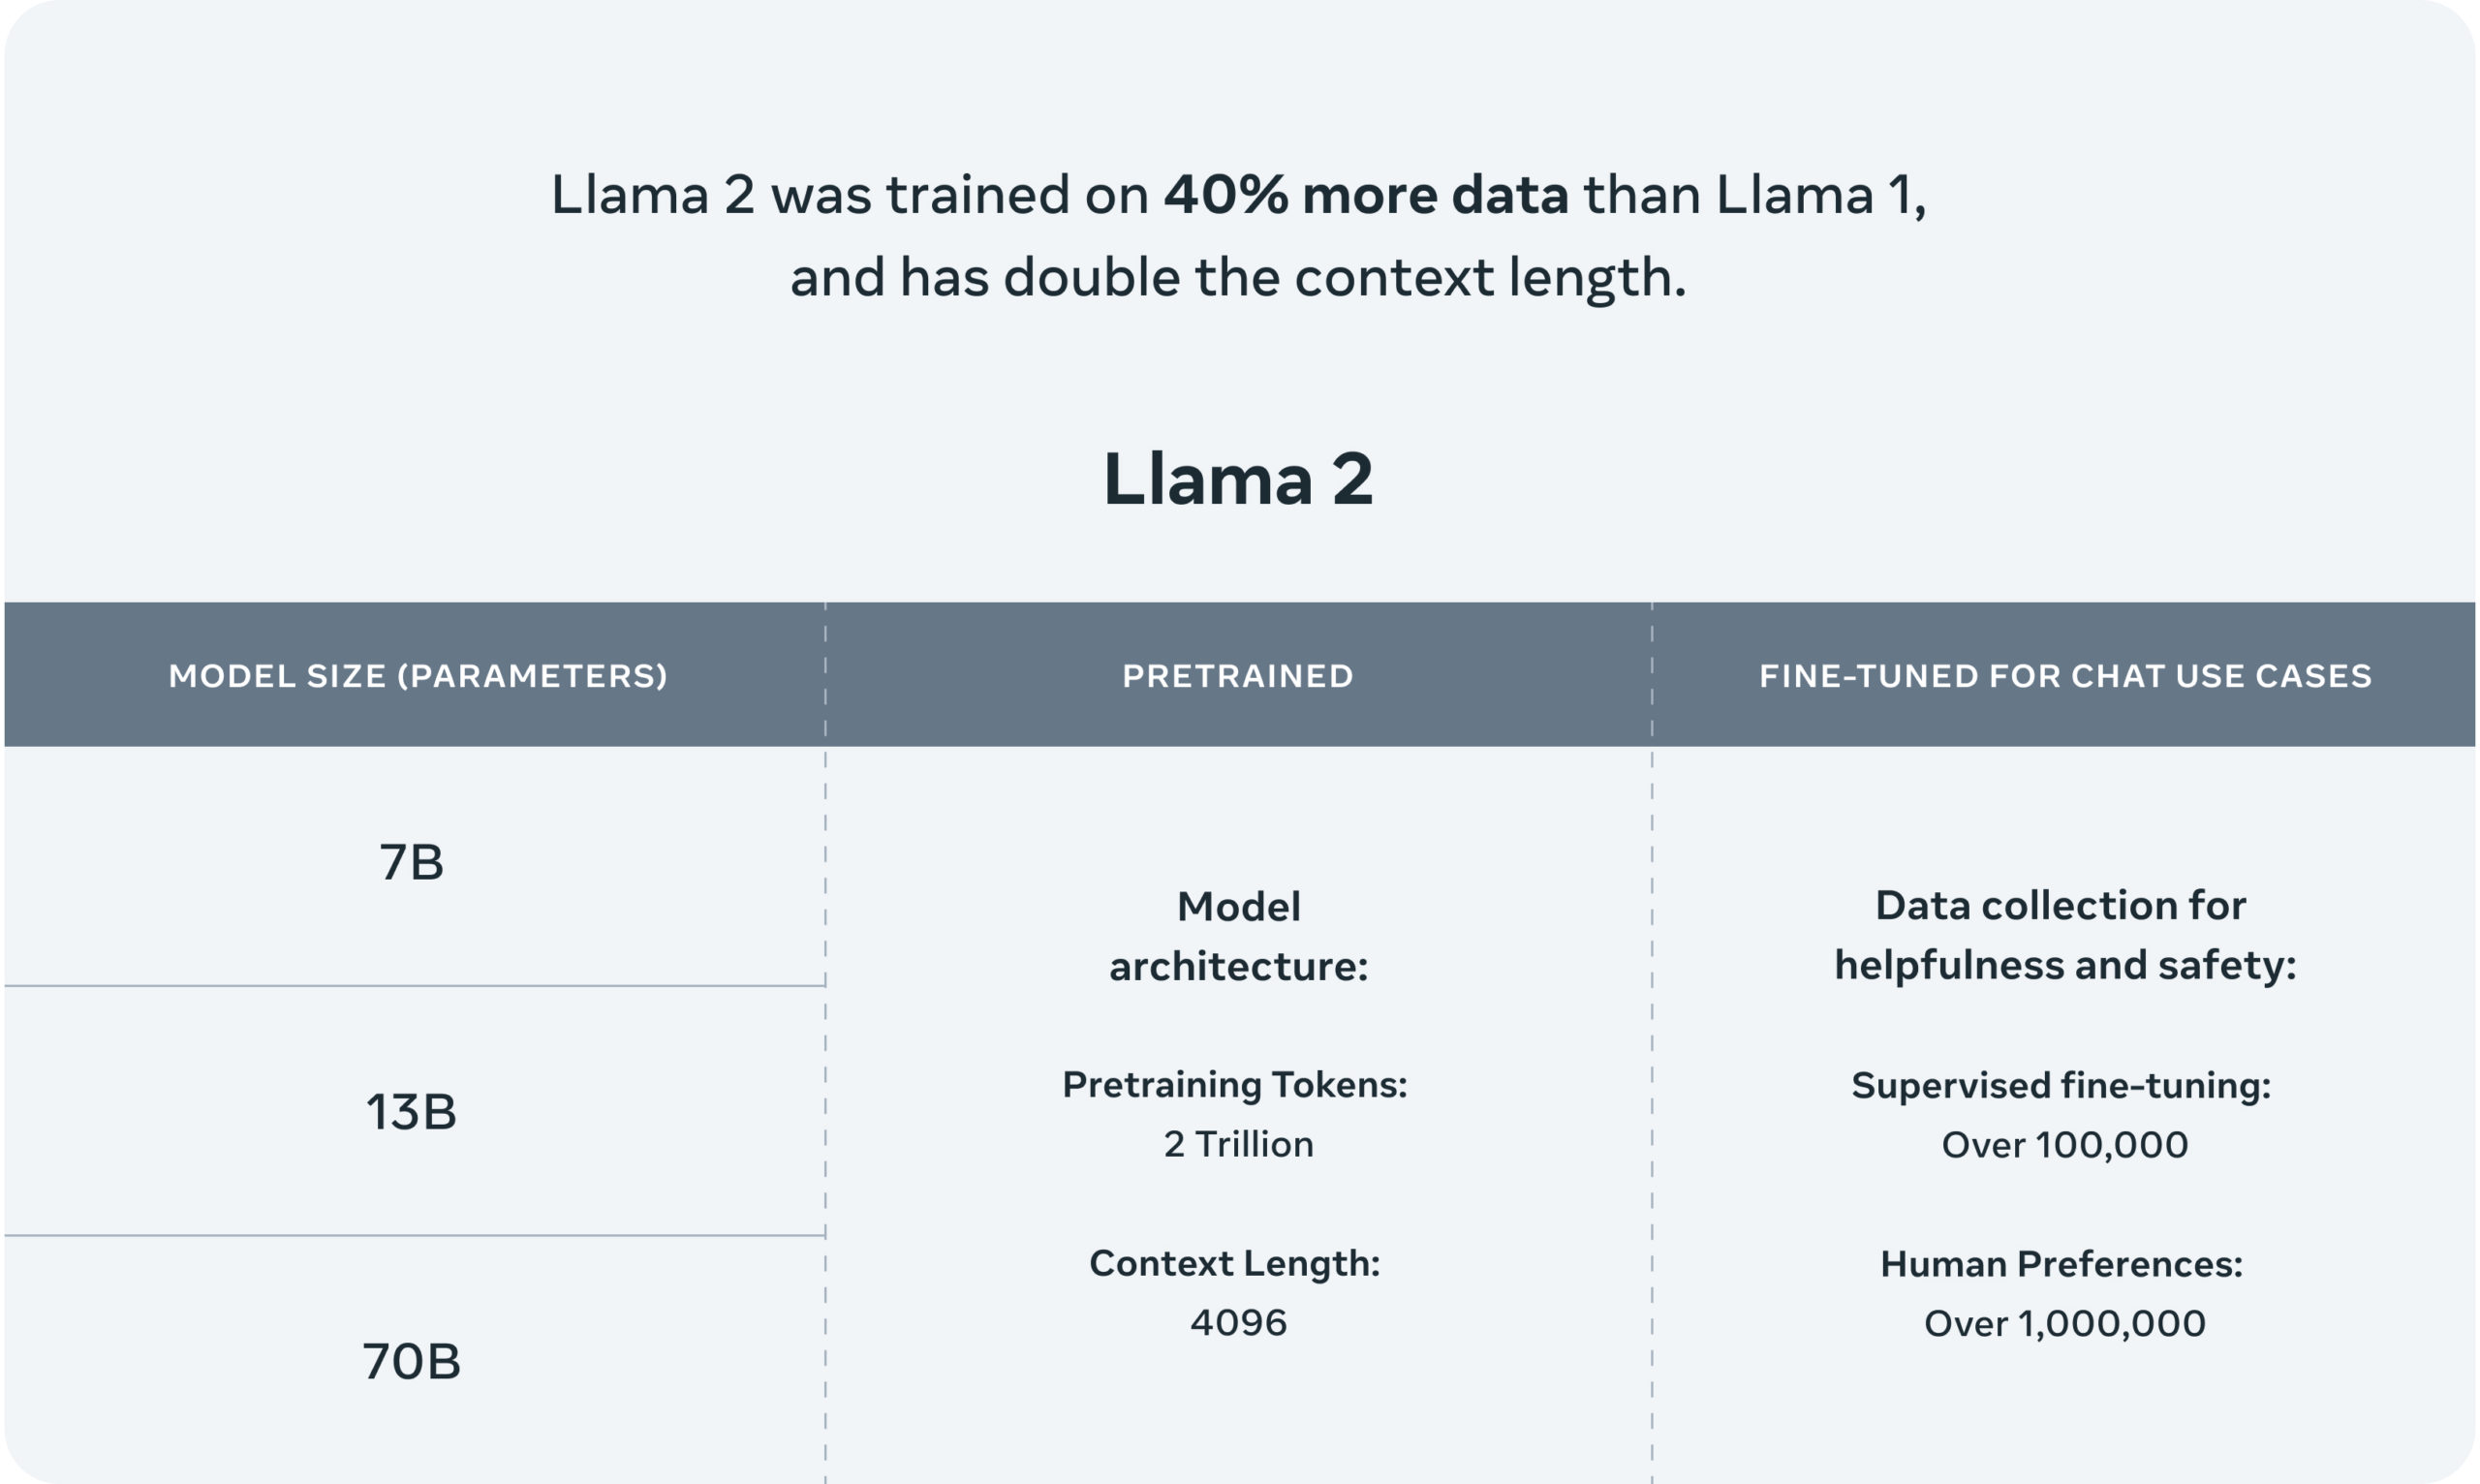
This second-generation model comes with notable enhancements, including pre-trained versions with parameter sizes of 7 billion, 13 billion, and a staggering 70 billion. Llama 2’s training data has been expanded, encompassing 40% more information, all while boasting double the context length compared to Llama 1, with a context length of 4,096 tokens.


Notably, the Llama-2 chat models, tailored for dialogue applications, have been fine-tuned with the assistance of over 1 million new human annotations. As we delve deeper, we will explore its capabilities and the numerous ways to access this remarkable language model. 
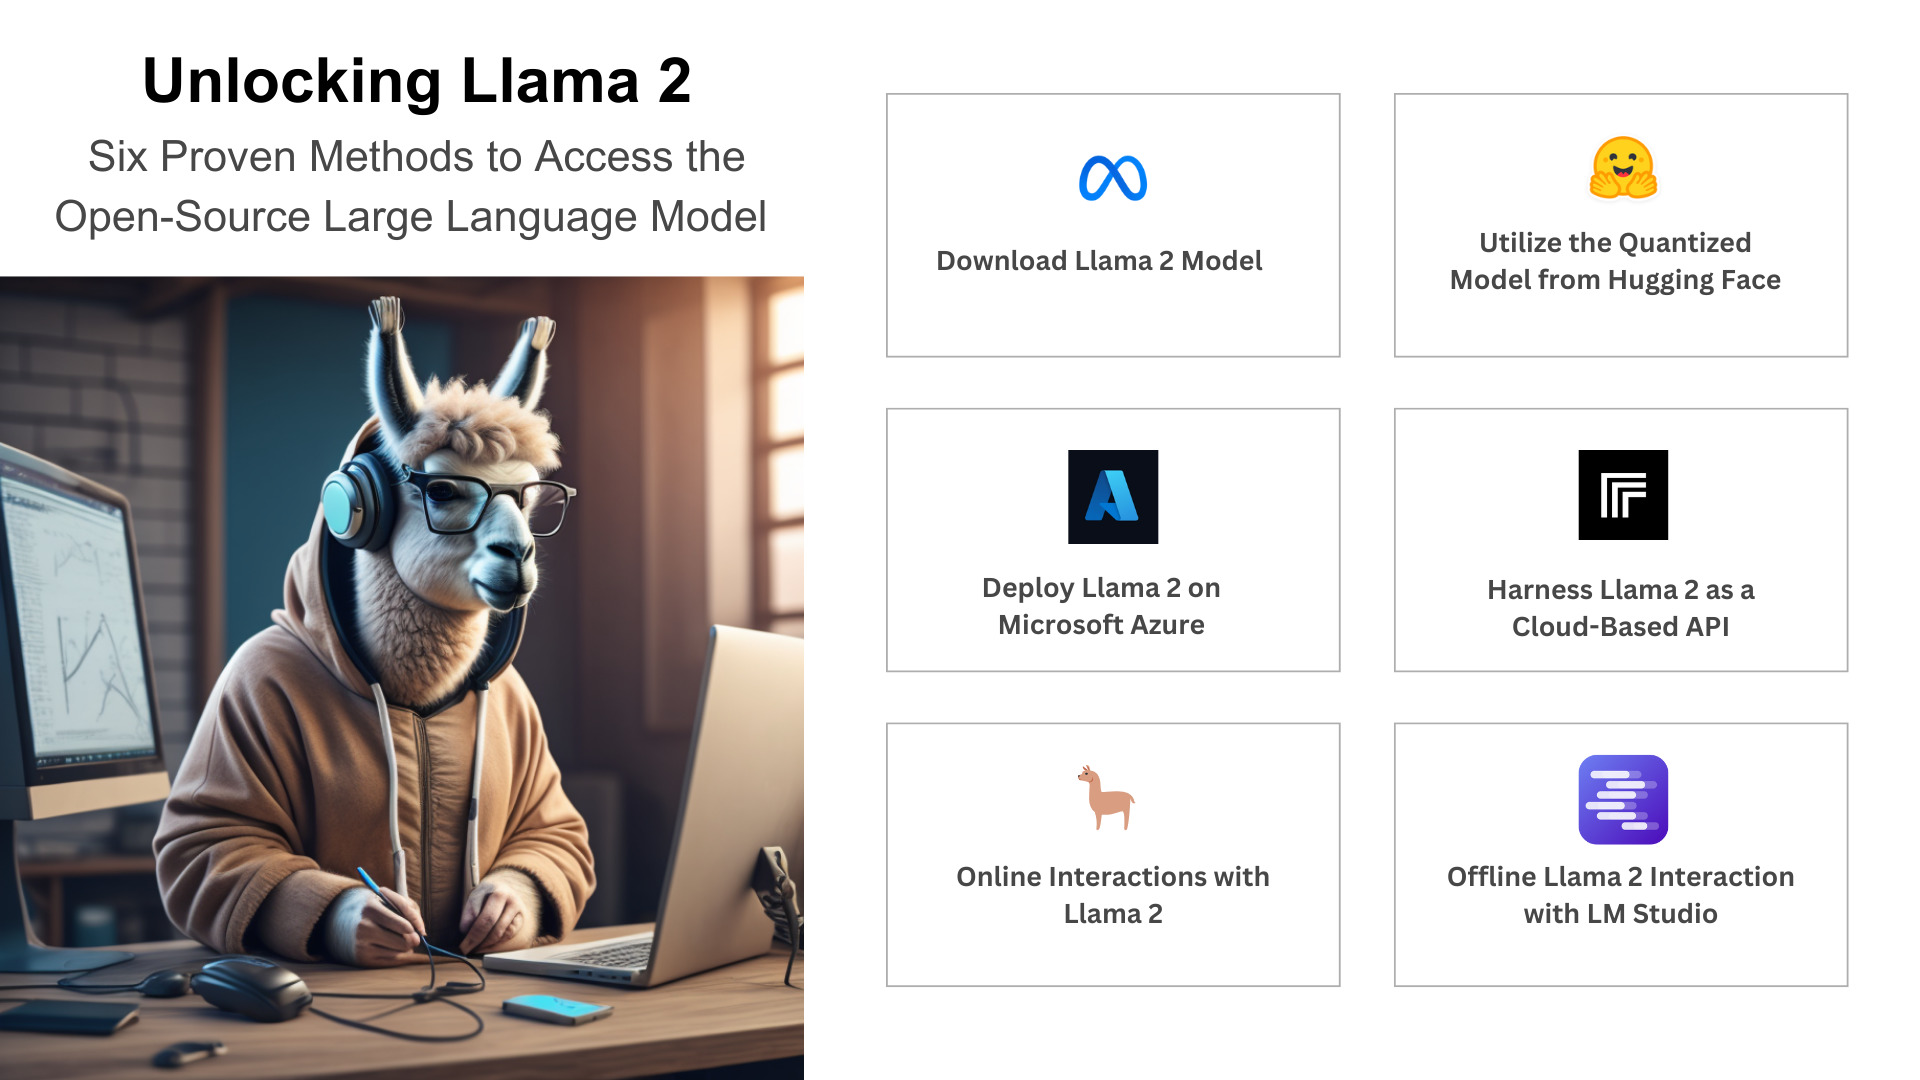
Llama2_Intro_Meta
Source: https://ai.meta.com/llama/ 


Exploring your path to Llama 2: Six access methods you must learn 

Accessing the power of it is easier than you might think, thanks to its open-source nature. Whether you are a researcher, developer, or simply curious, here are six ways to get your hands on the Llama 2 model right now: 


Unlocking_Llama2_six access methods
Understanding Llama2, Six Access Methods


Download Llama 2 Model 

Since Llama 2 large language model is open-source, you can freely install it on your desktop and start using it. For this, you will need to complete a few simple steps. 

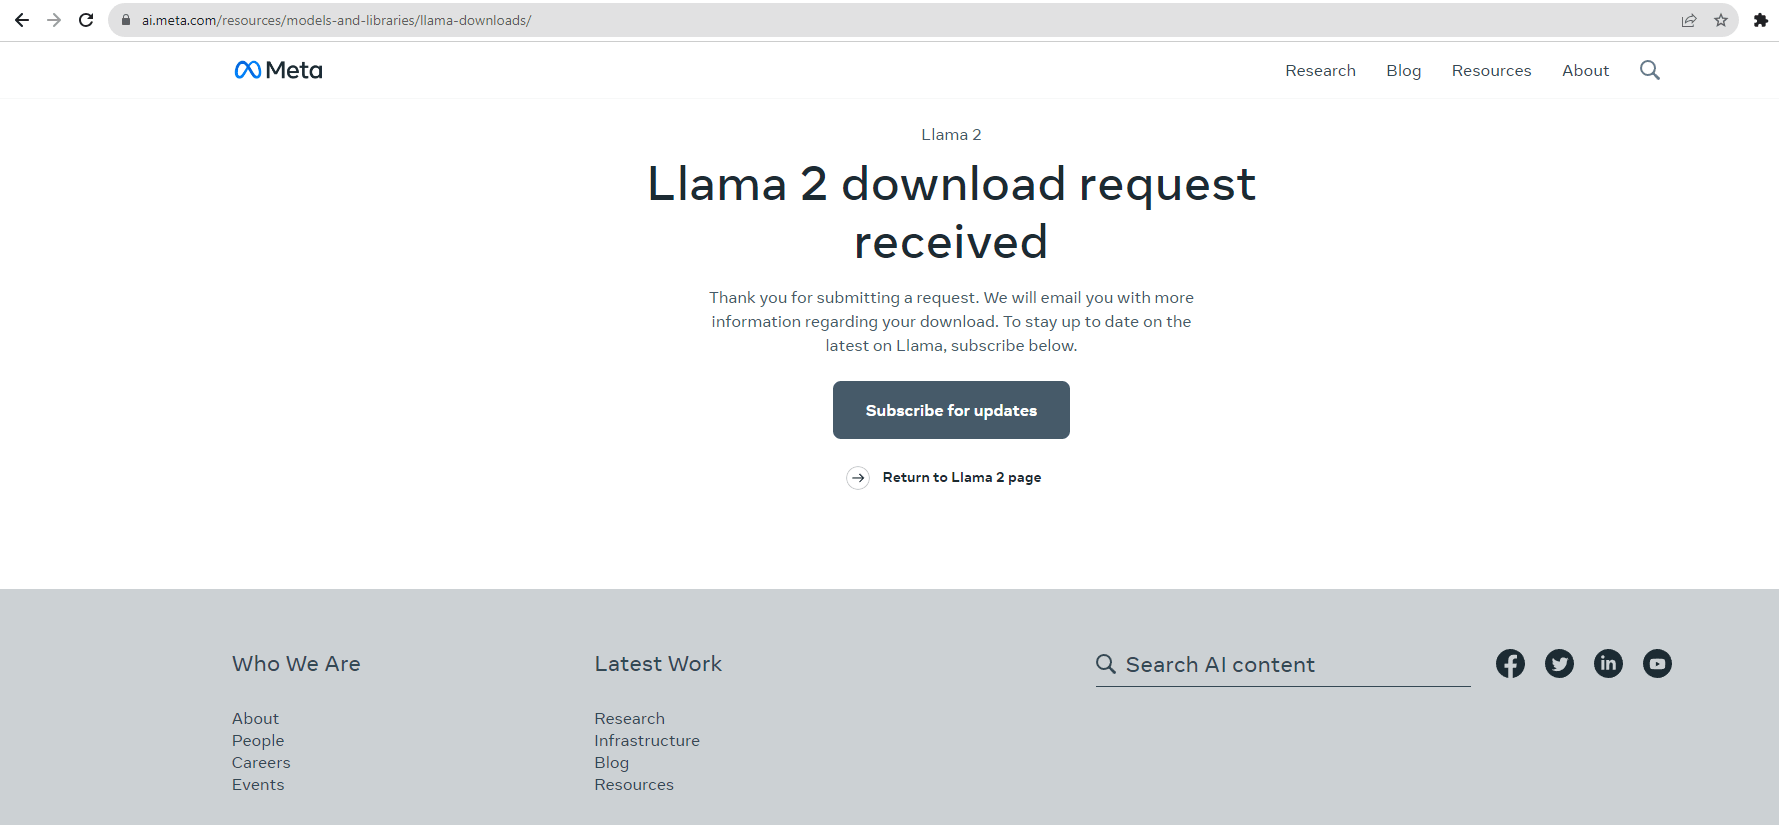
  • First, head to Meta AI’s official Llama 2 download webpage and fill in the requested information. Make sure you select the right model you plan on utilizing. 
Llama2_Download_Request_Form
Llama2 Download Request Form


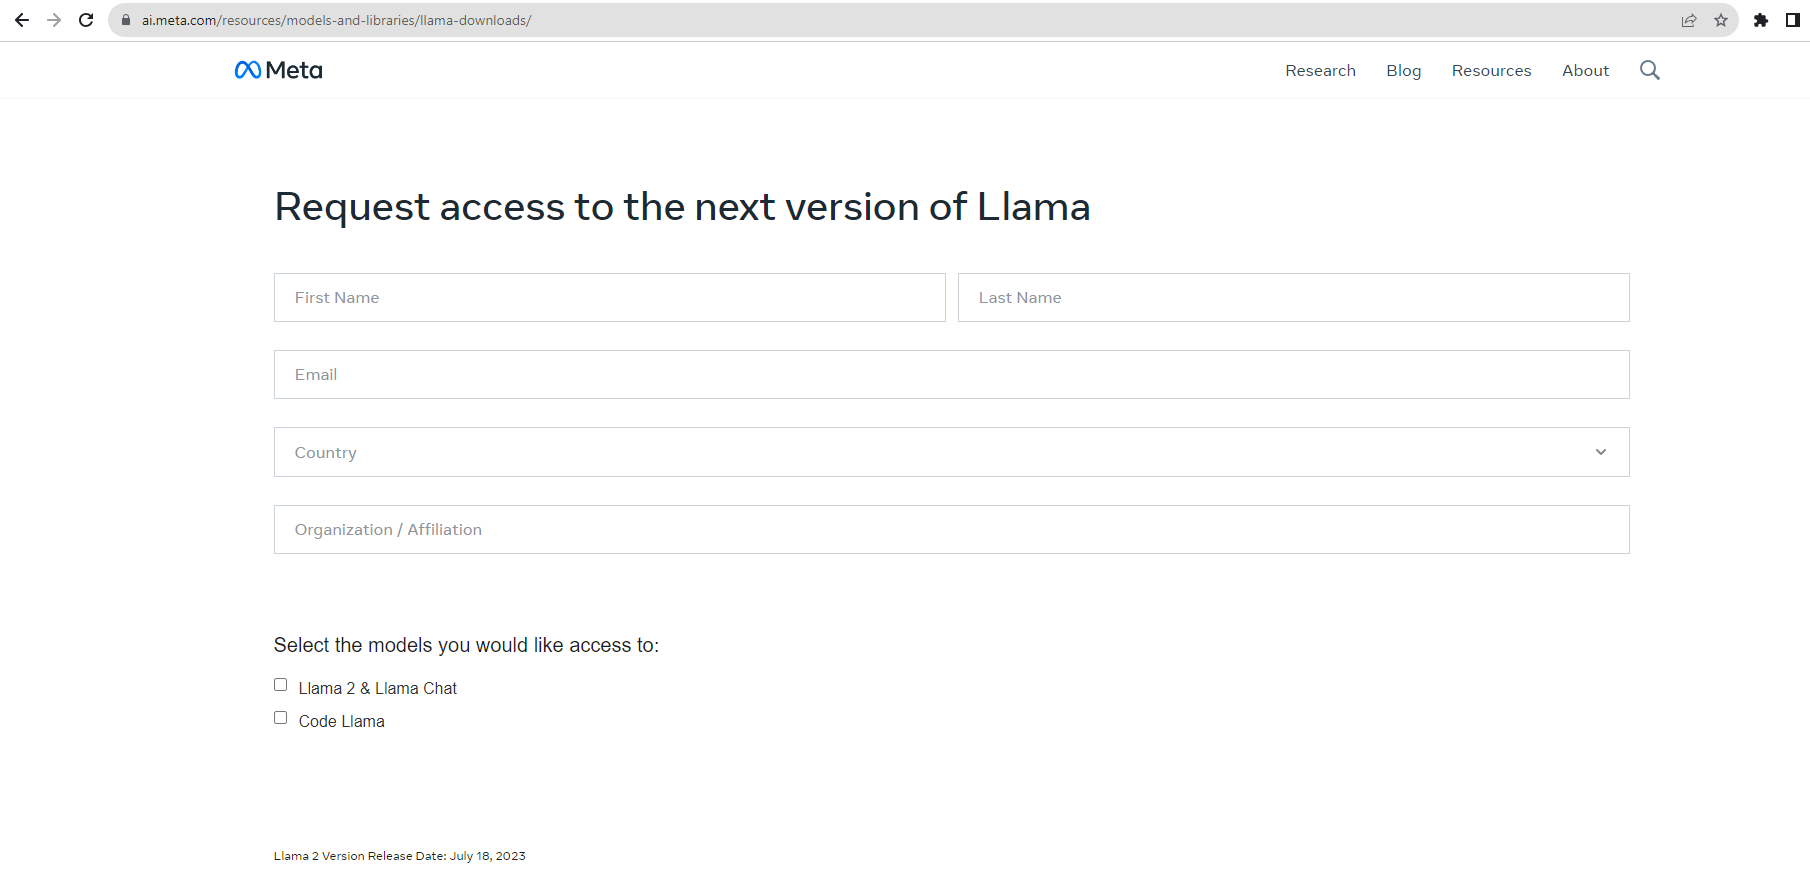
  • Upon submitting your download request, you can expect to encounter the following page. You will receive an installation email from Meta with more information regarding the download. 


Llama2_Download_Request_Received


  • Once the email has been received, you can proceed with the installation by adhering to the instructions detailed within the email. To begin, the initial step entails accessing the Llama repository on GitHub.  
Get_Started_with_Llama2_Email


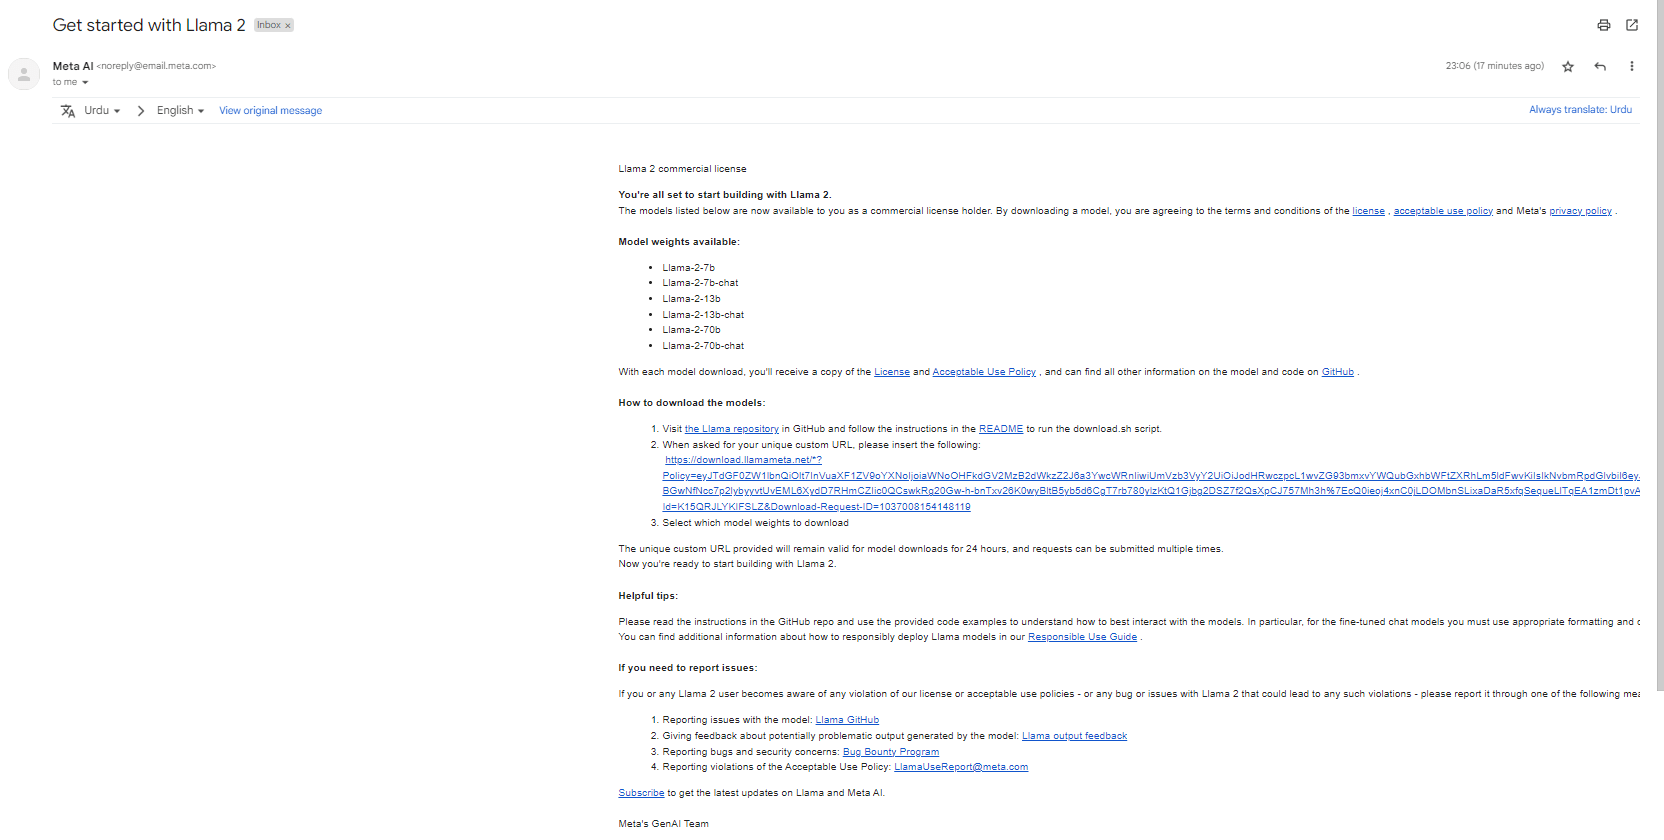
  • Download the code and extract the ZIP file to your desktop. Subsequently, proceed by adhering to the instructions outlined in the “Readme” document to start using all available models. 


Learn to build custom large language model applications today!                                                


Its models are also available in the Hugging Face organization of Llama 2 from Meta. All the available models are accessible there as well. To use these models from Hugging Face, we still need to submit a download request to Meta, and additionally, we need to fill out a form to enable the use of Llama 2 in Hugging Face.

To access its models on Hugging Face, follow these steps:


Meta_Llama2_Organization_HuggingFace
Meta Llama2 Organization HuggingFace


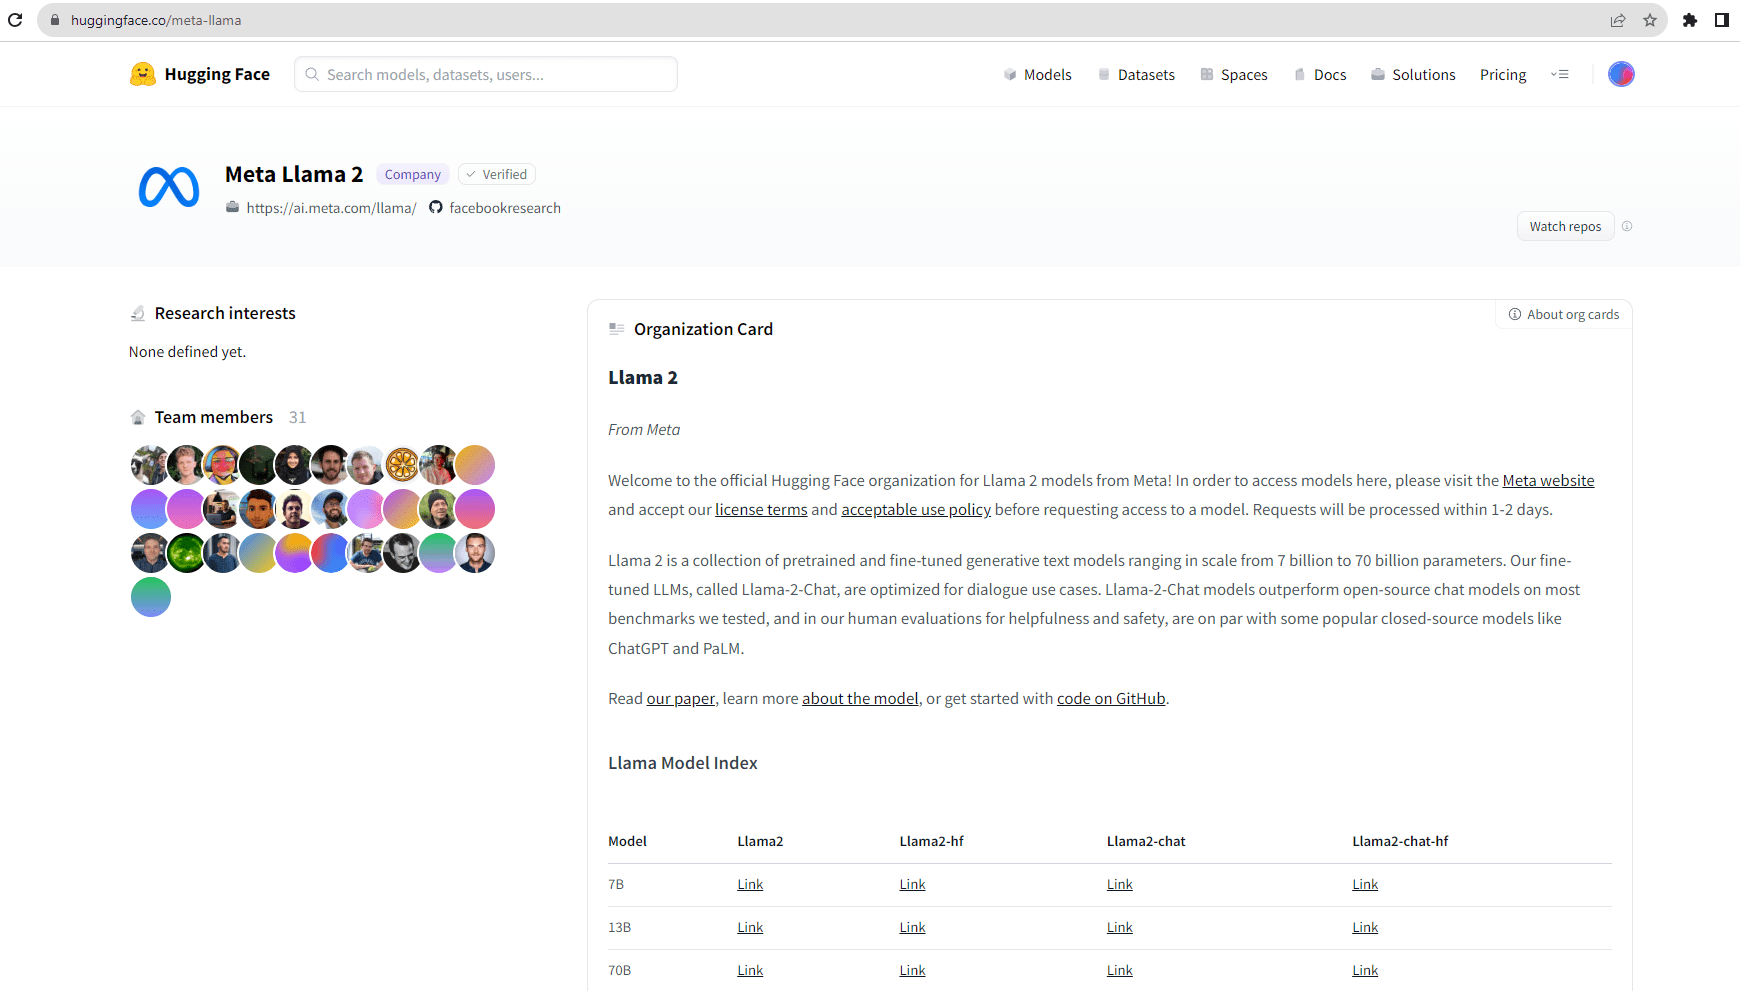
  • You can see a “Models” tab on the page which lists all the available models. 
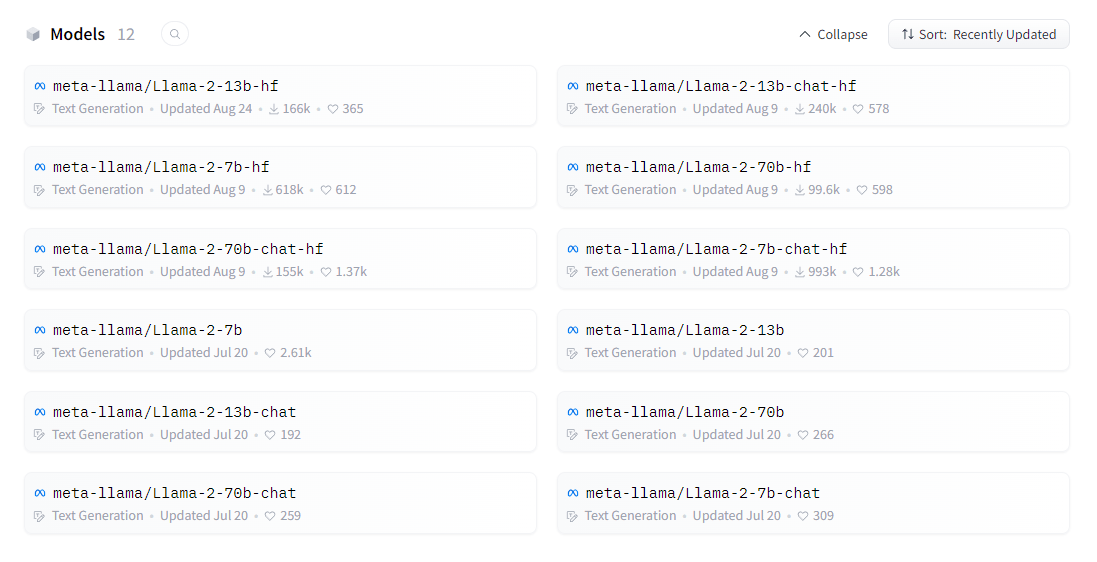
Llama2_HuggingFace_Models


Access_Llama2_HuggingFace
Access Llama2 HuggingFace


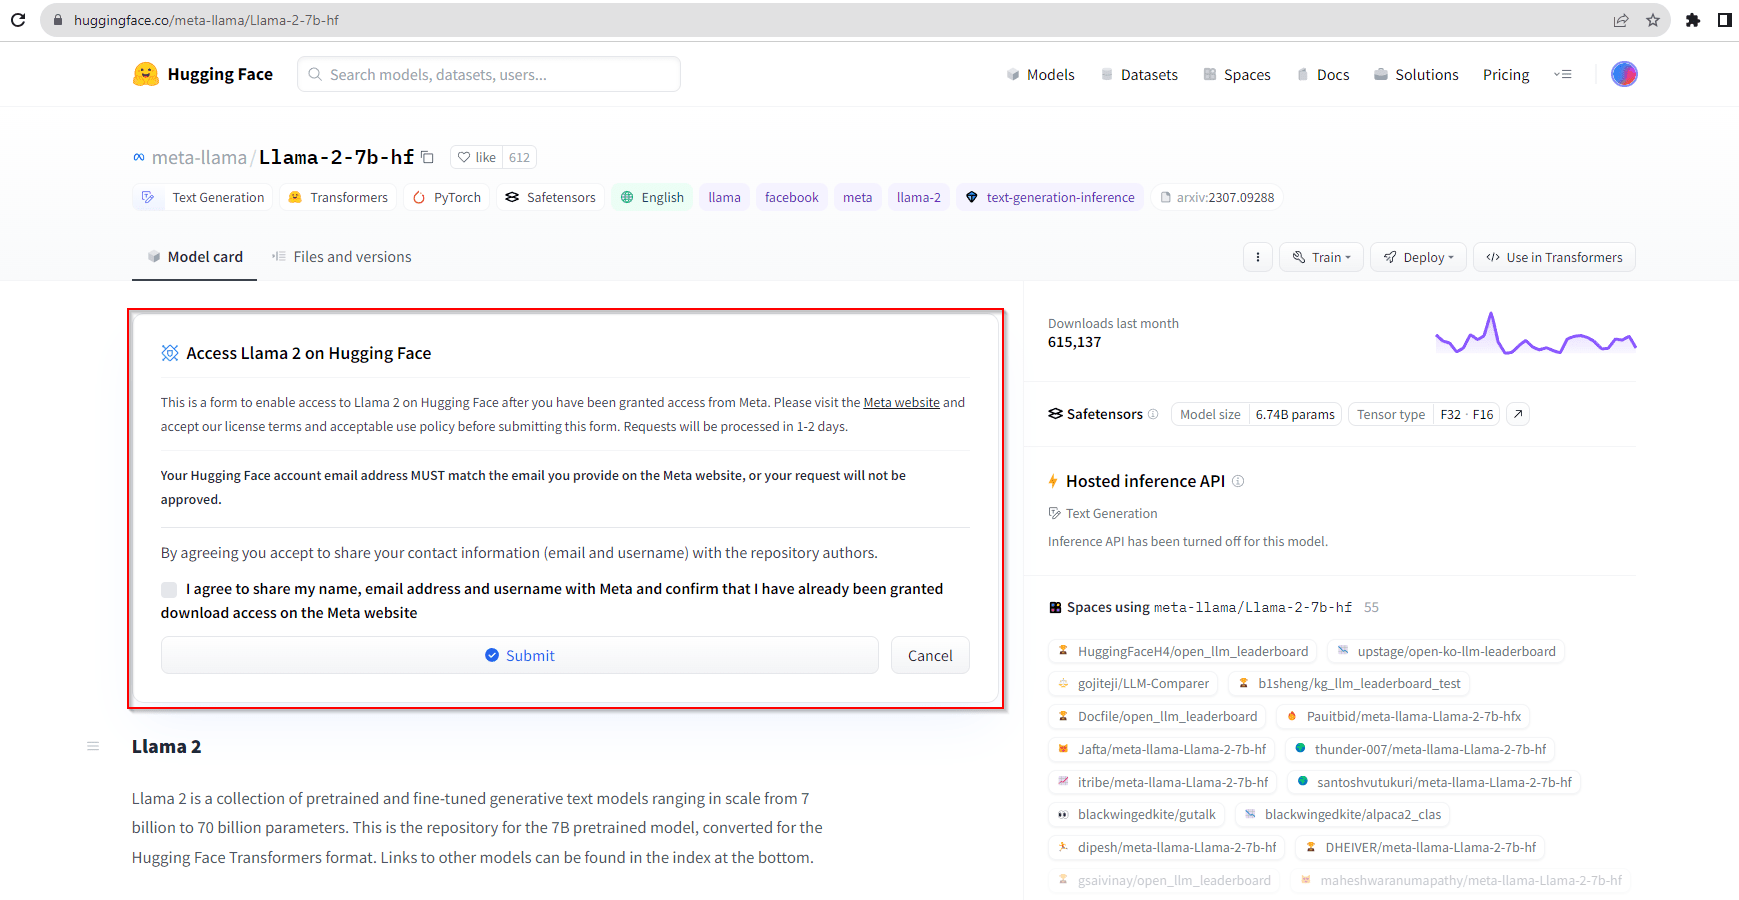
  • In the Access Llama 2 on Hugging Face card enter the email you used to send out the download request. 

Note: Please ensure that the email you use on Hugging Face matches the one you used to request Llama 2 download permission from Meta. 


Utilize the quantized model from Hugging Face 

In addition to the models from the official Meta Llama 2 organization, there are some quantized models also available on Hugging Face. 

If you search for Llama in the Hugging Face search bar. You will see a list of models available in Hugging Face. You can see that models from meta-llama the official organization are available but there are other models also available.

These models are the quantized version of the same Llama 2 models. Like the model, TheBloke/Llama-2-7b-Chat-GGUF contains GGUF format model files for Meta Llama 2’s Llama 2 7B Chat. 


Quantized_Llama2-7b
Quantized_Llama2-7b


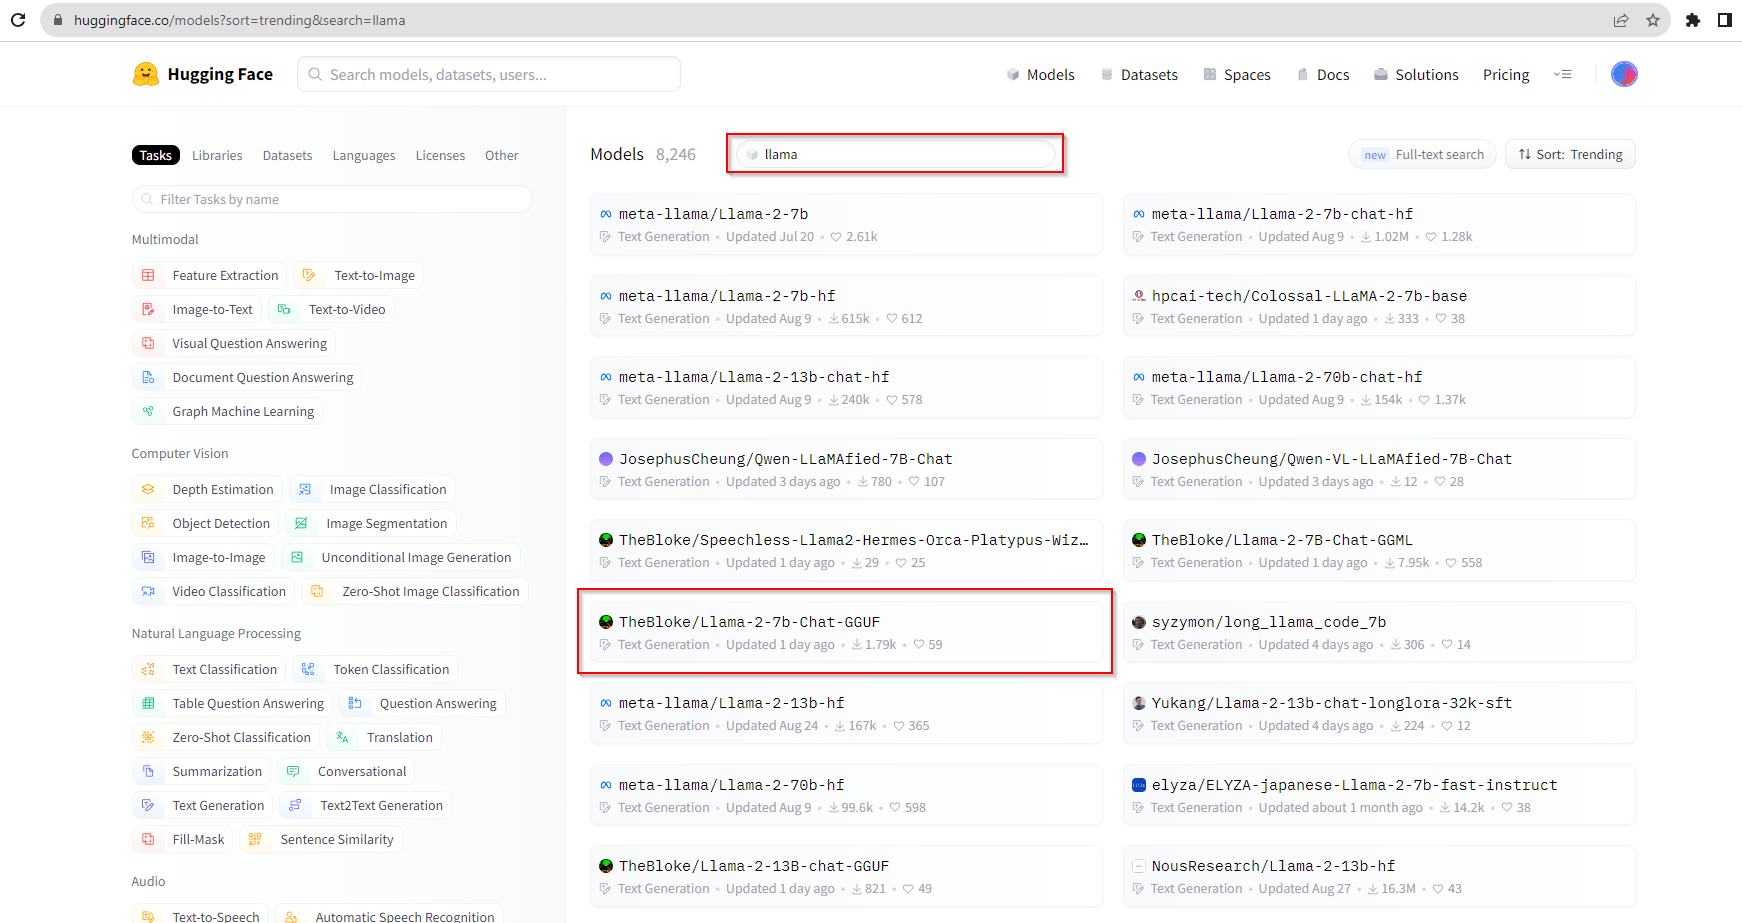
The key advantage of these compressed models lies in their accessibility. They are open-source and do not necessitate users to request downloads from either Meta or Hugging Face. Although they are not the complete, original models, these quantized versions allow users to harness the capabilities of the model with reduced computational requirements. 


Deploy Llama 2 on Microsoft Azure 

Microsoft and Meta have strengthened their partnership, designating Microsoft as the preferred partner for Llama 2. This collaboration brings Llama 2 into the Azure AI model catalog, granting developers using Microsoft Azure the capability to seamlessly integrate and utilize this powerful language model. 


Azure ML Model Catalog


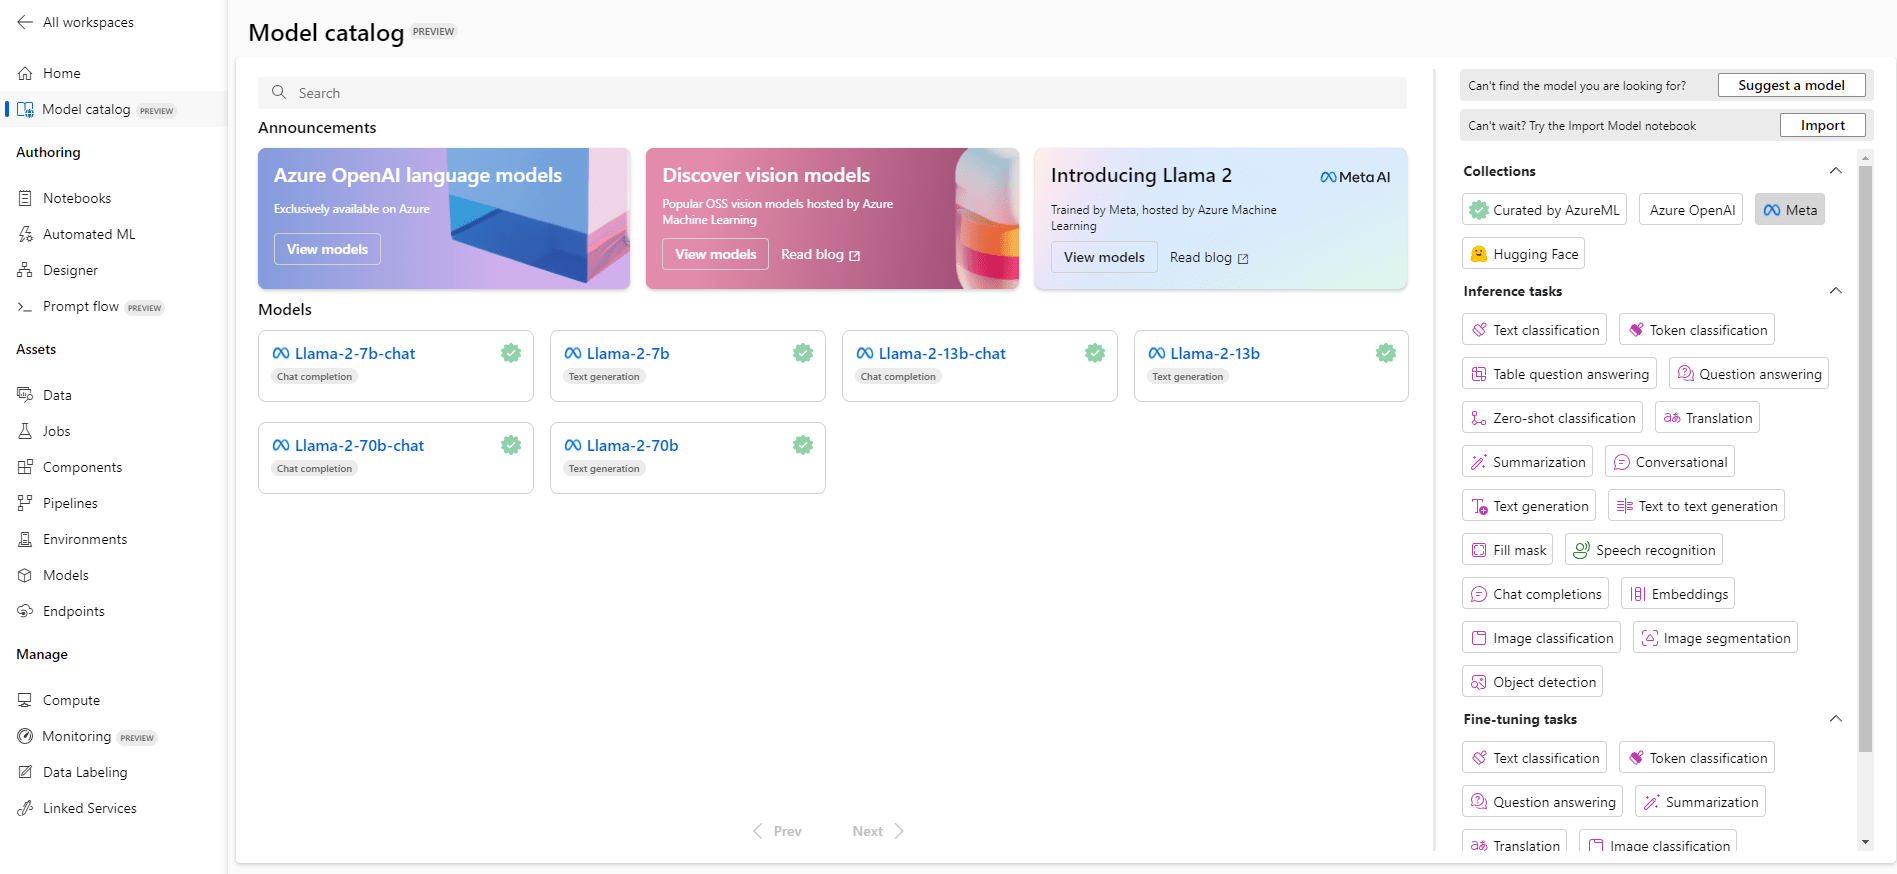
Within the Azure model catalog, you can effortlessly locate the Llama 2 model developed by Meta. Microsoft Azure simplifies the fine-tuning of Llama 2, offering both UI-based and code-based methods to customize the model according to your requirements. Furthermore, you can assess the model’s performance with your test data to ascertain its suitability for your unique use case. 


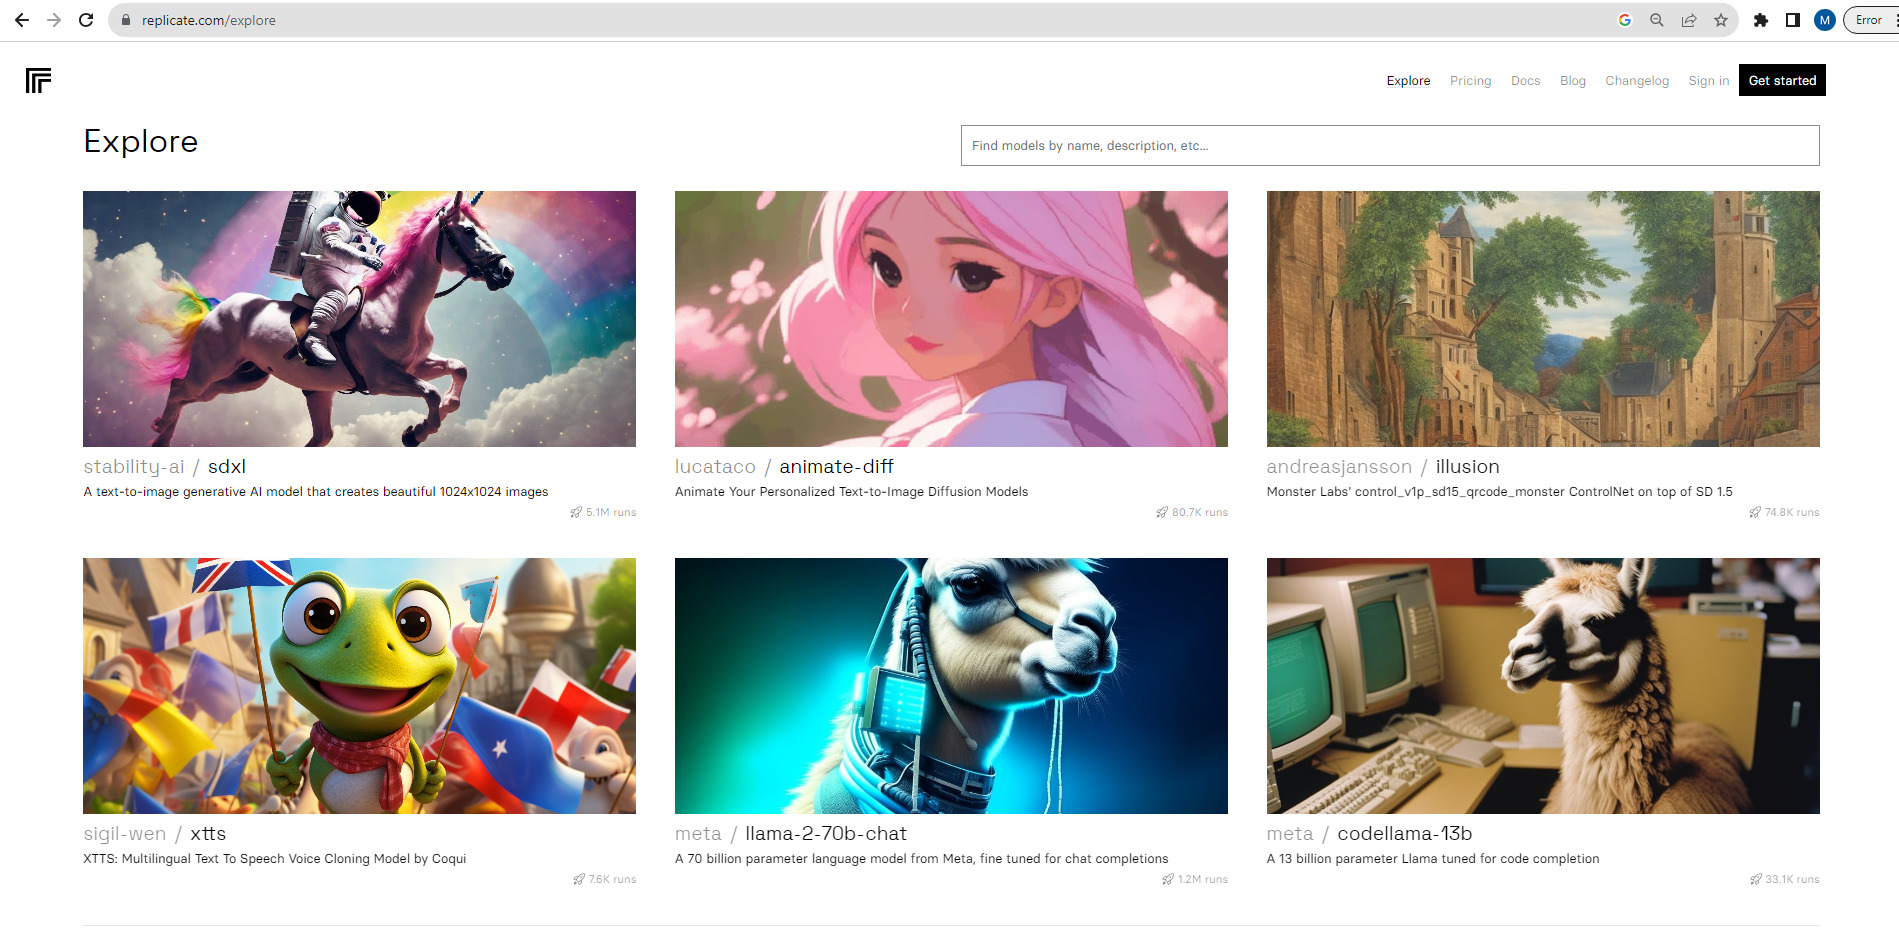
Harness Llama 2 as a cloud-based API 

Another avenue to tap into the capabilities of the Llama 2 model is through the deployment of Llama 2 models on platforms such as Hugging Face and Replicate, transforming it into a cloud API. By leveraging the Hugging Face Inference Endpoint, you can establish an accessible endpoint for your Llama 2 model hosted on Hugging Face, facilitating its utilization. 

Hugging Face Inference Endpoint


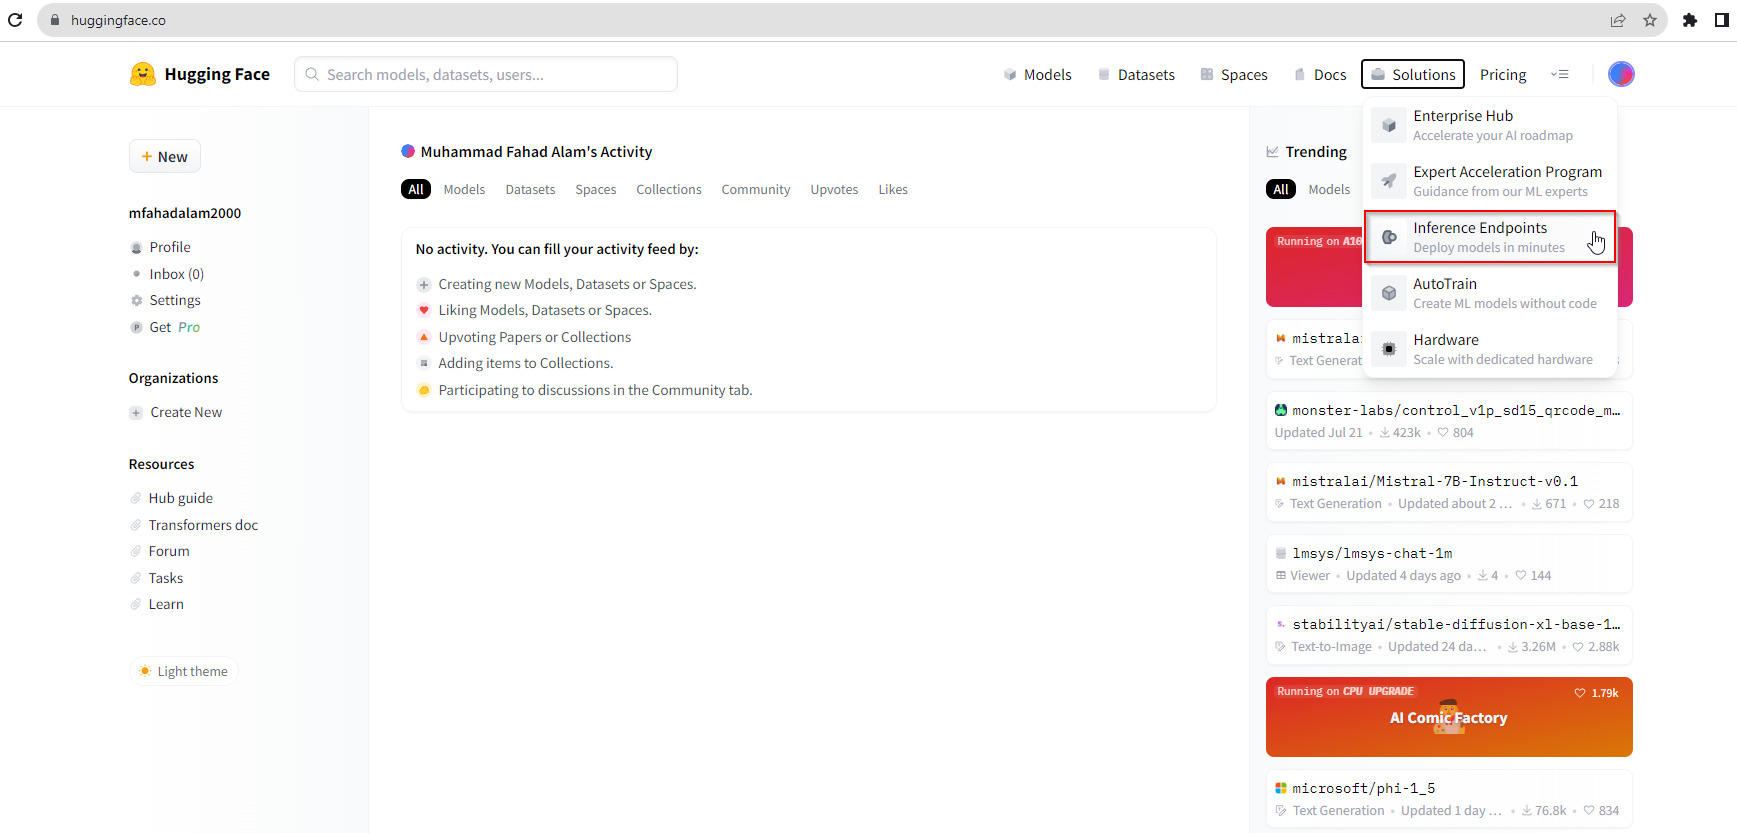
Additionally, it is conveniently accessible through Replicate, presenting a streamlined method for deploying and employing the model via API. This approach alleviates worries about the availability of GPU computing power, whether in the context of development or testing.

It enables the fine-tuning and operation of models in a cloud environment, eliminating the need for dedicated GPU setups. Serving as a cloud API, it simplifies the integration process for applications developed on a wide range of technologies. 


Replicate_Llama2
Replicate_Llama2

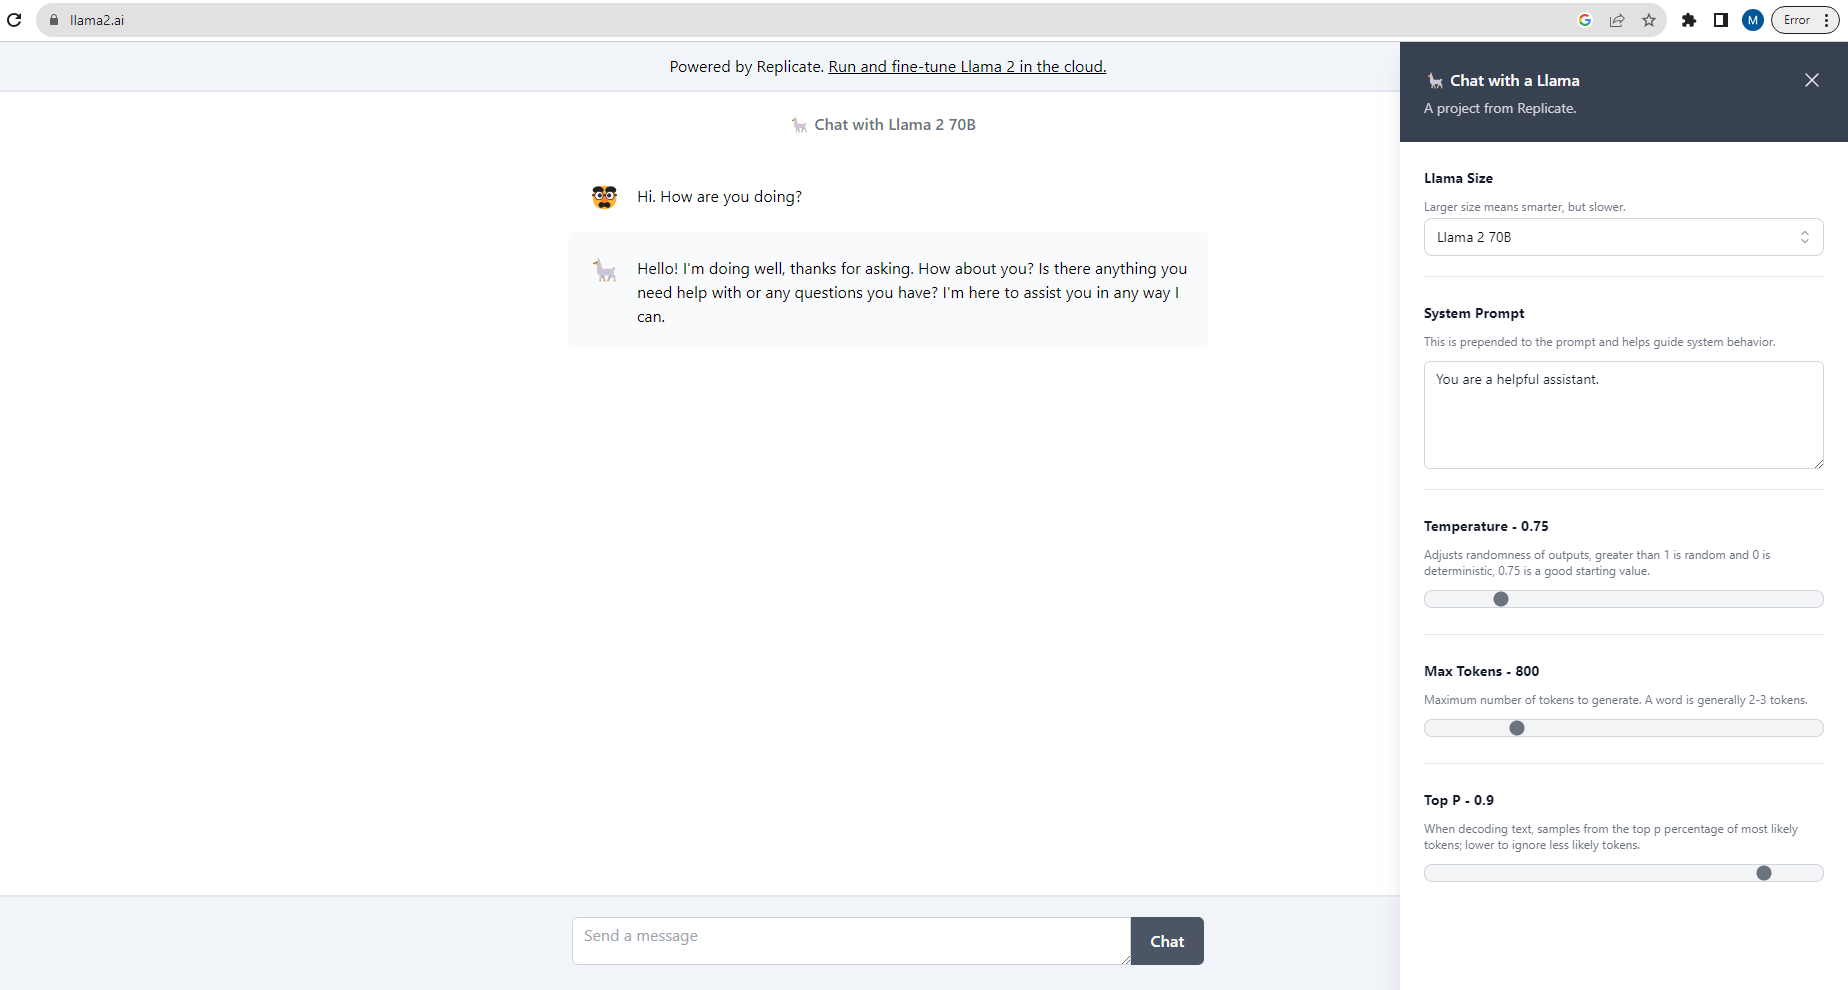
Online Interactions with Llama 2 

Experience its capabilities online through platforms like llama2.ai where you can freely engage with different models. Customize your interactions by adjusting parameters such as system prompt, max token, and randomness, offering a user-friendly gateway to explore the model’s creative AI potential.

This demo provides a non-technical audience with the opportunity to submit queries and toggle between chat modes, simplifying the experience of interacting with Llama 2’s generative abilities.  


Llama2_Online
Llama2_Online

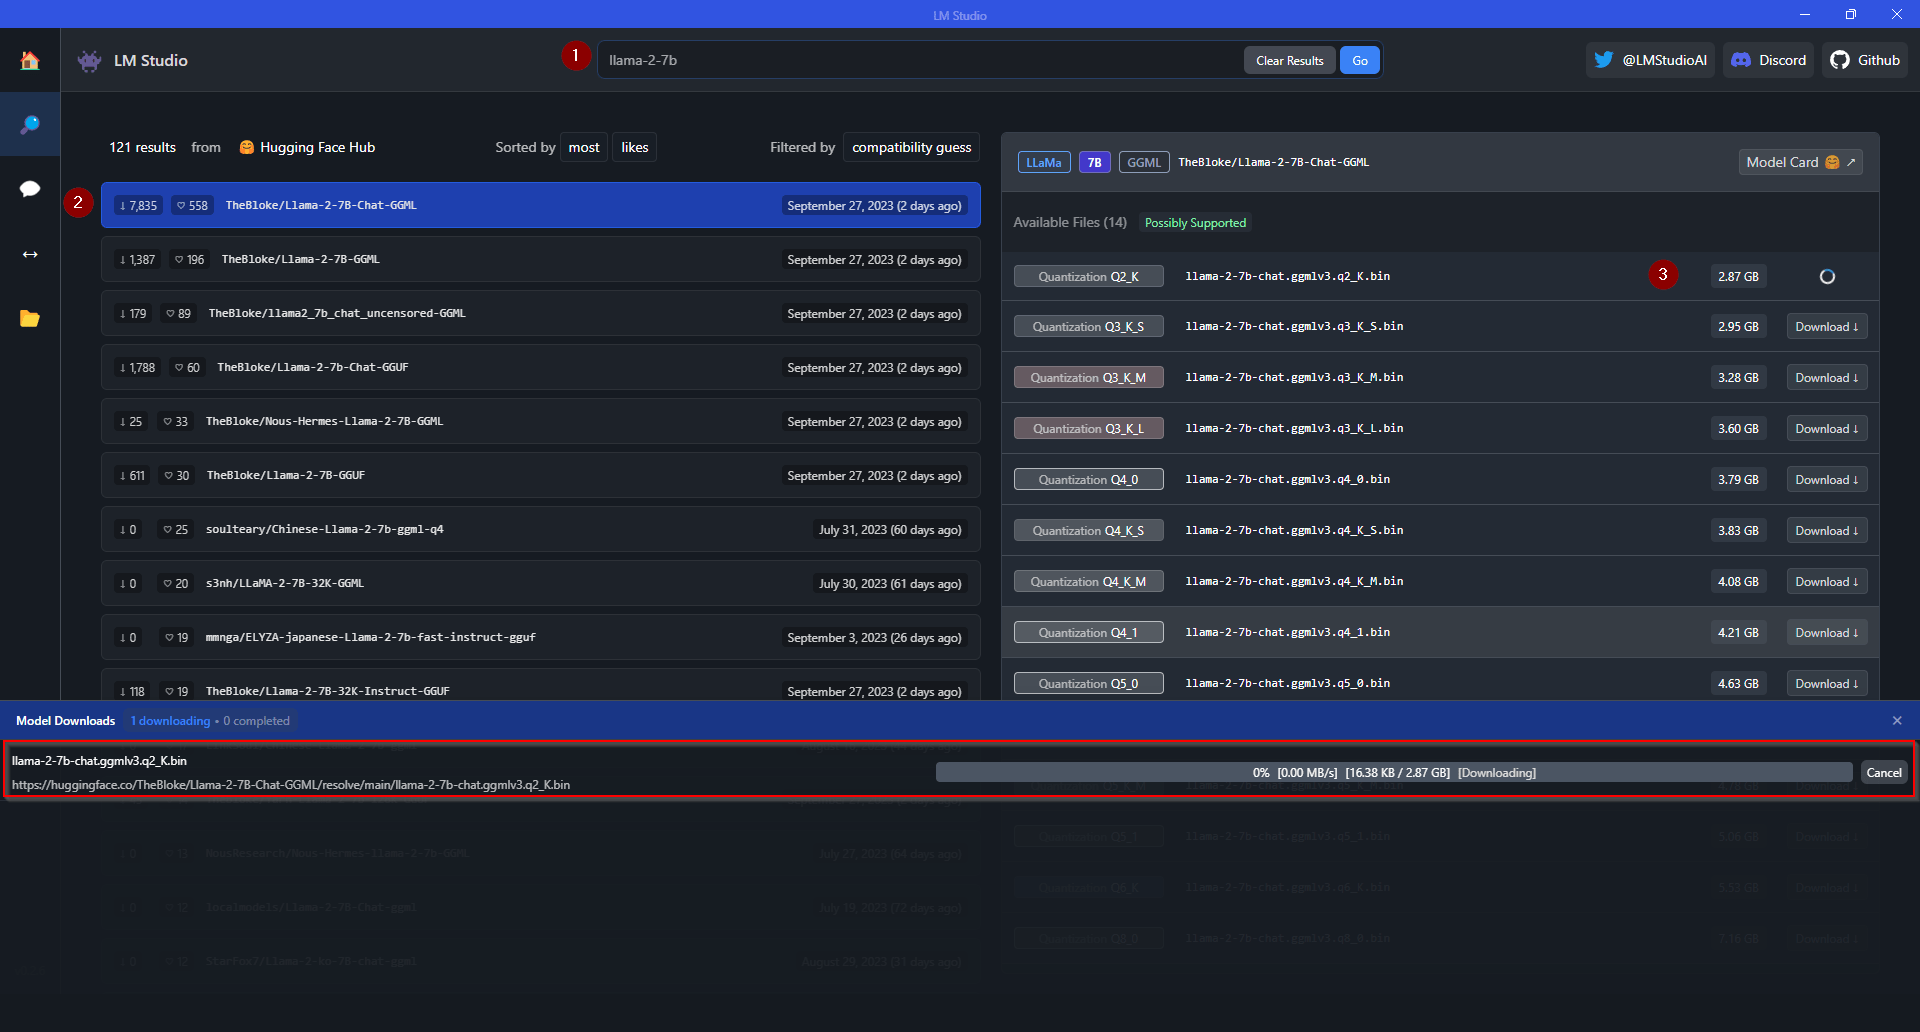
Offline Llama 2 Interaction with LM Studio 

With LM Studio, you have the power to run LLMs (Large Language Models) offline on your laptop, employ models through an intuitive in-app Chat UI or compatible local servers, access model files from Hugging Face repositories, and discover exciting new LLMs right from the app’s homepage. 

LM_Studio_Llama2

LM_Studio_Llama2

LM Studio empowers you to engage with Llama 2 models offline. Here is how it works:  

  • Once installed, search for your desired Llama 2 model, such as Llama 2 7b. You will find a comprehensive list of repositories and quantized models on Hugging Face. Select your preferred repository and initiate the model download by clicking the link on the right. Monitor the download progress at the bottom of the screen. 


LM_Studio_Llama2-7b
LM_Studio_Llama2-7b


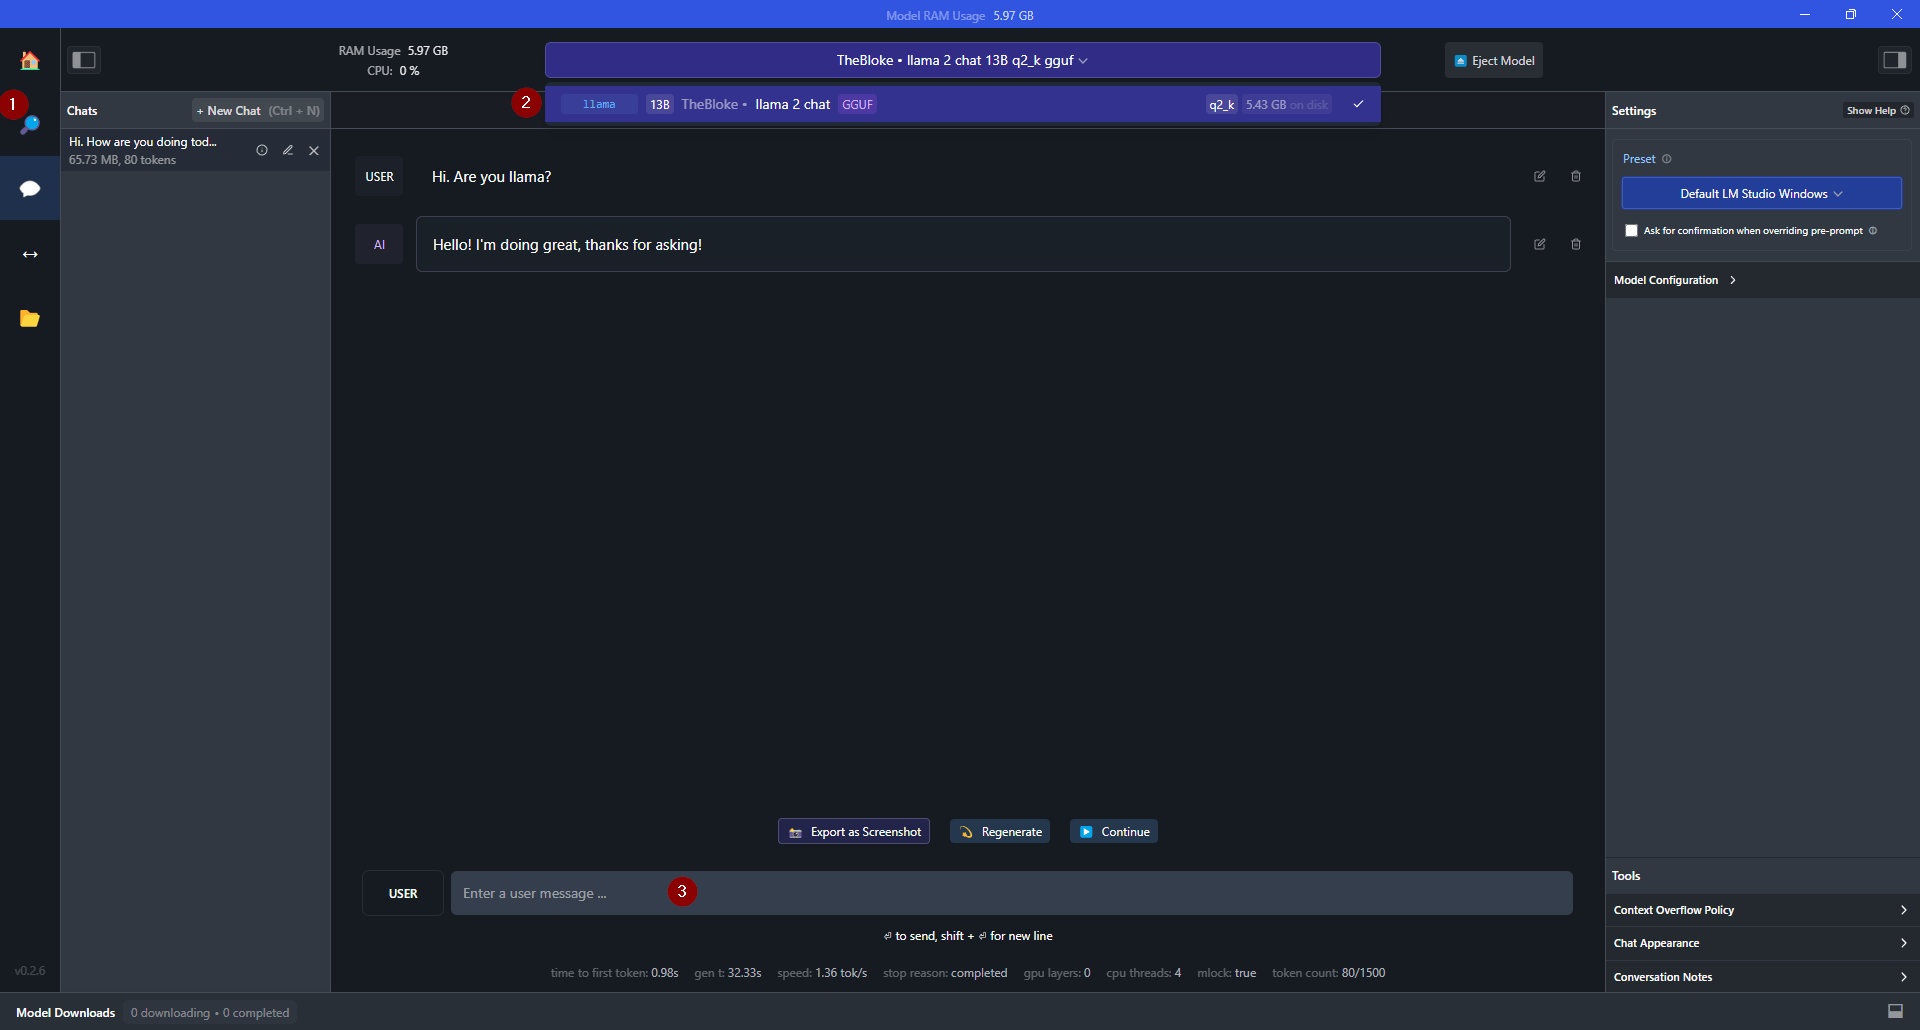
  • After the model is downloaded, click the AI Chat icon, select your model, and start a conversation with it. LM Studio offers a seamless offline experience, enabling you to explore the potential of Llama 2 models with ease. 
LM Studio Llama2 Inference


Explore Llama 2 now!

In summary, this blog has guided you on an exploration of an open-source language model.

We analyzed its development, pointed out its unique features, and gave a detailed overview of six methods to use it. These methods are suitable for developers, researchers, and anyone interested in their potential.

Armed with this understanding, you are now well-equipped to unlock the capabilities of Llama 2 for your individual AI initiatives and pursuits. 

In this blog, we delve into Large Language Model Evaluation and Tracing with LangSmith, emphasizing their pivotal role in ensuring application reliability and performance.

You’ll learn to set up LangSmith, connect it with LangChain, and master the process of precise tracing and evaluation, equipping you with the tools to optimize your Large Language Model applications and bring them to production. Discover the key to unlock your model’s full potential.

LLM evaluation and tracing with LangSmith


Whether you’re an experienced developer or just starting your journey, LangSmith’s private beta provides a valuable tool for your toolkit. 

Understanding the significance of evaluation and tracing is key to improving Large Language Model applications, ensuring the reliability, correctness, and performance of your models. This is a critical step in the development process, particularly if you’re working towards bringing your LLM application to production. 

LangSmith and LangChain in LLM application

To working on Large Language Models (LLMs), LangChain and LangSmith stand as key pillars for developers and AI enthusiasts.

LangChain simplifies the integration of powerful LLMs into applications, streamlining data access, and offering flexibility through concepts like “Chains” and “Agents.” It bridges the gap between these models and external data sources, enabling the creation of robust natural language processing applications.

LangSmith, developed by LangChain, takes LLM application development to the next level. It aids in debugging, monitoring, and evaluating LLM-based applications, with features like logging runs, visualizing components, and facilitating collaboration. It ensures the reliability and efficiency of your LLM applications.

These two tools together form a dynamic duo, unleashing the true potential of large language models in application development. In the upcoming sections, we’ll delve deeper into the mechanics, showcasing how they can elevate your LLM projects to new heights.


Large language model bootcamp

Quick start to LangSmith

Prerequisites 

Please note that LangSmith is currently in a private beta phase, so we’ll show you how to join the waitlist. Once LangSmith releases new invites, you’ll be at the forefront of this innovative platform. 

Sign up for an account here

welcome to LangSmith


Configuring LangSmith with LangChain 

Configuring LangSmith alongside LangChain is a straightforward procedure. It merely involves a few simple steps to establish LangSmith and start utilizing it for tracing and evaluation. 


Read more about LangChain in detail


To initiate your journey, follow the sequential steps provided below: 

  • Begin by creating a LangSmith account, as outlined in the prerequisites 
  • In your working folder, create .env file containing essential environment variables. Although initial placeholders are provided, these will be replaced in subsequent steps: 


  • Substitute the placeholder <your-openai-api-key> with your OpenAI API key obtained from OpenAI. 
  • For LangChain API key, navigate to settings page on LangSmith, generate the key and replace the placeholder. 


LangSmith-Create API key- 1


  • Return to the home page and create a project with a suitable name. Subsequently, copy the project name and update the placeholder. 


LangSmith - Project 2

  • Install it and any other necessary dependencies with the following command: 


  • Execute the provided example code to initiate the process: 


  • After running the code, return to the LangSmith home page, and access the project you just created. 

Getting started with LangSmith 3  


  • Within the “Traces” section, you will find the run that was recently executed. Click on it to access detailed trace information. 

Getting started with LangSmith 4

Congratulations, your initial run is now visible and traceable within LangSmith! 

Scenario # 01: LLM Tracing 

What is a trace? 

A ‘Run’ signifies a solitary instance of a task or operation within your LLM application. This could be anything from a single call to an LLM, chain, or agent. 


A ‘Trace’ encompasses an arrangement of runs structured in a hierarchical or interconnected manner. The highest-level run in a trace, known as the ‘Root Run,’ is the one directly triggered by the user or application. The root run is designated with an execution order of 1, indicating the order in which it was initiated within the trace when considered as a sequence. 

Learn to build LLM applications


Examples of traces 

We’ve already examined a straightforward LLM Call trace, where we observed the input provided to the large language model and the resulting output. In this uncomplicated case, a single run was evident, devoid of any hierarchical or multiple run structures.  

Now, let’s delve further by tracing LangChain chain and agent to uncover deeper insights into their operations. 

Trace a sequential chain 

In this instance, we explore the tracing of a sequential chain within LangChain, a foundational chain of this platform. Sequential chains enable the connection of multiple chains, creating complex pipelines for specific scenarios. Detailed information on this can be found here. 

Let’s run this example of sequential chain and see what we get in the trace. 


Upon executing the code for this sequential chain and returning to our project, a new trace, ‘SimpleSequentialChain,’ becomes visible. 


LangSmith - ChatOpenAI 5   


Upon examination, this trace reveals a collection of LLM calls, featuring two distinct LLM call runs within its hierarchy. 


LangSmith - Sequential Chain 6


This delineation of execution order becomes apparent; in our example, the initial run entails extracting a title and constructing a synopsis, as displayed in the provided screenshot. 

LangSmith - ChatOpenAI 7

Subsequently, the second run utilizes the synopsis and the output from the first run to generate a review. 


LangSmith - ChatOpenAI 8

This meticulous tracing mechanism grants us the ability to inspect intermediate results, the messages transmitted to the LLM, and the outputs at each step, all while offering insights into token counts and latency measures. Furthermore, the option to filter traces based on various parameters adds an additional layer of customization and control. 


Blog | Data Science Dojo


Trace an agent 

In this segment, we embark on a journey to trace an agent’s inner workings using LangSmith. For those keen to delve deeper into the world of agents, you’ll find comprehensive documentation in LangChain.

To provide a brief overview, we’ve engineered a ZeroShotAgent, equipping it with tools like DuckDuckGo search and paraphrasing capabilities. The agent interacts with user queries, employing these tools in a ReAct(Reason + Act) manner to generate response. 

Here is the code for agent: 


By tracing the agent’s actions, we gain insights into the sequence and tools utilized by the agent, as well as the intermediate outputs it produces. This tracing capability proves invaluable for agent design and debugging, allowing us to identify and resolve errors efficiently.


LangSmith - Agent executor 9


The trace reveals that the agent initiates with an LLM call, proceeds to search for DuckDuckGo Results Json, engages the paraphraser, and subsequently executes two additional LLM calls to generate responses, which in our case are the suggested blog topics. 

These traces underscore the critical role tracing plays in debugging and designing effective LLM applications. It’s important to note that all this information is meticulously logged in LangSmith, offering a treasure trove of insights for various applications, which we’ll briefly explore in subsequent sections. 


Sharing your trace 

LangSmith simplifies the process of sharing the logged runs. This feature facilitates easy publishing and replication of your work. For example, if you encounter a bug or unexpected output under specific conditions, you can share it with your team or create an issue on LangChain for collaborative troubleshooting.

By simply clicking the share option located at the top right corner of the page, you can effortlessly distribute your run for analysis and resolution 


LangSmith - Agent executor 10


LangSmith Run shared 11  


Scenario # 02: Testing and evaluation 

Why is testing and evaluation essential for LLMs? 

The development of high-quality, production-grade Large Language Model (LLM) applications is a complex task fraught with challenges, including: 

  • Non-deterministic Outputs: LLM models operate probabilistically, often yielding varying outputs for the same input prompt. This unpredictability persists even when utilizing a temperature setting of 0, as model weights are not static over time. 
  • API Opacity: Models underpinning APIs undergo changes and updates, making it imperative to assess their evolving behavior. 
  • Security Concerns: LLMs are susceptible to prompt injections, posing potential security risks. 
  • Latency Requirements: Many applications demand swift response times. 

These challenges underscore the critical need for rigorous testing and evaluation in the development of LLM applications. 

Step-by-step LLM evaluation process 

1. Define an LLM chain 

Begin by defining an LLM and creating a simple LLM chain aimed at generating concise responses to specific queries. This LLM will serve as the subject of evaluation and testing. 


2. Create a dataset 

Generate a compact dataset comprising question-and-answer pairs related to computer science abbreviations and terms. This data set, containing both questions and their corresponding answers, will be used to evaluate and test the model. 


After executing the code, navigate to LangSmith. Within the “Datasets & Testing” section, you’ll find the dataset you’ve created. By expanding it under “examples,” you’ll encounter the six specific examples you’ve defined for evaluation.  


LangSmith - Datasets and testing 13  


3. Evaluation 

For our evaluations, we’ll make use of the LangChain evaluator, specifically focusing on the ‘Correctness: QA evaluation.’ QA evaluators play a vital role in assessing the accuracy of responses to user queries, especially when you have a dataset with reference labels or context documents. Our approach incorporates all three QA evaluators: 

  • “context_qa”: This evaluator directs the LLM chain to utilize reference “context” (supplied through example outputs) to ascertain correctness. 
  • “qa”: It prompts an LLMChain to directly appraise a response as either “correct” or “incorrect,” based on the reference answer. 
  • “cot_qa”: This evaluator closely resembles “context_qa” but introduces a chain of thought “reasoning” before delivering a final verdict. This approach generally leads to responses that align more closely with human judgments, albeit with a slightly increased token and runtime cost. 

Below is the code to kick start the evaluation on the dataset. 


4. Reviewing evaluation outcomes 

Upon completing the evaluation, LangSmith provides a platform to examine the results. Navigate to the “Dataset & Testing” section, select the dataset used for the evaluation, and access “Test Runs.” You’ll find the designated Test Run Name and feedback from the evaluator. 

By clicking on the Test Run Name, you can delve deeper, inspect feedback for individual examples, and view side-by-side comparisons. Clicking on any reference example reveals detailed information. 


LangSmith traces 14


For instance, the first example received a perfect score of 1 from all three evaluators. The generated and expected outputs are presented side by side, accompanied by feedback and comments from the evaluator. 


LangSmith - Run 15


However, in a different example, one evaluator issued a score of 1, while the other two scored it as 0. Upon closer examination, it becomes apparent that there exists a disparity between the generated and expected outputs 

LangSmith Run - 16

LLM chain LangSmith - 17


The “cot-qa” evaluator assigned a score of 1, and further exploration of the comments reveals that, although the generated output was correct, discrepancies in the dataset contextually influenced the evaluation. It’s worth noting that the “cot-qa” evaluator spotted this, demonstrating its ability to notice context-related subtleties that other evaluators might miss. 

Run - LangSmith 18


Varied evaluation choices (Delve deeper) 

The evaluator showcased in the previous example is but one of several available within LangSmith. Each option serves specific purposes and holds its unique value. For a detailed understanding of each evaluator’s specific functions and to explore illustrative examples, we encourage you to explore LangChain Evaluators where in-depth coverage of these available options is provided. 


Implement the power of tracing and evaluation with LangSmith 

In summary, our journey through LangSmith has underscored the critical importance of evaluating and tracing Large Language Model applications. These processes are the cornerstone of reliability and high performance, ensuring that your models meet rigorous standards. 

With LangSmith, we’ve explored the power of precise tracing and evaluation, empowering you to optimize your models confidently. As you continue your exploration, remember that your LLM applications hold limitless potential, and LangSmith is your guiding light on this path of discovery. Thank you for joining us on this transformative journey through the world of LLM Evaluation and Tracing with LangSmith. 

This blog discusses the different tasks and techniques used in natural language processing. We will be using python code to demo what and how each task works. We will also discuss why these tasks and techniques are essential for natural language processing. 


Introduction

According to a survey, only 32 percent of the business data is put to work, and 68 percent goes unleveraged. Most data are often unstructured. According to estimations, 80 to 90 percent of business data is unstructured, and so are emails, reports, social media posts, websites, and documents. Using NLP techniques, it became possible for machines to manage and analyze unstructured data accurately and quickly.  

Computers can now understand, manipulate, and interpret human language. Businesses use NLP to improve customer experience, listen to customer feedback, and find market gaps. Almost 50% of companies today use NLP applications, and 25% plan to do so in 12 months.   

The future of customer care is NLP. Customers prefer mobile messaging and chatbots over the legacy voice channel. It is four times more accurate. According to the IBM market survey, 52% of global IT professionals reported using or planning to use NLP to improve customer experience. Chatbots can resolve 80% of routine tasks and customer questions with a 90% success rate by 2022. Estimates show that using NLP in chatbots will save companies USD 8 billion annually.     

The NLP market was at 3 billion US dollars in 2017 and is predicted to rise to 43 billion US dollars in 2025, around 14 times higher. 


Natural Language Processing (NLP)  

Natural language processing is a branch of artificial intelligence that enables computers to analyze, understand, and drive meaning from a human language using machine learning and respond to it. NLP combines computational linguistics with artificial intelligence and machine learning to create an intelligent system capable of understanding and responding to text or voice data the same way humans do. 


NLP analyzes the syntax and semantics of the text to understand the meaning and structure of human language. Then it transforms this linguistic knowledge into a machine-learning algorithm to solve real-world problems and perform specific tasks.   

Natural language is challenging to comprehend, which makes NLP a challenging task. Mastering a language is easy for humans, but implementing NLP becomes difficult for machines because of the ambiguity and imprecision of natural language. 


NLP requires syntactic and semantic analysis to convert human language into a machine-readable form that can be processed and interpreted. 


Syntactic analysis  

Syntactic analysis is the process of analyzing language with its formal grammatical rules. It is also known as syntax analysis or parsing formal grammatical rules applied to a group of words but not a single word. After verifying the correct syntax, it takes text data as input and creates a structural input representation. It creates a parse tree. A syntactically correct sentence does not necessarily make sense. It needs to be semantically correct to make sense.   


Semantic analysis  

Semantic analysis is the process of figuring out the meaning of the text. It enables computers to interpret the words by analyzing sentence structure and the relationship between individual words of the sentence. Because of language’s ambiguous and polysemic nature, semantic analysis is a particularly challenging area of NLP. It analyzes the sentence structure, word interaction, and other aspects to discover the meaning and topic of the text.  


NLP tasks and techniques: 

Before proceeding further, ensure you run the below code block to install all the dependencies. 


!pip install -U spacy 

!python -m spacy download en 

!pip install nltk 

!pip install prettytable 

Here are some everyday tasks performed in syntactic and semantic analysis:  


Tokenization  

Tokenization is a common task in NLP. It separates natural language text into smaller units called tokens. For example, in Sentence tokenization paragraph separates into sentences, and word tokenization splits the words of a sentence.  


The code below shows an example of word tokenization using spaCy.   


Code:  

import spacy 

nlp = spacy.load("en_core_web_sm") 

doc = nlp("Data Science Dojo is the leading platform providing data science training.") 

for token in doc: 

    print(token.text) 


Output: 


Data 

Science 

Dojo 

is 

the 

leading 

platform 

providing 

data 

science 

training 

. 

Part-of-speech tagging  

Part of speech or grammatical tagging labels each word as an appropriate part of speech based on its definition and context. POS tagging helps create a parse tree that helps understand word relationships. It also helps in Named Entity Recognition, as most named entities are nouns, making it easier to identify them. 

In the code below, we use pos_ attribute of the token to get the part of speech for the universal pos tag set.   


Code:  

import spacy 

from prettytable import PrettyTable 

table = PrettyTable(['Token', 'Part of speech', 'Tag']) 

nlp = spacy.load("en_core_web_sm") 

doc = nlp("Data Science Dojo is the leading platform providing data science training.") 

for token in doc: 

  table.add_row([token.text, token.pos_, token.tag_]) 

print(table) 


Output:    

Part of speech tag
Part of speech tag

Demo: 

Try it yourself with this Analyze Text Demo. 

Analyze Text
Analyze Text


Dependency and Consistency parsing  

Dependency parsing is how grammatical structure in a sentence is analyzed to find out the related word and their relationship. Each relationship has one head and one dependent. Then, a label based on the nature of dependency is assigned between the head and the dependent.  

Consistency parsing is a process by which phrase structure grammar is identified to visualize the entire syntactic structure.   

In the code below, we created a dependency tree using the displacy visualizer of spacy.  


Code:  


import spacy 

nlp = spacy.load("en_core_web_sm") 

doc = nlp("Data Science Dojo is the leading platform providing data science training.")         

spacy.displacy.render(doc, style="dep") 


Output:  

  output


Demo:  

Try it yourself with this Analyze Text Demo. 


Lemmatization and stemming  

We use inflected forms of the word when we speak or write. These inflected forms are created by adding prefixes or suffixes to the root form. In the process of lemmatization and stemming, we are grouping similar inflected forms of a word into a single root word. In this way, we link all the words with the same meaning as a single word, which is simpler to analyze by the computer.  


The word’s root form in lemmatization is lemma, and in stemming is a stem. Lemmatization and stemming do the same task of grouping inflected forms, but they are different. Lemmatization considers the word and its context in the sentence, while stemming only considers the single word. So, we consider POS tags in lemmatization but not in stemming. That is why lemma is an actual dictionary word, but stem might not be.  

Now we are applying lemmatization using spacy.   

Code:    


import spacy 

nlp = spacy.load('en_core_web_sm', disable=['parser', 'ner']) 

doc = nlp("Data Science Dojo is the leading platform providing data science training.") 

lemmatized = [token.lemma_ for token in doc] 

print("Original: \n", doc) 

print("\nAfter Lemmatization: \n", " ".join(lemmatized)) 


Output:   

Original 

 Data Science Dojo is the leading platform providing data science training. 

After Lemmatization:  

 Data Science Dojo is the lead platform to provide datum science training.  


Unfortunately, spacy does not contain any function for stemming.  

Let us use Porter Stemmer from nltk to see how stemming works.  


Code: 

import nltk 

nltk.download('punkt') 

from nltk.stem import PorterStemmer 

from nltk.tokenize import word_tokenize   

ps = PorterStemmer() 

sentence = "Data Science Dojo is the leading platform providing data science training." 

words = word_tokenize(sentence) 

stemmed = [ps.stem(token) for token in words]  

print("Original: \n", " ".join(words)) 

print("\nAfter Stemming: \n", " ".join(stemmed)) 


Output:    

Original:  

 Data Science Dojo is the leading platform providing data science training . 

After Stemming:  

 data scienc dojo is the lead platform provid data scienc train . 


Stop word removal  

Stop words are the frequent words that are used in any natural language. However, they are not particularly useful for text analysis and NLP tasks. Therefore, we remove them, as they do not play any role in defining the meaning of the text.   


Code: 


import spacy 

nlp = spacy.load("en_core_web_sm") 

doc = nlp("Data Science Dojo is the leading platform providing data science training.") 

token_list = [ token.text for token in doc ] 

filtered_sentence = [ word for word in token_list if nlp.vocab[word].is_stop == False ]  

print("Tokens:\n",token_list) 

print("\nAfter stop word removal:\n", filtered_sentence)    


Output: 


Tokens: 

['Data', 'Science', 'Dojo', 'is', 'the', 'leading', 'platform', 'providing', 'data', 'science', 'training', '.'] 


After stop word removal: 

['Data', 'Science', 'Dojo', 'leading', 'platform', 'providing', 'data', 'science', 'training', '.'] 


Demo: 

Try it yourself with this Cleanse Stop Words Demo. 

Cleanse Stop Word Demo


Named entity recognition  

Named entity recognition is an NLP technique that extracts named entities from the text and categorizes them into semantic types like organization, people, quantity, percentage, location, time, etc. Identifying named entities helps identify the critical element in the text, which can help sort the unstructured data and find valuable information.   


Code: 


import spacy 

from prettytable import PrettyTable 

nlp = spacy.load("en_core_web_sm") 

doc = nlp("Data Science Dojo was founded in 2013 but it was a free Meetup group long before the official launch. With the aim to bring the knowledge of data science to everyone, we started hosting short Bootcamps with the most comprehensive curriculum. In 2019, the University of New Mexico (UNM) added our Data Science Bootcamp to their continuing education department. Since then, we've launched various other trainings such as Python for Data Science, Data Science for Managers and Business Leaders. So far, we have provided our services to more than 10,000 individuals and over 2000 organizations.") 

table = PrettyTable(["Entity", "Start Position", "End Position", "Label"]) 

for ent in doc.ents: 

    table.add_row([ent.text, ent.start_char, ent.end_char, ent.label_]) 

print(table) 

spacy.displacy.render(doc, style="ent") 


Output:   


Named Entity
Named Entity

Visualization:   


Named Entity Visual
Named Entity Visual


Demo: 

Try it yourself with this Text Entity Extractor Demo. 


Text Entity Extractor Demo


Sentiment analysis 

Sentiment analysis, also referred to as opinion mining, uses natural language processing to find and extract sentiments from the text. It determines whether the data is positive, negative, or neutral.  


Some of the real-world applications of sentiment analysis are:  

  • Customer support  
  • Customer feedback  
  • Brand monitoring  
  • Product analysis  
  • Market research  


Demo: 

Try it yourself with this Opinion Mining Demo. 


Opinion Mining Demo
Opinion Mining Demo

Conclusion:  

We have discussed natural language processing and what common tasks it performs in natural language processing. Then, we saw how we can perform different functions in spacy and nltk and why they are essential in natural language processing.   

Full Code Available 

 We know about the different tasks and techniques we perform in natural language processing, but we have yet to discuss the applications of natural language processing. For that, you can follow this blog. 

Read more about: 

Blog: NLP Applications


Upgrade your data science skillset with our Python for Data Science and Data Science Bootcamp training!  


This blog will discuss the different Natural Language Processing applications. We will see the applications and what problems they solve in our daily life. 

 Introduction   

One of the essential things in the life of a human being is communication. We need to communicate with other human beings to deliver information, express our emotions, present ideas, and much more. The key to communication is language. We need a common language to communicate, which both ends of the conversation can understand. Doing this is possible for humans, but it might seem a bit difficult if we talk about communicating with a computer system or the computer system communicating with us. 

But we have a solution for that, Artificial Intelligence, or more specifically, a branch of Artificial Intelligence known as Natural Language Processing (NLP). Natural Language Processing enables the computer system to understand and comprehend information the same way humans do. It helps the computer system understand the literal meaning and recognize the sentiments, tone, opinions, thoughts, and other components that construct a proper conversation. 

Natural Language Processing (NLP)
Applications of Natural Language Processing

After making the computer understand human language, a question arises in our minds, how can we utilize this ability of a computer to benefit humankind? 

Natural Language Processing Applications: 

Let’s answer this question by going over some Natural Language Processing applications and understanding how they decrease our workload and help us complete many time-taking tasks more quickly and efficiently. 

1. Email filtering 

Email is a part of our everyday life. Whether it is related to work or studies or many other things, we find ourselves plunged into the pile of emails. We receive all kinds of emails from various sources; some are work-related or from our dream school or university, while others are spam or promotional emails. Here Natural Language Processing comes to work. It identifies and filters incoming emails into “important” or “spam” and places them into their respective designations.


Large language model bootcamp


2. Language translation 

There are as many languages in this world as there are cultures, but not everyone understands all these languages. As our world is now a global village owing to the dawn of technology, we need to communicate with other people who speak a language that might be foreign to us. Natural Language processing helps us by translating the language with all its sentiments.  

3. Smart assistants 

In today’s world, every new day brings in a new smart device, making this world smarter and smarter by the day. And this advancement is not just limited to machines. We have advanced enough technology to have smart assistants, such as Siri, Alexa, and Cortana. We can talk to them like we talk to normal human beings, and they even respond to us in the same way.

All of this is possible because of Natural Language Processing. It helps the computer system understand our language by breaking it into parts of speech, root stem, and other linguistic features. It not only helps them understand the language but also in processing its meaning and sentiments and answering back in the same way humans do. 

 4. Document analysis 

Another one of NLP’s applications is document analysis. Companies, colleges, schools, and other such places are always filled to the brim with data, which needs to be sorted out properly, maintained, and searched for. All this could be done using NLP. It not only searches a keyword but also categorizes it according to the instructions and saves us from the long and hectic work of searching for a single person’s information from a pile of files. It is not only limited to this but also helps its user to inform decision-making on claims and risk management. 

5. Online searches 

In this world full of challenges and puzzles, we must constantly find our way by getting the required information from available sources. One of the most extensive information sources is the internet. We type what we want to search and checkmate! We have got what we wanted. But have you ever thought about how you get these results even when you do not know the exact keywords you need to search for the needed information? Well, the answer is obvious.

It is again Natural Language Processing. It helps search engines understand what is asked of them by comprehending the literal meaning of words and the intent behind writing that word, hence giving us the results, we want. 

 6. Predictive text 

A similar application to online searches is predictive text. It is something we use whenever we type anything on our smartphones. Whenever we type a few letters on the screen, the keyboard gives us suggestions about what that word might be and when we have written a few words, it starts suggesting what the next word could be. These predictive texts might be a little off in the beginning.

Still, as time passes, it gets trained according to our texts and starts to suggest the next word correctly even when we have not written a single letter of the next word. All this is done using NLP by making our smartphones intelligent enough to suggest words and learn from our texting habits. 

7. Automatic summarization 

With the increasing inventions and innovations, data has also increased. This increase in data has also expanded the scope of data processing. Still, manual data processing is time taking and is prone to error. NLP has a solution for that, too, it can not only summarize the meaning of information, but it can also understand the emotional meaning hidden in the information. Thus, making the summarization process quick and impeccable. 

 8. Sentiment analysis 

The daily conversations, the posted content and comments, book, restaurant, and product reviews, hence almost all the conversations and texts are full of emotions. Understanding these emotions is as important as understanding the word-to-word meaning. We as humans can interpret emotional sentiments in writings and conversations, but with the help of natural language processing, computer systems can also understand the sentiments of a text along with its literal meaning. 

 9. Chatbots  

With the increase in technology, everything has been digitalized, from studying to shopping, booking tickets, and customer service. Instead of waiting a long time to get some short and instant answers, the chatbot replies instantly and accurately. NLP gives these chatbots conversational capabilities, which help them respond appropriately to the customer’s needs instead of just bare-bones replies.

Chatbots also help in places where human power is less or is not available round the clock. Chatbots operating on NLP also have emotional intelligence, which helps them understand the customer’s emotional sentiments and respond to them effectively. 

 10. Social media monitoring   

Nowadays, every other person has a social media account where they share their thoughts, likes, dislikes, experiences, etc., which tells a lot about the individuals. We do not only find information about individuals but also about the products and services. The relevant companies can process this data to get information about their products and services to improve or amend them. NLP comes into play here. It enables the computer system to understand unstructured social media data, analyze it and produce the required results in a valuable form for companies.

Conclusion: 

We now understand that NLP has many applications, spreading its wings in almost every field. Help decrease manual labor and do the tasks accurately and efficiently. 

In this blog, we discussed the applications of AI in healthcare. We took a deep dive into an application of AI, and prognosis prediction using an exercise. We made a simple prognosis detector with an explanation of each step. Our predictor takes symptoms as inputs and predicts the prognosis using a classification model.

Introduction to prognosis prediction

The role of data science and AI (Artificial Intelligence) in the Healthcare industry is not limited to predicting and tracking disease spread. Now, it has become possible to learn the causes of whatever symptoms you are experiencing, such as cough, fever, and body pain, without visiting a doctor and self-treating it at home. Platforms like Ada Health and Sensely can diagnose the symptoms you report.

If you have not already, please go back and read AI & Healthcare. If you have already read it, you will remember I wrote, “Predictive analysis, using historical data to find patterns and predict future outcomes can find the correlation between symptoms, patients’ habits, and diseases to derive meaningful predictions from the data.”

This tutorial will do just that: Predict the prognosis with symptoms as our input.

Exercise: Predict prognosis using symptoms as input

Prognosis Prediction Process

Import required modules

Let us start by importing all the libraries needed in the exercise. We import pandas as we will be reading CSV files as Data Frame. We are importing Label Encoder from sklearn.preprocessing package. Label Encoder is a utility class to convert non-numerical labels to numerical labels. In this exercise, we predict prognosis using symptoms, so it is a classification task.

We are using RandomForestClassifier, which consists of many individual decision trees that work as an ensemble. Learn more about RandomForestClassifier by enrolling in our Data Science Bootcamp, a remote instructor-led Bootcamp. We also require classification reports and accuracy score metrics to measure the model’s performance.

import numpy as np
import pandas as pd
from sklearn.preprocessing import LabelEncoder
from sklearn.ensemble import RandomForestClassifier
from sklearn.metrics import classification_report, accuracy_score

Read CSV files

We are using this Kaggle dataset for our exercise.

It has two files, Training.csv and Testing.csv, containing training and testing data, respectively. You can download these files by going to the data section of the above link.

Read CSV files into Data Frame using pandas read_csv() function. It reads comma-separated files at supplied file path into DataFrame. It takes a file path as a parameter, so provide the right file path where you have downloaded the files.

train = pd.read_csv("File path of Training.csv")
test = pd.read_csv("File path of Testing.csv")

Check samples of the training dataset

To check what the data looks like, let us grab the first five rows of the DataFrame using the head() function.

We have 133 features. We want to predict prognosis so that it would be our target variable. The rest of the 132 features are symptoms that a person experience. The classifier would use these 132 symptoms feature to predict prognosis.

train.head()
data frame
Head Data frame

The training set holds 4920 samples and 133 features, as shown by the shape attribute of the DataFrame.

train.shape
Output
(4920, 133)

Descriptive analysis

Description of the data in the DataFrame can be seen by describe() method of the DataFrame. We see no missing values in our DataFrame as the count of all the features is 4920, which is also the number of samples in our DataFrame. We also see that all the numeric features are binary and have a value of either 1 or 0.

train.describe()
Describe data frame
Describe data frame
train.describe(include=['object'])
data frame objects
Describe data frame objects

Our target variable prognosis has 41 unique values, so there are 41 diseases in which the model will classify input. There are 120 samples for each unique prognoses in our dataset.

train['prognosis'].value_counts()
Prognosis Column
Value Count of Prognosis Column

There are 132 symptoms in our dataset. The names of the symptoms will be listed if we use this code block.

possible_symptoms = train[train.columns.difference(['prognosis'])].columnsprint(list(possible_symptoms))

Output
['abdominal_pain', 'abnormal_menstruation', 'acidity', 'acute_liver_failure', 'altered_sensorium', 'anxiety', 'back_pain', 'belly_pain', 'blackheads', 'bladder_discomfort', 'blister', 'blood_in_sputum', 'bloody_stool', 'blurred_and_distorted_vision', 'breathlessness', 'brittle_nails', 'bruising', 'burning_micturition', 'chest_pain', 'chills', 'cold_hands_and_feets', 'coma', 'congestion', 'constipation', 'continuous_feel_of_urine', 'continuous_sneezing', 'cough', 'cramps', 'dark_urine', 'dehydration', 'depression', 'diarrhoea', 'dischromic _patches', 'distention_of_abdomen', 'dizziness', 'drying_and_tingling_lips', 'enlarged_thyroid', 'excessive_hunger', 'extra_marital_contacts', 'family_history', 'fast_heart_rate', 'fatigue', 'fluid_overload', 'fluid_overload.1', 'foul_smell_of urine', 'headache', 'high_fever', 'hip_joint_pain', 'history_of_alcohol_consumption', 'increased_appetite', 'indigestion', 'inflammatory_nails', 'internal_itching', 'irregular_sugar_level', 'irritability', 'irritation_in_anus', 'itching', 'joint_pain', 'knee_pain', 'lack_of_concentration', 'lethargy', 'loss_of_appetite', 'loss_of_balance', 'loss_of_smell', 'malaise', 'mild_fever', 'mood_swings', 'movement_stiffness', 'mucoid_sputum', 'muscle_pain', 'muscle_wasting', 'muscle_weakness', 'nausea', 'neck_pain', 'nodal_skin_eruptions', 'obesity', 'pain_behind_the_eyes', 'pain_during_bowel_movements', 'pain_in_anal_region', 'painful_walking', 'palpitations', 'passage_of_gases', 'patches_in_throat', 'phlegm', 'polyuria', 'prominent_veins_on_calf', 'puffy_face_and_eyes', 'pus_filled_pimples', 'receiving_blood_transfusion', 'receiving_unsterile_injections', 'red_sore_around_nose', 'red_spots_over_body', 'redness_of_eyes', 'restlessness', 'runny_nose', 'rusty_sputum', 'scurring', 'shivering', 'silver_like_dusting', 'sinus_pressure', 'skin_peeling', 'skin_rash', 'slurred_speech', 'small_dents_in_nails', 'spinning_movements', 'spotting_ urination', 'stiff_neck', 'stomach_bleeding', 'stomach_pain', 'sunken_eyes', 'sweating', 'swelled_lymph_nodes', 'swelling_joints', 'swelling_of_stomach', 'swollen_blood_vessels', 'swollen_extremeties', 'swollen_legs', 'throat_irritation', 'toxic_look_(typhos)', 'ulcers_on_tongue', 'unsteadiness', 'visual_disturbances', 'vomiting', 'watering_from_eyes', 'weakness_in_limbs', 'weakness_of_one_body_side', 'weight_gain', 'weight_loss', 'yellow_crust_ooze', 'yellow_urine', 'yellowing_of_eyes', 'yellowish_skin']

There are 41 unique prognoses in our dataset. The name of all prognoses will be listed if we use this code block:

list(train['prognosis'].unique())
Output
['Fungal infection','Allergy','GERD','Chronic cholestasis','Drug Reaction','Peptic ulcer diseae','AIDS','Diabetes ','Gastroenteritis','Bronchial Asthma','Hypertension ','Migraine','Cervical spondylosis','Paralysis (brain hemorrhage)','Jaundice','Malaria','Chicken pox','Dengue','Typhoid','hepatitis A','Hepatitis B','Hepatitis C','Hepatitis D','Hepatitis E','Alcoholic hepatitis','Tuberculosis','Common Cold','Pneumonia','Dimorphic hemmorhoids(piles)','Heart attack','Varicose veins','Hypothyroidism','Hyperthyroidism','Hypoglycemia','Osteoarthristis','Arthritis','(vertigo) Paroymsal  Positional Vertigo','Acne','Urinary tract infection','Psoriasis','Impetigo']

Data visualization

new_df = train[train.columns.difference(['prognosis'])]
#Maximum Symptoms present for a Prognosis are 17
new_df.sum(axis=1).max()
Minimum Symptoms present for a Prognosis are 3
new_df.sum(axis=1).min()
series = new_df.sum(axis=0).nlargest(n=15)
pd.DataFrame(series, columns=["Occurance"]).loc[::-1, :].plot(kind="barh")
bar chart
Horizontal bar chart for Occurrence column

Fatigue and vomiting are the symptoms most often seen.

Encode object prognosis

Our target variable is categorical features. Let us create an instance of Label Encoder and fit it with the prognosis column of train data and test data. It will encode all possible categorical values in numerical values.

label_encoder = LabelEncoder()
label_encoder.fit(pd.concat([train['prognosis'], test['prognosis']]))

It concludes the data preparation step. Now, we can move on to model training with this data.

Training and evaluating model

Let us train a RandomForestClassifier with the prepared data. We initialize RandomForestClassifier, fit the features and label in it then finally make a prediction on our test data.

In the end, we transform label encoded prognosis values back to the original form using the fit_transform() method of the LabelEncoder object.

random_forest = RandomForestClassifier()
random_forest.fit(train[train.columns.difference(['prognosis'])], label_encoder.fit_transform(train['prognosis']))
y_pred = random_forest.predict(test[test.columns.difference(['prognosis'])])
y_true = label_encoder.fit_transform(test['prognosis'])
print("Accuracy:", accuracy_score(y_true, y_pred))
print(classification_report(y_true, y_pred, target_names=test['prognosis']))
Classification report

Predict prognosis by taking symptoms as input

We have our model trained and ready to make predictions. We need to create a function that takes symptoms as input and predicts the prognosis as output. The function predict_prognosis() below is just doing that.

We take input features as a string of symptoms separated by space. We strip the string to remove spaces at the beginning and end of the string. We split this string and created a list of symptoms. We cannot use this list directly in the model for prediction as it contains symptoms’ names, but our model takes a list of 0 and 1 for the absence and presence of symptoms. Finally, with the features in the desired form, we predict the prognosis and print the predicted prognosis.

def predict_prognosis():
  print("List of possible Symptoms you can enter: ", list(train[train.columns.difference(['prognosis'])].columns))
  input_symptoms = list(input("\nEnter symptoms space separated: ").strip().split())
  print(input_symptoms)
  test_value = []
  for symptom in train[train.columns.difference(['prognosis'])].columns:
    if symptom in input_symptoms:
      test_value.append(1)
    else:
      test_value.append(0)
    np_test = np.array(test_value).reshape(1, -1)
    encoded_label = random_forest.predict(np_test)
  predicted_label = label_encoder.inverse_transform(encoded_label)[0]
  print("Predicted Prognosis: ", predicted_label)
predict_prognosis()

Give input symptoms:

Blog | Data Science Dojo

Predicted prognoses

Suppose we have these symptoms abdominal pain, acidity, anxiety, and fatigue. To predict prognosis, we must enter the symptoms in comma separate fashion. The system will separate the symptoms, transform them into a form model that can predict and finally output the prognosis.
Output prognosis
Output prognosis

Conclusion

To sum up, we discussed the applications of AI in healthcare. Took a deep dive into an application of AI, and prognosis prediction using an exercise. Created a prognosis predictor with an explanation of each step. Finally, we tested our predictor by giving it input symptoms and got the prognosis as output.

Full Code Available!