For a hands-on learning experience to develop Agentic AI applications, join our Agentic AI Bootcamp today. Early Bird Discount

Key Takeaways

  • Hermes Agent is an open-source autonomous AI agent by Nous Research that learns and improves the longer you use it
  • Its built-in learning loop — persistent memory, autonomous skill creation, and user modeling — is what separates it from every other open-source agent available today
  • By the end of this guide you’ll have Hermes installed, WhatsApp connected, and your first AI briefing scheduled — no email setup, no business account

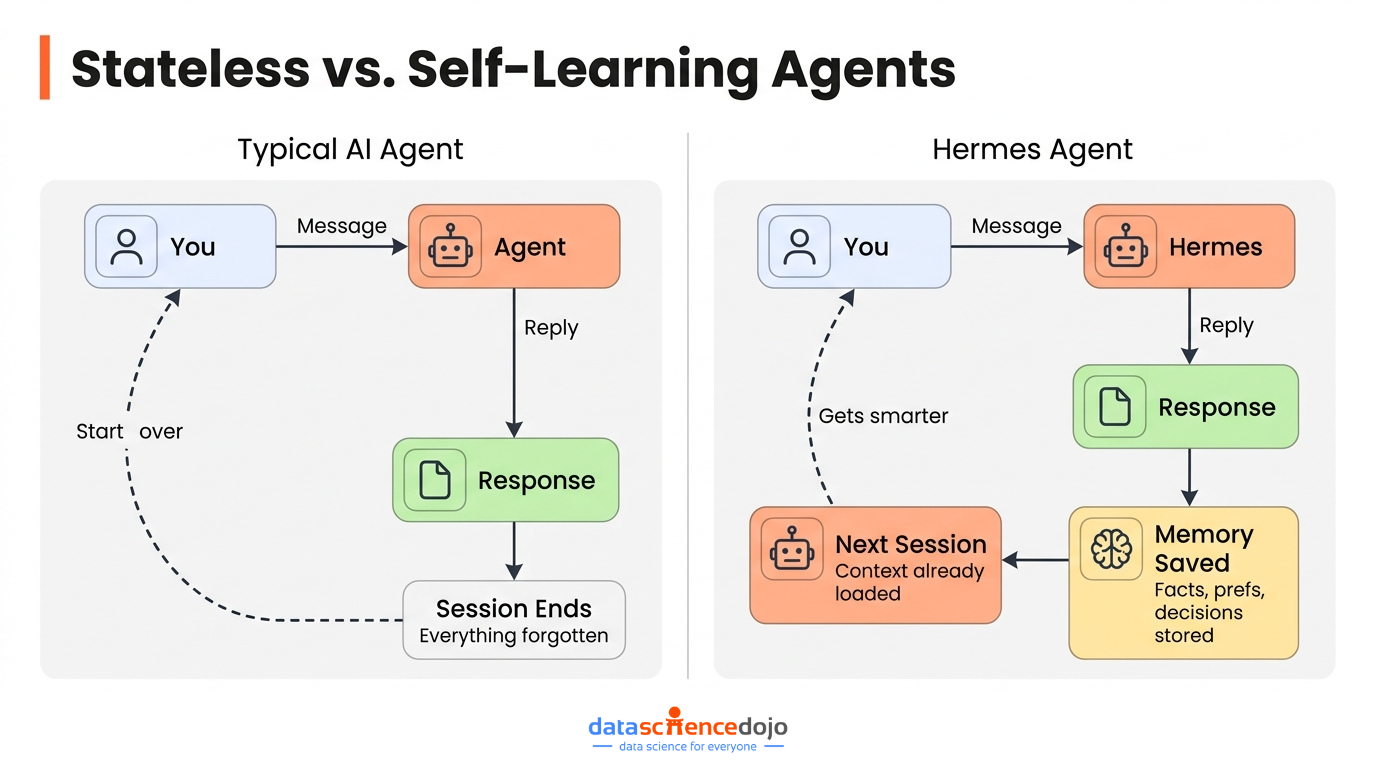
Most AI tools forget everything the moment you close the tab. You come back the next day, open a new session, and you’re explaining yourself from scratch again. Your name, your preferences, the context of what you were working on — gone.

Hermes Agent was built on the premise that this is unacceptable for anything you’d actually call an agent. An agent that forgets is just a chatbot with a fancier UI. Real autonomy requires memory, continuity, and the ability to get better at your specific tasks over time — not just smarter responses within a single session.

Released in February 2026 by Nous Research under the MIT license, Hermes crossed 140,000 GitHub stars in under three months and became the most-used agent on OpenRouter. That’s not explained by novelty. It’s explained by what the framework actually delivers that others don’t.

This guide covers how Hermes works under the hood, how it compares to OpenClaw and the major agent frameworks, and closes with a step-by-step setup guide for getting Hermes running and delivering a daily AI briefing to your WhatsApp using just your personal number.

The Problem Hermes Was Built to Solve

Stateless vs Self Learning Agents like Hermes

Open a new session with most AI agents, even good ones, and you face the same three problems:

  • No memory of previous conversations. Every session starts cold.
  • No accumulated skill. The agent approaches your tasks the same way on day 100 as it did on day 1.
  • No model of you. It doesn’t know your preferences, your projects, your communication style, or what you’ve already decided.

The frustration compounds fast. Ask an agent to do something complex that spans multiple days and you’ll spend more time re-explaining context than you will on the actual work.

Most frameworks treat memory as an optional plugin — something you wire in if you need it. Hermes treats it as a first-class architectural requirement. The same goes for skill creation and user modeling. These aren’t add-ons. They’re built into how the system works by default, from the first conversation.

Understanding why this matters at a deeper level — why continuity, context, and behavioral reuse are the actual bottlenecks in agentic systems — is something worth reading about separately. The concept of context engineering covers exactly this: why what surrounds a prompt often matters more than the prompt itself, and how production agents are built to manage that surrounding layer intelligently.

If you’re new to autonomous agents and want grounding before diving into a specific tool, it’s worth understanding what agentic AI actually is and what separates it from standard LLM applications before going further.

How Hermes Agent Works: The Learning Loop

The Hermes Agent Learning Loop

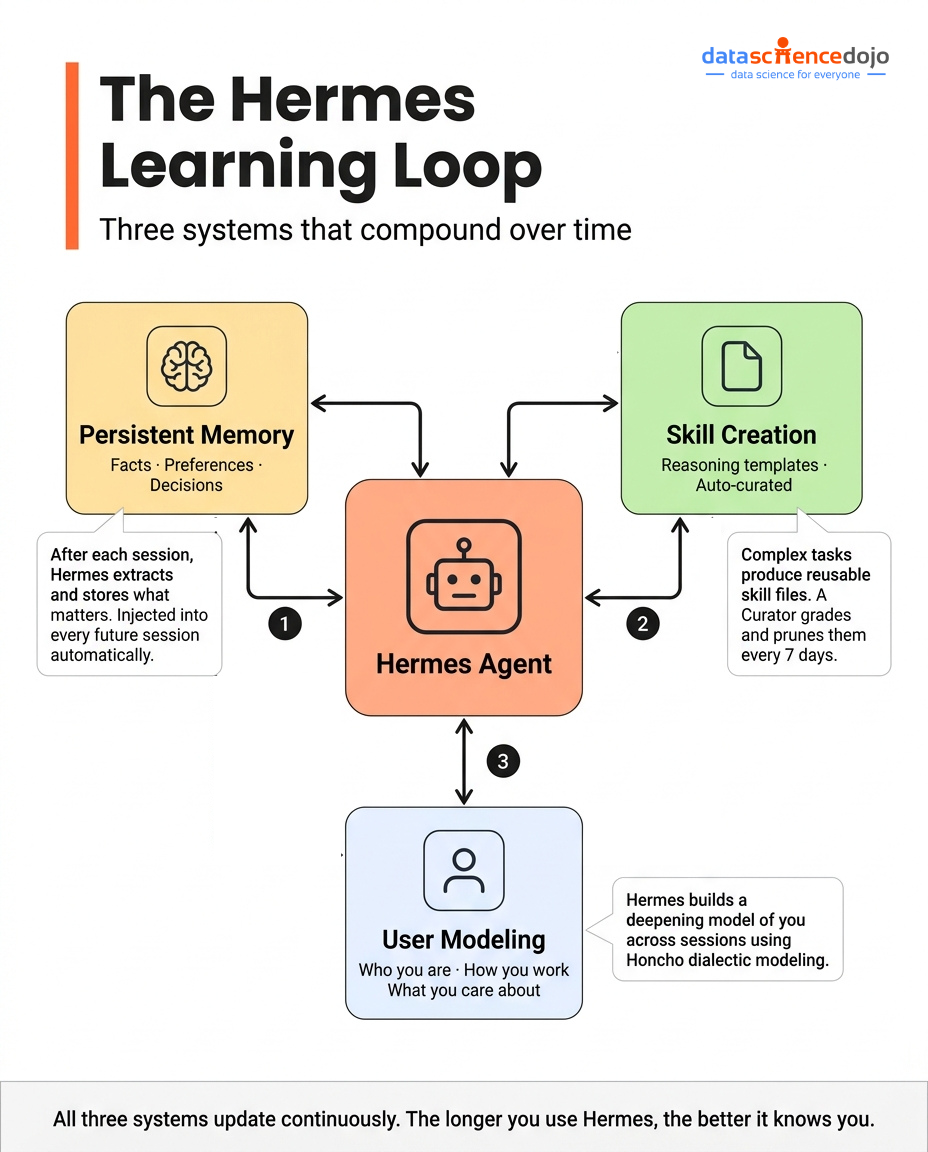
The core of Hermes is what Nous Research calls the learning loop. It has three distinct but interlocking components, and all three have to work together for the system to behave the way it’s designed to.

Persistent Memory

How Hermes Agent Manages Persistent Memory

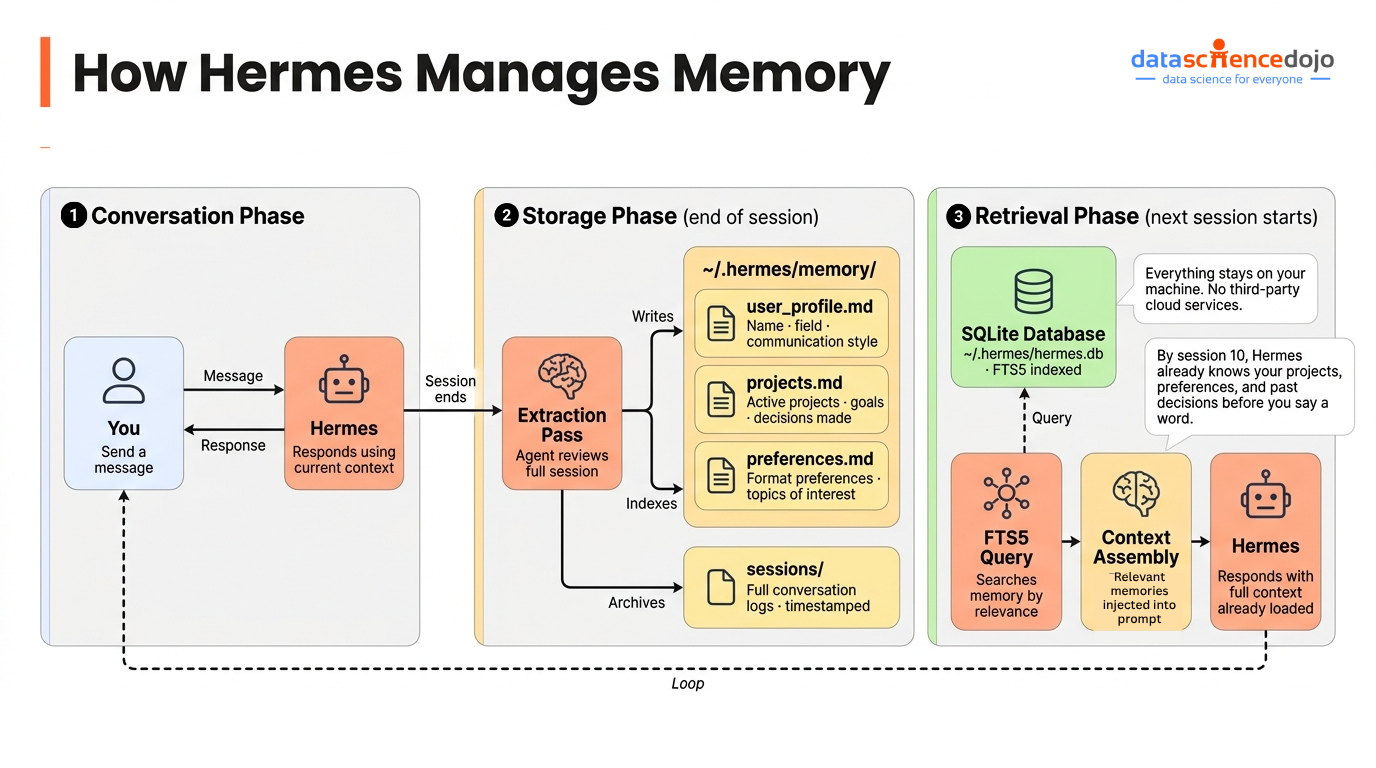
Everything Hermes learns about you and your work lives in a local SQLite database at ~/.hermes/. Nothing passes through third-party cloud infrastructure. Your data stays on your machine.

At the end of each conversation, Hermes runs an extraction pass over the session — pulling out facts, preferences, decisions, and context worth preserving. These get stored and indexed via SQLite FTS5, which gives the system full-text search across all past sessions.

When a new conversation starts, Hermes queries that database and injects relevant memories into context before the model ever sees your first message.

  • By the second conversation, Hermes knows your name, your field, and what you’re working on
  • By the fifth, it knows how you like things formatted, what topics you care about, and what questions you’ve already answered
  • By the tenth, it’s making connections between recent news and your specific projects without being asked

This is the compounding effect that makes persistent memory more than a convenience feature. It changes what the agent is capable of producing over time — not because the model got smarter, but because the context it’s operating in became richer and more personal.

It’s worth noting that this is a solved architectural problem in 2026. There are entire frameworks and memory products dedicated to the long-term memory layer for agents. What makes Hermes distinctive is that it ships with this built in, fully integrated with the scheduler, the skill system, and the user model — not as a separate service you connect to.

Autonomous Skill Creation

How Hermes Creates & Curates Skills

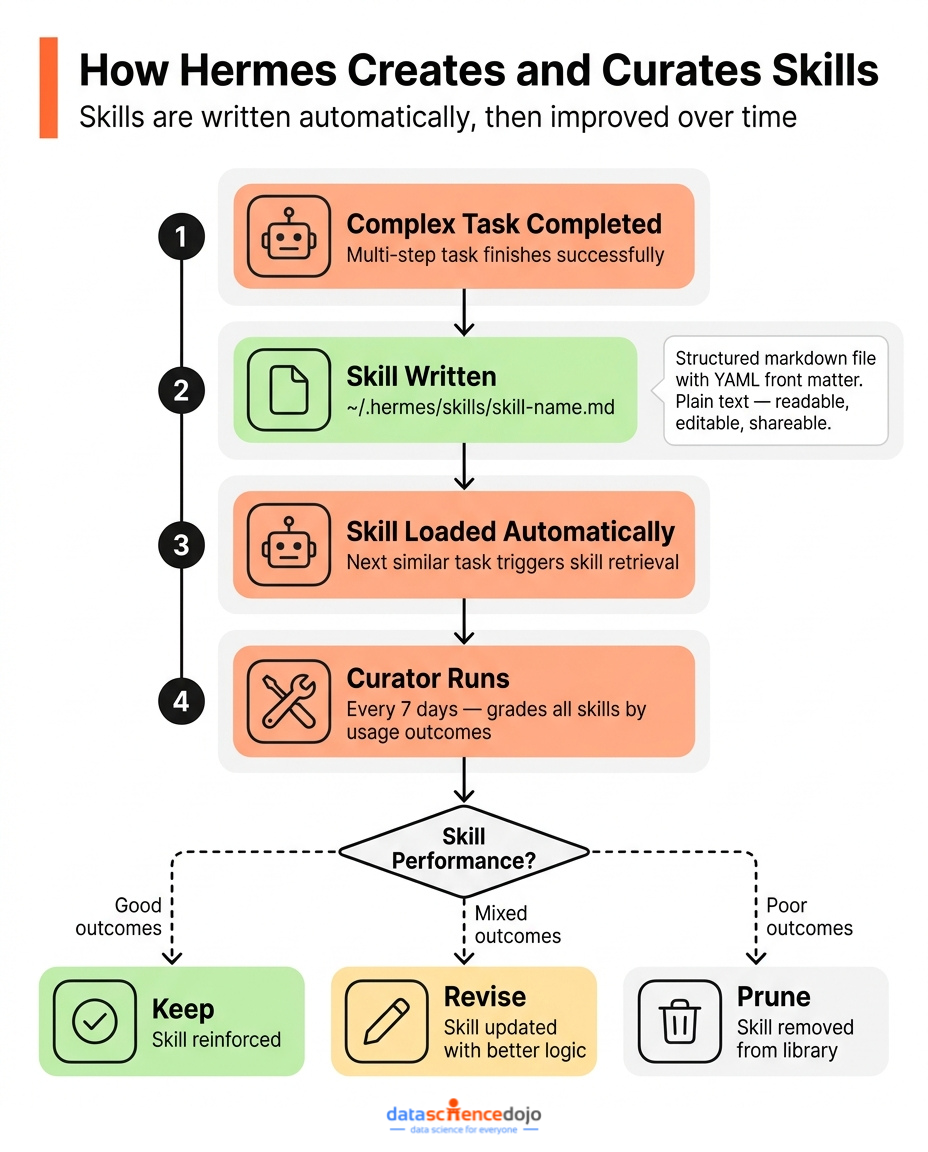
When Hermes completes a complex, multi-step task, it doesn’t just return a result. It also writes a skill — a structured markdown file with YAML front matter that encodes the reasoning template it used.

Skills are stored in ~/.hermes/skills/ and are loaded automatically when relevant tasks come up. The next time you ask Hermes to do something similar, it doesn’t start from scratch. It loads the skill, applies the accumulated logic, and produces better output faster.

Here’s what makes this genuinely useful rather than just an interesting feature:

  • Skills are plain text markdown files. You can read them, edit them, version-control them, and share them.
  • They’re compatible with the agentskills.io open standard, so you can import skills from the community or publish your own.
  • They’re not static. An autonomous Curator process runs on a 7-day cycle, grading skills based on actual usage outcomes, consolidating overlapping ones, and pruning those that consistently underperform.

The Curator is what separates Hermes’s skill system from other platforms like Claude. Skills evolve based on evidence. A skill that worked well three months ago but no longer produces good results gets revised or removed. The library stays lean and current.

There’s a useful conceptual distinction worth understanding here, between tools and skills. Tools give an agent external capabilities — web search, file access, API calls, terminal commands. Skills give it internal behavioral templates — the domain-specific reasoning logic that makes outputs consistent and purposeful. Both matter, but they solve different problems. If you want to go deeper on the difference between agent tools and agent skills and why that distinction matters for building reliable agents, it’s a concept that shows up constantly in production systems.

User Modeling

The third layer is the most distinctive component of Hermes and the one with no real equivalent in competing frameworks.

Hermes uses the Honcho dialectic user modeling system to build a persistent representation of you across sessions. This goes well beyond a preference list. It models:

  • How you communicate and what level of detail you prefer
  • What projects you’re working on and how they relate to each other
  • What decisions you’ve already made and don’t want relitigated
  • What topics connect to your work in ways you’d find useful to know about

The user model updates continuously as you interact. It informs not just how Hermes responds, but what it proactively notices and flags. A morning briefing produced for someone building an AI agent project will look meaningfully different from one produced for someone tracking climate policy — even if the underlying news sources and search queries are identical — because the user model shapes what gets surfaced and how it’s framed.

This is the layer that makes Hermes feel like it knows you after a few weeks of use. The technical foundation is solid — it’s not a gimmick — but the experience of it is closer to having an assistant who’s been paying attention than using a tool that retrieved your preferences from a database.

Core Architecture: Under the Hood

The Agent Core

Every Hermes subsystem — the CLI, the messaging gateway, the cron scheduler, the ACP server for IDE integration — runs through a single AIAgent object defined in run_agent.py. This is an important design choice. It means the agent responding to your message in the terminal is architecturally identical to the one handling your scheduled tasks and responding to messages in Discord. Same memory, same skills, same user model, same behavior.

Many frameworks have inconsistencies between their interactive and automated modes — subtle differences in how context is handled, which tools are available, or how memory is accessed. Hermes eliminates that class of problem by having a single agent core that everything else wraps around.

Transport Layer

Model access is abstracted behind a ProviderTransport abstract base class, with concrete implementations for Anthropic, OpenAI-compatible endpoints, AWS Bedrock, and the Responses API. What this means in practice: you can switch models or providers with hermes model and nothing else changes. No code edits, no configuration rewrites, no behavioral differences.

Supported providers include:

  • 200+ models via OpenRouter (including free tiers)
  • Anthropic (Claude Haiku, Sonnet, Opus)
  • OpenAI (GPT-4.1, o3, o4-mini)
  • AWS Bedrock
  • Local models via Ollama and LM Studio (fully offline, zero API cost)

The model-agnostic architecture also matters for cost management. You can run lightweight free models for routine daily tasks like news briefings and switch to a more capable model only for complex research or coding work — all within the same agent instance.

Sub-Agent Delegation

When tasks get complex, Hermes doesn’t try to handle everything in a single context window. Instead, it spawns sub-agents — isolated, short-lived workers that each get a focused context, a specific toolset, and a single well-defined goal.

The main agent acts as an orchestrator. It breaks the task into parts, delegates each part to a sub-agent, collects results, and synthesizes the final output. Each sub-agent runs in its own session, keeping concerns separated and context windows small.

This architecture has practical benefits beyond just handling larger tasks:

  • Smaller context windows work better with local and lightweight models
  • Parallel sub-agents can run workstreams simultaneously, not sequentially
  • Failures in one sub-agent don’t contaminate the main context

Built-in Scheduler

The cron system is one of Hermes’s most practically valuable features. The gateway runs a background ticker that checks every 60 seconds for due jobs. When a job fires, it spins up a fresh agent session, runs the job’s prompt with full tool access, and delivers the output to whatever messaging platform or destination you specified.

Jobs are created in natural language:

Every weekday at 8am, search for AI news and send me a summary by email

Hermes parses this, generates the correct cron expression, registers the job, and you’re done. No cron syntax to remember, no external scheduler to set up.

A few important nuances about the scheduler worth understanding:

  • Each cron job runs in a fresh session with no chat history — by design. This keeps jobs predictable and prevents state bleed between runs. It means your prompts need to be self-contained.
  • Jobs can be chained via the context_from parameter. Job B can automatically receive Job A’s output as context. This enables multi-stage pipelines: collect → analyze → deliver.
  • You can attach specific skills to a job so it has relevant domain expertise loaded without having to pull in the entire skill library.
  • A safety constraint prevents cron-triggered sessions from creating new cron jobs, which stops runaway scheduling loops.

Browser Tooling

Rather than scraping raw HTML, Hermes represents web pages as accessibility trees — structured formats that encode the semantic meaning of page elements, not just their raw markup. This makes the agent significantly more reliable at:

  • Understanding page structure and navigation
  • Clicking the right buttons on dynamically rendered pages
  • Filling forms correctly without misidentifying fields
  • Extracting structured information from complex layouts

Browser support includes cloud providers like Browserbase and local Chrome or Chromium instances.

Hermes vs. OpenClaw: A Genuine Architectural Comparison

OpenClaw is the closest open-source comparison to Hermes, and the distinction between them is meaningful. A framing that circulates widely in developer communities captures it accurately: “Hermes packages a gateway around a learning agent. OpenClaw packages an agent around a messaging gateway.”

That’s not a trivial difference. It determines what the system fundamentally optimizes for. OpenClaw is excellent at what it does — a messaging-first agent that’s reliable, extensible, and well-suited to teams that want a capable bot integrated into their communication workflow. Hermes optimizes for the agent getting smarter and more personalized over time.

[IMAGE: Side-by-side comparison diagram of Hermes vs OpenClaw architecture]
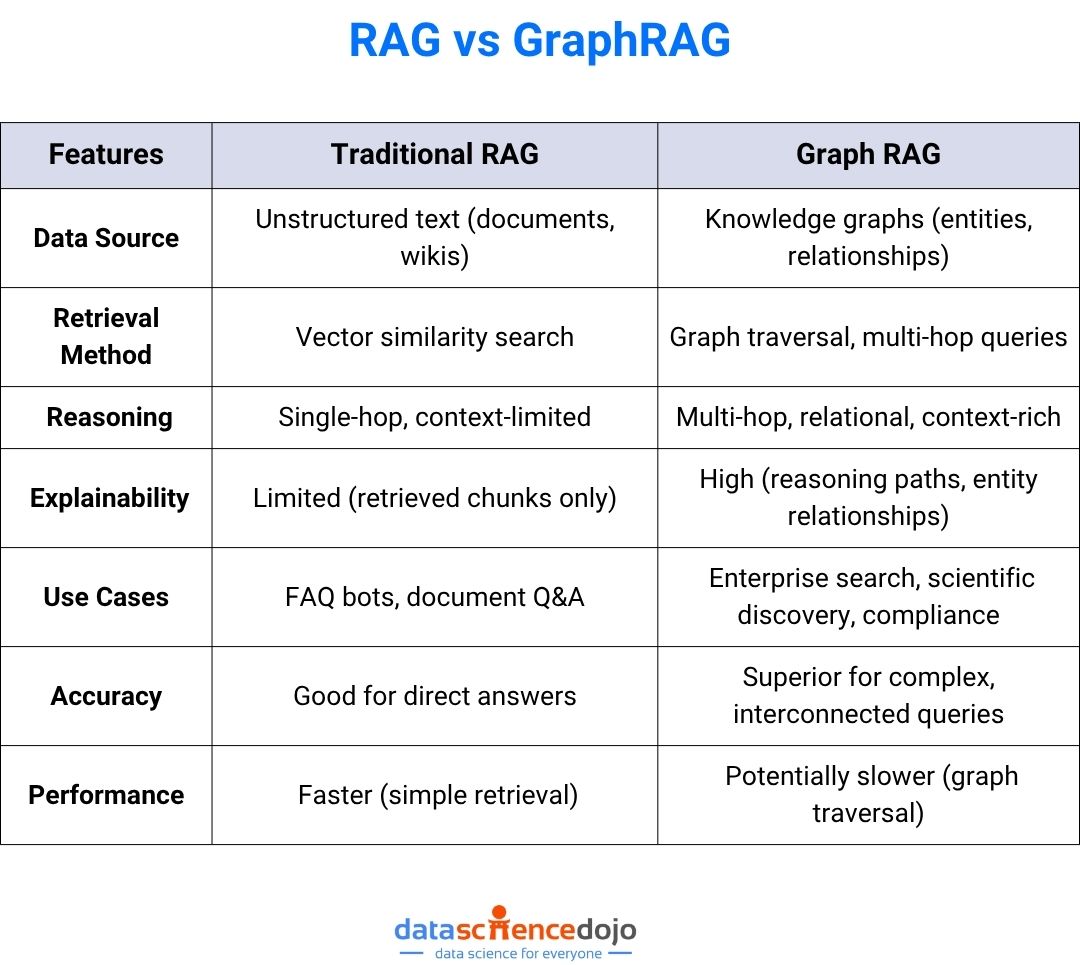
Feature Hermes Agent OpenClaw
Memory Persistent, local SQLite, FTS5 search Session-scoped, resets between runs
Skill system Autonomous creation, self-improving Curator Manual skill configuration
User modeling Honcho dialectic modeling across sessions Not built-in
Scheduling Native cron, 60s tick, natural language input Requires external setup
Model support 200+ via OpenRouter, all major providers OpenAI-compatible APIs
Local model support Ollama, LM Studio, llama.cpp Ollama
Platform support 18 messaging platforms natively Core platforms
Self-evolution GEPA optimizer, autonomous PR generation Not present
License MIT MIT

The practical gap is most visible after a few weeks of consistent use. With OpenClaw, the agent’s capability on day 30 is roughly the same as day 1 — it’s as good as the model and configuration you set up. With Hermes, the skill library has grown, the user model has deepened, and the agent’s outputs are measurably more relevant to your work. Developer comparisons using identical underlying models consistently show stronger results in Hermes for tasks that span multiple days.

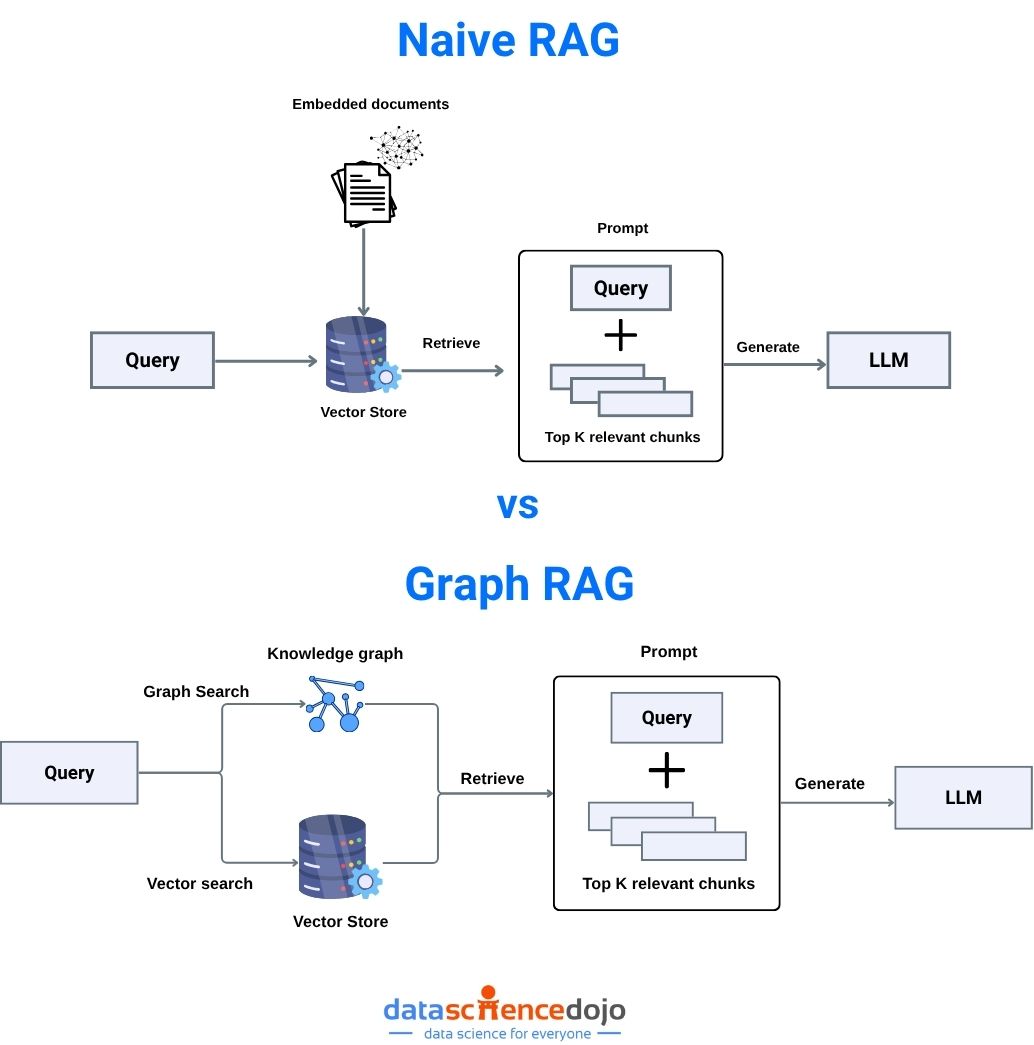
How Hermes Compares to LangChain, CrewAI, and AutoGen

Beyond OpenClaw, the broader landscape includes orchestration frameworks like LangChain, CrewAI, and AutoGen. These are fundamentally different kinds of tools.

LangChain, CrewAI, and AutoGen are developer libraries. You write Python to define agent logic, configure which tools are available, wire up a memory backend, set up a scheduler if you want one, and manage the infrastructure to keep it running. They’re powerful and flexible, and they’re the right choice if you want full programmatic control over your agent’s behavior. They require engineering investment to set up and ongoing maintenance to keep running.

Hermes is an end-user product that happens to be open source. The difference in practice:

  • Install with a single curl command and you’re talking to it in minutes
  • Memory, skill creation, user modeling, and scheduling are all on by default — nothing to configure
  • Runs as a persistent background service with an install command that handles the systemd/launchd setup
  • Messaging gateway, IDE integration, email delivery, and browser tools are all first-party, not external integrations

The tradeoff is control. If you need to define precisely how an agent orchestrates subtasks, LangChain or LangGraph gives you that. If you want a capable agent running on your machine today with minimal setup, Hermes is the faster path. Neither is universally better — it depends on what you’re building.

For a broader view of how automation and AI agents work together and where these tools fit in a modern workflow, it’s worth reading about building smarter workflows with AI agents. Traditional automation follows fixed rules. Agents apply judgment. Hermes adds a third layer on top of that — it applies judgment, stores the outcome, and adjusts the next run.

The Self-Evolution Subsystem

The hermes-agent-self-evolution companion repository has no direct equivalent in other open-source agents. It implements GEPA — Genetic Evolution of Prompt Architectures — an automated optimizer that works as follows:

  1. Reads the current set of skill definitions, prompt templates, and tool configurations
  2. Generates evaluation datasets based on actual usage patterns and execution history
  3. Produces candidate variants by applying targeted mutations based on failure analysis
  4. Runs each variant through execution traces and evaluates against constraint gates — tests, size limits, and benchmark thresholds
  5. Opens a pull request against the main hermes-agent repository with the best-performing variant

The critical distinction from naive prompt optimization is that GEPA doesn’t just measure whether outputs were good or bad — it reads execution traces to understand why things failed. That produces targeted, root-cause-level improvements rather than generic rewrites that might improve one metric while degrading others.

This is a programmatic implementation of what the field now calls harness engineering — the discipline of building structural correction mechanisms around an agent so that specific failure modes become harder to repeat over time. If you want to understand what harness engineering is and why it’s become central to reliable agent systems in 2026, it’s a concept worth spending time on. The self-evolution subsystem is one of the clearest real-world examples of it working at scale.

Full Feature Inventory

Before the tutorial, here’s a complete picture of what Hermes ships with out of the box.

Tools and Capabilities

  • 40+ built-in tools: web search, browser automation, file access, code execution, terminal commands, image generation, and more
  • ACP server for IDE integration: VS Code, Zed, and JetBrains
  • OpenAI-compatible API server exposed at port 8642 — use Hermes as a local LLM endpoint

Messaging and Delivery

  • 18 messaging platforms: Telegram, Discord, Slack, WhatsApp, Signal, Feishu/Lark, WeCom, QQBot, Yuanbao, Microsoft Teams (via plugin), and more
  • Email delivery via SMTP
  • Voice memo transcription and TTS audio responses (Telegram)

Infrastructure

  • 7 terminal backends: Local, Docker, SSH, Singularity, Modal, Daytona, Vercel Sandbox
  • Native cron scheduler with natural language input, job chaining, and per-job skill injection
  • hermes gateway install creates a persistent background service (systemd on Linux, launchd on macOS)

Learning and Customization

  • Persistent SQLite memory with FTS5 full-text search
  • Autonomous skill creation, Curator-managed skill library, agentskills.io compatibility
  • SOUL.md for custom agent personality
  • AGENTS.md for project-specific context injection
  • Honcho user modeling

Training and Research

  • RL training data export: generate tool-calling trajectories for fine-tuning
  • Atropos integration for reinforcement learning experiments
  • GEPA self-evolution subsystem

Getting Started: Install Hermes and Set Up Your WhatsApp Briefing

Everything covered above runs from a single install. Here’s how to get it running and delivering your daily AI briefing straight to WhatsApp — using your personal number, no Meta business account needed.

Time: ~15 minutes
Difficulty: Beginner
Cost: Free
Platform: Windows (WSL2), Linux, or macOS

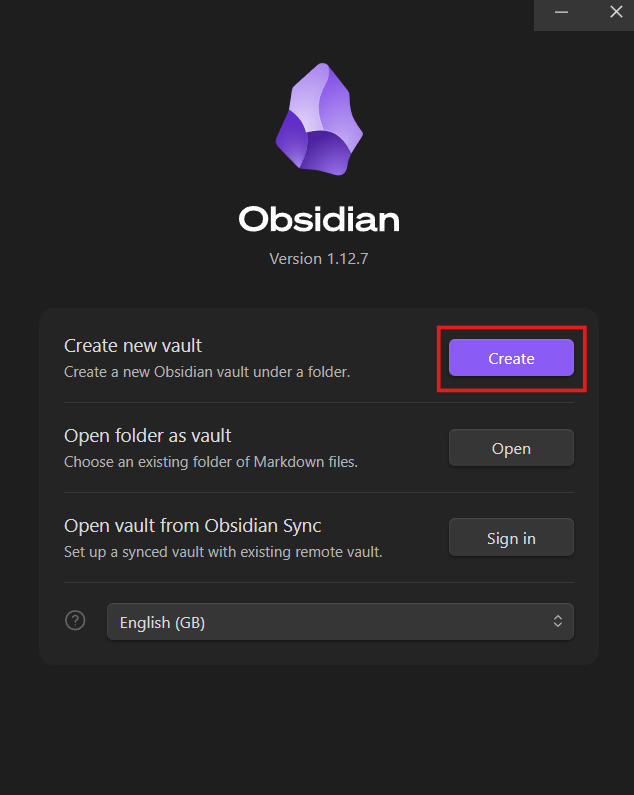
Part 1: Install Hermes

WSL2 / Linux / macOS:

Note: For this, you would need wsl installed.

Open your Ubuntu terminal and run:

The installer handles everything — Python 3.11, Node.js 22, ripgrep, ffmpeg, repo clone, and virtualenv. Takes 3–5 minutes. When done, close and reopen the terminal, then verify:

hermes –version

⚠️ On Windows, run this inside the Ubuntu app (WSL2), not PowerShell. Everything from here runs in Ubuntu.

Part 2: Run Setup

hermes setupThe wizard walks you through three choices:

  • Provider: Choose OpenRouter. Get a free key at openrouter.ai, no credit card required.
  • Model: For this tutorial, we’re using nvidia/nemotron-3-super-120b-a12b. It’s free.
  • Terminal backend: Select Local.

Hermes Agent Startup Screen

When it asks about messaging, select Set up messaging now and choose WhatsApp. It might not complete the setup after this. If that happens you can use hermes whatsapp to set up messaging gateway for Whatsapp.

Part 3: Connect WhatsApp via QR Code

Hermes uses Baileys to connect to WhatsApp — no Meta developer account, no business number. Just your personal WhatsApp and a QR scan.

Start the gateway:
hermes gateway

Hermes Whatsapp Setup

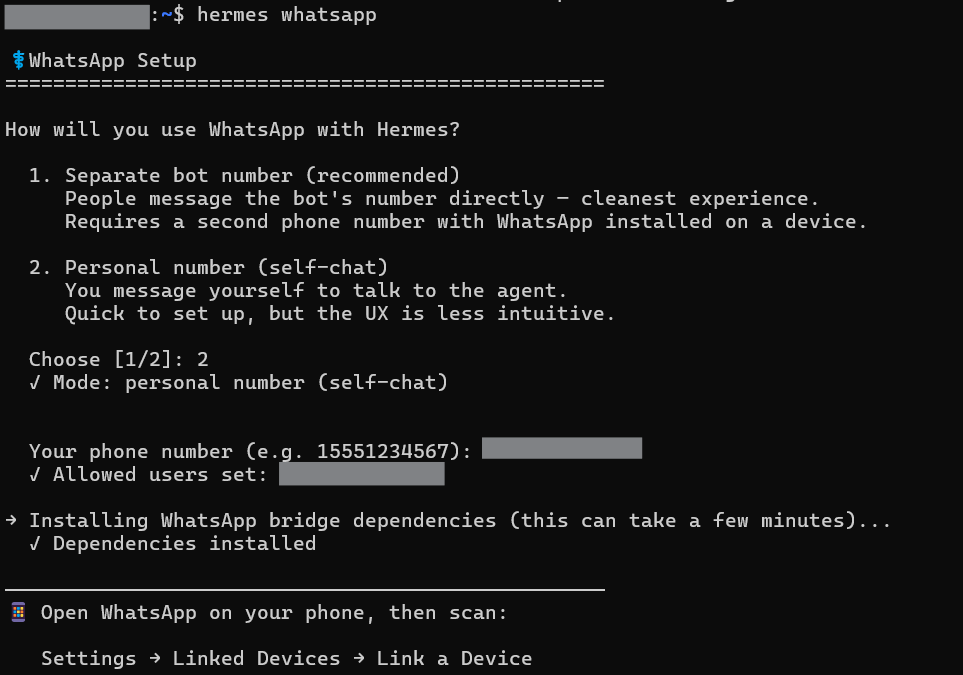
A QR code will appear in the terminal. On your phone:

  1. Open WhatsApp
  2. Tap the three dots (Android) or Settings (iOS)
  3. Tap Linked DevicesLink a Device
  4. Scan the QR code in your terminal

You’ll see a confirmation:

Hermes Whatsapp successful pairing

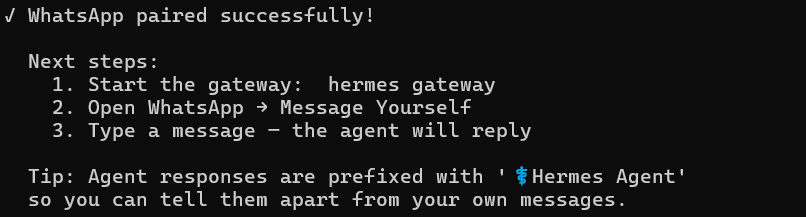
Part 4: Set Your Home Chat and Create the Briefing

Open WhatsApp on your phone and message yourself (use the “Message yourself” feature or send to your own number). Send:

/sethome

Hermes confirms this chat as the delivery destination. Now send your briefing instruction:
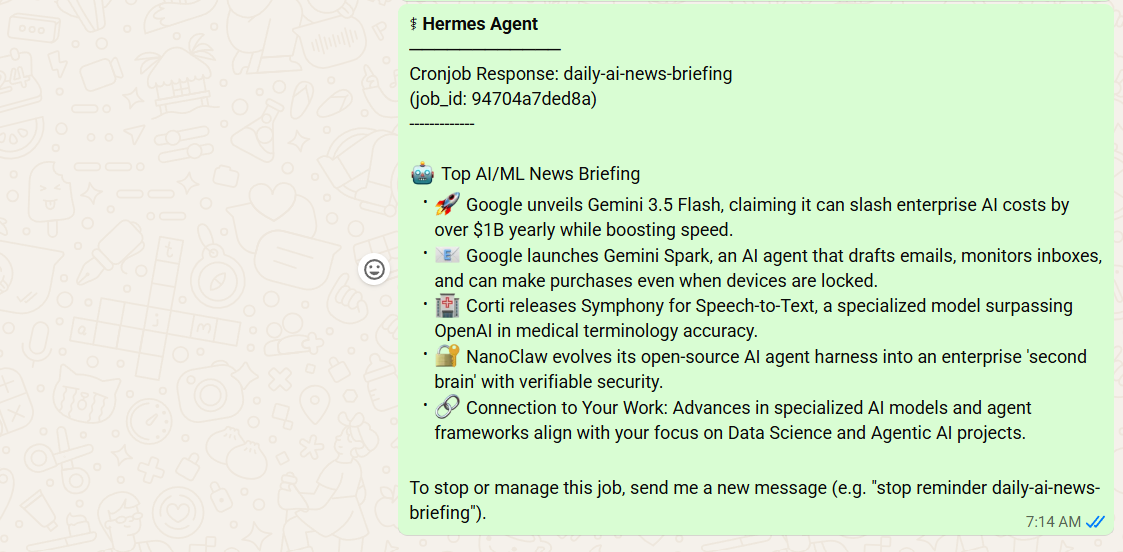
Hermes confirms:

Hermes AI News Briefing Setup

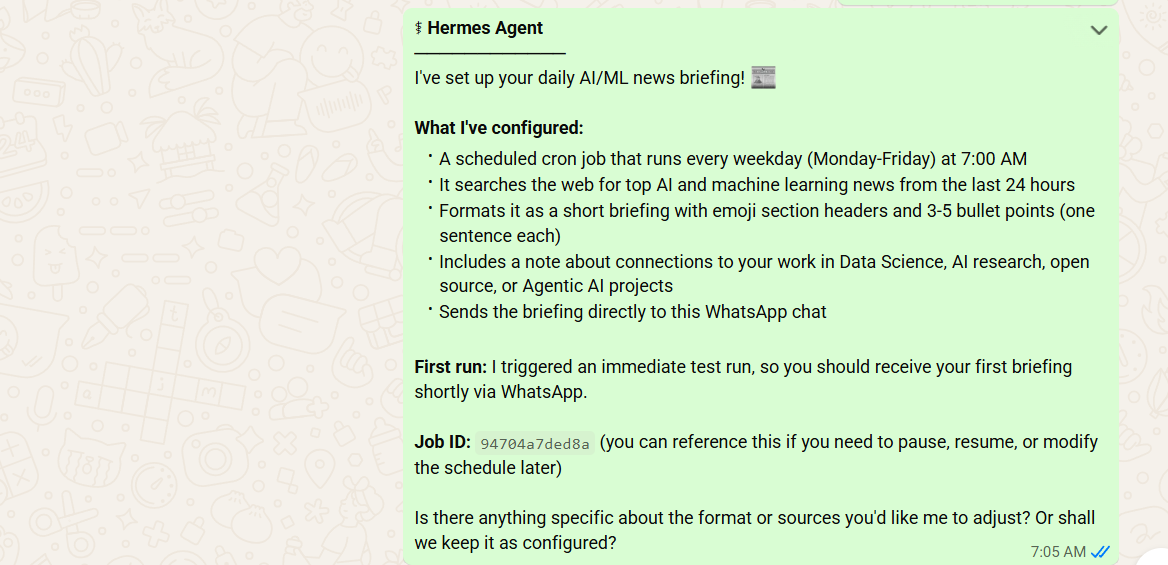
It automatically triggered a test run and after a few minutes shares today’s briefing:

Hermes Agent Daily AI News Briefing

This is just the beginning. You can keep giving it instructions and Hermes will automatically update the News Briefing Skill for you.

Part 5: Keep the Gateway Running

The WhatsApp connection stays alive as long as hermes gateway is running. To make it persistent:

Windows 11 WSL2 (systemd):

  • hermes gateway install
  • hermes gateway start

Frequently Asked Questions

Does Hermes require a paid API key?

No. It can run on free models via OpenRouter and works fully offline with local models via Ollama or LM Studio — zero API cost either way. The daily morning briefing tutorial in this post costs nothing to run.

How is this different from just scheduling a Python script that calls an API?

A Python script executes a fixed function every time it runs. The output on day 100 is structurally identical to the output on day 1. Hermes runs a language model with persistent memory context, skill injection, and a continuously updated user model. The output on day 100 reflects what the agent has learned about what you actually want — not just what the prompt says.

Does Hermes send my data anywhere?

Memories, skills, session history, and the user model all stay local in ~/.hermes/on your machine. The only outbound data is your LLM API calls, which go directly to whichever provider you configured. Nothing routes through Nous Research infrastructure.

Can I use Hermes without Telegram, Discord, or any messaging platform?

Yes. The CLI (hermes) works completely standalone. Scheduled jobs can deliver to email or save output to local files. A messaging platform makes it more convenient to interact on mobile, but it’s entirely optional.

What happens if a cron job fails mid-run?

Failed jobs are logged in ~/.hermes/logs/ with full error details. They are not automatically retried. For workflows where failure would be a problem, add a fallback instruction directly in the job prompt: “if the web search returns no results, send an email noting that no news was found today.”

Can I share my skills with teammates or the community?

Yes. Skills are plain markdown files in ~/.hermes/skills/. They’re portable, version-controllable with git, and compatible with the agentskills.io open standard for community sharing. If you build a skill that works well for a particular domain, publishing it means others can import it directly.

What’s the difference between the CLI and the gateway?

The CLI (hermes) is for interactive sessions — you type, it responds. The gateway is the background process that handles messaging platforms and runs scheduled cron jobs. Both use the same agent core, so behavior is consistent. You need the gateway running for scheduled tasks to fire.

Wrapping Up

Hermes Agent is worth paying attention to not because it has the most features or the most impressive benchmarks, but because it solves the right problem. Stateless agents are fundamentally limited for any task that spans more than a single session. Hermes is the most complete open-source attempt to fix that.

The combination of persistent local memory, autonomous skill creation, a continuously updated user model, and a built-in scheduler that runs 24/7 produces something that behaves qualitatively differently from any other open-source agent available today. The morning briefing use case in this tutorial demonstrates all of those components working together — and it only gets better with time.

For anyone who wants to go deeper on how agentic systems are designed and deployed in 2026 — covering LangGraph, context engineering, multi-agent coordination, and production deployment patterns — the Agentic AI Bootcamp is the most comprehensive structured program available. If you’re building agents seriously, it’s worth the investment.

Key Takeaways

  • Obsidian stores notes as plain Markdown files — the exact format AI agents read and write natively, with no conversion layer needed
  • Connecting Claude to your Obsidian vault via MCP takes under 10 minutes and requires no API keys
  • Features like Graph View, Dataview, Templates, Daily Notes, and Canvas turn a passive folder of notes into a queryable, agent-powered research system

Most AI agents have a memory problem. Every conversation starts from zero. You paste the same papers, re-explain the same context, and repeat yourself constantly — and the moment you close the chat, everything is gone. This is one of the core limitations of LLM agents today — they’re powerful at reasoning but have no persistent memory between sessions.

The fix is a persistent knowledge base your agent can actually read, search, and write to. And in 2026, the best tool for building one is Obsidian.

This tutorial walks you through everything — from installing Obsidian and setting up your vault, to connecting an AI agent via MCP and using Obsidian’s most powerful features to make your research papers queryable on demand. We use research papers as the running use case throughout, but the same setup works for any knowledge domain.

If you want to understand how to have an AI agent compile raw PDFs into structured wiki pages first, read our LLM Wiki Tutorial before continuing. This tutorial picks up where that one ends — you have a wiki, now let’s make it intelligent.

What Is Obsidian and Why Does It Work So Well with AI?

Obsidian is a local-first note-taking app that stores everything as plain .md (Markdown) files on your computer. No proprietary format, no cloud lock-in, no vendor dependency — just files in a folder.

That simplicity turns out to be its superpower for AI workflows.

Every major LLM was trained on Markdown. When your knowledge base is a folder of .md files, an AI agent can read it natively without the need of a parsing layer, API integration or format conversion. You point the agent at the folder and it just works.

On top of that, Obsidian has features that make a knowledge base genuinely useful rather than just a pile of notes: a visual knowledge graph, a live query engine, templates for consistency, and a canvas for visual mapping.

What You’ll Build

By the end of this tutorial you’ll have:

  • An Obsidian vault structured for AI retrieval, with research papers as source material
  • Claude connected to your vault via MCP — able to read, search, create, and update notes in real time
  • A live research dashboard powered by Dataview
  • A visual knowledge graph showing how your research concepts connect
  • A daily research log the agent fills in automatically
  • A visual research map built on Canvas

Part 1 — Install Obsidian and Set Up Your Vault

Step 1: Download and Install Obsidian

Go to obsidian.md and download Obsidian for your operating system. It’s free for personal use and runs on Windows, macOS, Linux, iOS, and Android. Install it and open it.

Step 2: Create Your Vault

A vault in Obsidian is just a folder on your computer. Everything inside it — notes, folders, attachments — lives there as plain files.

Click Create new vault and configure it:

  • Name: Research-KB
  • Location: A simple path with no spaces.

Creating a new vault in Obsidian

Step 3: Get Familiar with the Interface

Take two minutes to locate these panels, you’ll use all of them throughout this tutorial:

Panel Location What it does
File Explorer Left sidebar Browse all notes and folders
Editor Center Write and read notes
Properties panel Top of each note Structured metadata
Command Palette Ctrl+P / Cmd+P Run any action by typing
Graph View Ctrl+G / Cmd+G Visual knowledge map
Settings Bottom-left gear icon All configuration

Step 4: Create Your Folder Structure

Right-click in the File Explorer → New folder and create each of these:

Research-KB/

├── raw/ ← original PDFs go here

├── wiki/ ← agent-compiled knowledge pages

├── Templates/ ← note templates

├── Daily Notes/ ← daily research log

Copy your research PDFs into the raw/ folder directly from your file explorer and they’ll appear in Obsidian automatically. If you already have wiki pages from the LLM Wiki Tutorial, copy them into Research-KB/wiki/ now.

 Adding Research Papers to Raw Folder in Obsidian

Step 5: Create Your AGENTS.md File

Create a new file in the vault root called AGENTS.md. This is the first file your agent reads, it tells the agent how your vault is structured and how to behave inside it.

Checkpoint: Your vault is set up. You should see raw/, wiki/, Templates/, Daily Notes/, and AGENTS.md in your File Explorer.

Part 2 — Connect Claude to Your Vault via MCP

MCP (Model Context Protocol) is an open standard that lets AI agents connect to external tools and data sources. Here it lets Claude read and write files directly inside your Obsidian vault in real time, without pasting anything into a chat window. If you want a deeper understanding of how MCP works under the hood, read our Definitive Guide to Model Context Protocol.

Filesystem MCP

This points Claude directly at your vault folder. No plugins, no authentication, no ports.

Prerequisites:

  • Claude Desktop installed (not the browser version, download from claude.ai/download)
  • Node.js installed — confirm by running node –version in your terminal. If missing, install from nodejs.org

Step 1: Find your vault path

In Obsidian, hover over the vault name at the bottom-left of the screen — it shows the full folder path. Copy it.

Step 2: Open the Claude Desktop config file

In Claude Desktop, go to settings. Scroll down to the Developer tab and click Edit Config.

Editing Config in Claude Desktop

Step 3: Add the MCP server

In the Config File, add your MCP server:

Replace the path with your actual vault path. If you already have other MCP servers in this file, add “research-kb”: { … } inside the existing “mcpServers”: { } block — don’t replace the whole file.

Step 4: Restart Claude Desktop

Fully quit, not just close the window.

  • Windows: right-click system tray icon → Quit
    Mac: Cmd+Q

Reopen Claude Desktop. Click the + sign in the chatbox, you should see a Connectors tab. Click it — you should see research-kb listed as an available tool. That confirms the connection is live.

Blog | Data Science Dojo

Step 5: Test the connection

Run these prompts in order:

Check that test.md appears in Obsidian. If it does, delete it and move on.

Troubleshooting:

Problem Fix
Connector doesn’t apear Config has a syntax error — check for missing commas or brackets
“Cannot attach to MCP server” Path has spaces or is inside OneDrive — move the vault
npx not found Node.js isn’t installed or not on your system PATH

Part 3 — Tags and Properties: Making Your Research Queryable

What Are Properties?

Properties are structured metadata at the top of every note — title, tags, date, status, source paper. They’re what transform a note collection into a queryable database.

Without properties, your agent can only do keyword search. With them, it can answer questions like “show me all concepts tagged as high importance” or “which pages are still drafts?” — precise, filtered retrieval that scales as your vault grows.

Obsidian Properties Features

Add Properties to One Note Manually

Open any wiki page → click Add property at the top (or press Ctrl+;) → add these fields:

Do this for one note so you understand the format. Now let the agent handle the rest.

Let the Agent Add Properties at Scale

After it runs, click through a few notes — you should see the properties panel populated consistently across all pages. This consistent structure powers every feature that follows.

Asking Claude to add properties in Obsidian wiki

Part 4 — Templates: Consistent Notes Every Time

Why Templates Matter for AI Knowledge Bases

As your agent compiles more papers, inconsistent note formats break everything downstream — Dataview queries fail, the agent gets confused about where to find information. Templates enforce a consistent skeleton on every note the agent creates.

Set Up Your Wiki Page Template

Settings → Core plugins → Templates → toggle on

Using Template Plugin in Obsidian

Settings → Templates → set folder location to Templates

Setting Templates Folder in Obsidian

Create Templates/Wiki Page.md:

Test It Manually

Create a new note → press Ctrl+P → type “Templates: Insert template” → select “Wiki Page”. The template structure fills in automatically.

Tell the Agent to Use It

Add this to your AGENTS.md:

Then test:

“Create a new page called ‘Scaling Laws.md’ in wiki/ about scaling laws in large language models. Follow the template in Templates/Wiki Page.md exactly.”

Check that the note matches the template — all sections present, frontmatter filled in.

Checkpoint: Every new note your agent creates will follow the same format. Dataview queries and cross-note searches will work reliably from here on.

Part 5 — Graph View: See How Your Research Connects

Opening Graph View

Press Ctrl+G (Mac: Cmd+G). Each note becomes a node. Each [[wikilink]] between notes becomes a connection line. The result is a live visual map of your knowledge base.

Click any node to highlight its direct connections. Highly-connected concepts are the core ideas in your research. Isolated dots are gaps — topics that exist but don’t yet connect to anything else. This graph-based structure is also what makes Obsidian a natural complement to Graph RAG approaches — your wikilinks are essentially a hand-curated knowledge graph that the agent can traverse.

Obsidian Graph View

Why Your Graph Starts Sparse

At this stage, most notes probably don’t reference each other much. The agent is doing keyword search across disconnected files. The next step turns it into a real traversable network.

Strengthen the Graph with the Agent

After this runs, reopen Graph View — you’ll see a noticeably denser network. The agent isn’t just searching anymore; it’s navigating a connected knowledge graph.

Filter by Tag

In the Graph View left panel → Filters → type a tag like transformer. The graph narrows to only notes with that tag. Useful for exploring a specific research thread without the rest of the vault in view.

Part 6 — Dataview: Query Your Knowledge Base Like a Database

What Dataview Does

Dataview is a community plugin that adds SQL-like query syntax to Obsidian. Write a query inside any note and it renders as a live table, list, or card view — updated automatically whenever your vault changes. This is what makes your vault feel like a research database rather than a folder of files.

Install Dataview

Settings → Community plugins → Browse → search “Dataview” → Install and Enable.

Installing Dataview plugin in Obsidian

Build Your Research Dashboard

Create Research Dashboard.md in the vault root:

Press Ctrl+E to switch to Reading View — the queries render as live tables pulling directly from your notes’ properties.

Dataview in Obsidian

Every time the agent adds or updates a note, the dashboard refreshes automatically. No manual tracking required.

Cross-Paper Synthesis with the Agent

“Using my vault’s notes and their properties, which research concepts appear across the most papers? Read wiki/_index.md and individual pages to find concepts referenced in 3 or more source papers. List them ranked by how many papers mention them.”

Asking Claude to find insights from Obsidian Vault

This is cross-paper synthesis — exactly what makes an AI knowledge base more valuable than uploading PDFs to a chat window one at a time. Unlike traditional Retrieval Augmented Generation which retrieves raw chunks on every query, your Obsidian wiki pre-compiles and connects knowledge so the agent reasons across it rather than rediscovering it from scratch each time.

Checkpoint: You now have a live research dashboard that updates automatically as your agent adds new content.

Part 7 — Daily Notes: Your Agent-Powered Research Log

What Daily Notes Do

Daily Notes creates one note per day using a template you define. Connected to your agent, this becomes a daily research briefing — what’s new in your vault, what questions are still open, what changed since yesterday. Over time it builds a complete, searchable log of your research progress.

Set It Up

Settings → Core plugins → Daily notes → toggle on

Settings → Daily notes configure:

  • Date format: YYYY-MM-DD
  • New file location: Daily Notes/
  • Template file: Templates/Daily Note

Setting up Daily Notes Plugin in Obsidian

Create Templates/Daily Note.md:

Open and Fill Today’s Note

Press Ctrl+P → “Daily notes: Open today’s daily note” → Obsidian creates the note from your template automatically.

Then prompt the agent:

“Open today’s daily note in Daily Notes/. Read wiki/_index.md and the 5 most recently modified pages in wiki/. Fill in: New Wiki Pages Created, Pages Updated, and Agent Briefing. For the Agent Briefing, write 3–5 sentences summarizing what this knowledge base now covers and what the most significant gap is — a question the current papers can’t yet fully answer.”

Every morning this gives you an immediate picture of where your knowledge base stands and what’s worth exploring next.

Part 8 — Canvas: Map Your Research Visually

What Canvas Is

Canvas is Obsidian’s freeform visual workspace. Place notes as cards on a board and draw labeled connections between them. Unlike Graph View — which auto-generates from wikilinks — Canvas is intentional. You decide what to show and how to arrange it.

It’s ideal for mapping a specific research question visually: how transformer architecture evolved, what the competing approaches to alignment are, which papers build on each other. For example, if your wiki covers foundational papers like Attention Is All You Need, you can read our guide to the attention mechanism for deeper context on what to put on the canvas.

Create a Canvas Manually

  1. Ctrl+P → “Canvas: Create new canvas” → name it Transformer Evolution.canvas
  2. Right-click the canvas → Add note from vault → select 4–5 transformer-related wiki pages
  3. Arrange them roughly chronologically left to right
  4. Hover over a card edge → drag to another card to draw a connection
  5. Double-click the connection line → add a label like “builds on” or “extends”

Let the Agent Build a Canvas for You

Canvas files are JSON under the hood — the agent can write them directly.

“Read wiki/_index.md and identify the 6 most important concepts related to transformer architecture and language model development. Create a file called Transformer Evolution.canvas in the vault root using Obsidian canvas JSON format. Arrange the concepts roughly chronologically left to right, with labeled edges showing relationships like ‘builds on’, ‘introduces’, ‘extends’, or ‘applies to’.”

Canvas Feature in Obsidian

Open the .canvas file in Obsidian to see the pre-built visual map. Drag cards around to refine the layout.

Part 9 — The Full Workflow End to End

Every feature you’ve set up now works together as a single loop. Drop a new PDF into raw/ and run this one prompt:

Watch Obsidian as it runs — Graph View updates with new connections, Dashboard tables refresh with new entries, the Daily Note fills in automatically. That’s the complete loop: raw paper in, structured queryable knowledge out. This is what agentic AI systems look like in practice — not a chatbot answering questions, but an agent actively maintaining and building knowledge on your behalf.

Quick Reference: What to Check at Each Step

Feature What should work
Vault + MCP Agent lists vault files and creates a test note
Tags & properties Every wiki note has a filled properties panel
Templates Agent-created notes match the template exactly
Graph View Denser network after agent adds wikilinks
Dataview Dashboard tables render in Reading View
Daily Notes Today’s note created with agent briefing filled in
Canvas Canvas file opens with cards and labeled edges
Full workflow All of the above triggered from one prompt

Frequently Asked Questions

Do I need an Obsidian paid plan to follow this tutorial?

No. Everything here — vault creation, community plugins, MCP connection, Graph View, Dataview, Canvas — is available on Obsidian’s free personal plan. The Obsidian Sync paid plan is only needed if you want to sync across devices, which isn’t required for this setup.

Does Obsidian need to be open for the MCP to work?

For the Filesystem MCP (Option A), no — Claude reads files directly from disk regardless of whether Obsidian is open. For the REST API (Option B), yes — Obsidian must be running because the agent is calling Obsidian’s internal API.

What happens to my knowledge base if I switch AI models?

Nothing. Your vault is local Markdown files that live independently of any AI account or model. You can switch from Claude to GPT to a local model without losing a single note. That’s one of the core reasons Obsidian is the right foundation for this.

How do I stop the agent from creating inconsistent notes?

Two things prevent this: a detailed AGENTS.md with explicit rules, and a well-structured template the agent is always told to use. The more specific your AGENTS.md, the more consistent the output.

Can multiple people share the same knowledge base?

Yes — put the vault in a Git repository. Each collaborator can add sources and run agent sessions; Git handles merging. A good practice for teams is keeping a personal vault separate from the shared agent-facing wiki, pulling only reviewed content into personal notes.

My Dataview tables show no results — what’s wrong?

The most common cause is missing or inconsistent frontmatter. Make sure every note in wiki/ has the properties the query expects (status, importance, tags, source_paper) and that values are spelled consistently — “active” and “Active” are treated as different values by Dataview.

Wrapping Up

Obsidian turns a folder of research papers into a living knowledge base that compounds over time. Every new paper makes the agent smarter. Every wikilink the agent adds makes the graph denser. Every daily note builds a research log you can look back on months later.

The key shift is moving from pasting documents into a chat window to building a persistent system that grows with your research. With Obsidian, MCP, and the workflows in this tutorial, your AI agent has the context it needs — not just for today’s session, but for every session going forward.

Only 16.3% of the world’s population currently uses AI tools. Of that group, Claude holds just 3.5% of the AI chatbot market. By the numbers, most people haven’t discovered it yet and most of those who have are probably using it the same way they use everything else: type a question, get an answer, close the tab.

But here’s what the usage data actually shows. Claude users spend an average of 34.7 minutes per session — more than any other AI platform. The people who use it seriously aren’t spending that time typing better prompts. They’re building systems that handle the repetitive parts of their work so they can focus on the thinking.

The conversation around AI tools right now is dominated by MCPs, Model Context Protocol servers that connect Claude to external tools, databases, APIs, and applications. MCPs are genuinely powerful. But for content work, the more important feature is one most people haven’t touched yet: Claude Skills.

New to MCP? Start here. The Definitive Guide to Model Context Protocol →

MCPs give Claude new capabilities. Claude Skills give Claude your standards. For a content pipeline where voice, structure, SEO, and consistency matter on every single piece, the second one is what actually changes your output.

What Claude Skills Actually Are (and What They’re Not)

A Claude skill is a reusable instruction set that lives in a folder and loads automatically when a task matches its description. It’s not a plugin. It’s not a prompt template you paste in. It’s not an API connection.

Want the full technical breakdown of how skills differ from tools? What Are Agent Skills, and How Are They Different from Tools? →

The cleanest way to think about Claude Skills: a prompt is a one-off conversation. You explain your audience, your tone, your format requirements, what to avoid and then the conversation ends and Claude forgets all of it. A Claude skill is a system. You define those standards once, and Claude applies them every time, across every conversation, without you re-explaining anything.

What skills don’t do is give Claude new capabilities it didn’t have before. They give Claude your process — your SEO rules, your editorial voice, your platform-specific format requirements. The difference in output between a skilled and an unskilled Claude conversation is not about the model’s intelligence. It’s about whether Claude knows how you work. Think of it this way: MCP connects Claude to the world while skills teach Claude how you work in it.

Each skill is built around a SKILL.md file with a simple structure: a YAML frontmatter block at the top that tells Claude when to use it, and markdown instructions below that tell Claude what to do. Reference files and scripts can be bundled alongside it for more complex workflows.

Why Content Work Is the Best Use Case for Skills

Content creation is repetitive by design. Every blog post needs the same SEO structure. Every LinkedIn post needs the same voice. Every article targeting the same audience needs the same level of technical depth. You’re basically applying the same standards to new topics.

Without Claude Skills, that repetition becomes friction. You re-explain your keyword strategy at the start of every blog draft. You remind Claude who your audience is before every LinkedIn post. You correct the same tendencies; overly hedged sentences, generic hooks, mismatched tone, over and over because Claude has no memory of what you fixed last time.

With skills, that overhead disappears. Claude already knows your SEO requirements, your editorial voice, your platform rules, and what you consider a bad opening line. You bring the topic and your angle. The skill handles everything else.

Curious how agentic workflows make LLMs dramatically more useful? 5 Powerful Ways an AI Agent Enhances Large Language Models →

The compounding effect is the part that matters most. Every standard you encode into Claude skills gets applied to every piece you produce, indefinitely. The investment in building Claude skills once pays out across every article, every post, every caption you produce going forward.

The Two Skills That Power This Pipeline

This pipeline runs on two Claude skills that work together across every piece of content: one for long-form SEO articles and one for editorial voice and niche identity.

Claude Skill 1: The SEO Content Writer

Of all Claude skills in this pipeline, the SEO Content Writer is the most structural. It handles keyword placement, header hierarchy, paragraph rhythm, meta titles and descriptions, visual cue placeholders, and internal link suggestions. It knows that the primary keyword belongs in the H1 and the first 100 words. It knows that meta descriptions cap at 160 characters and need a soft CTA. It knows what a good FAQ section looks like for featured snippet targeting.

When you ask Claude to write or optimize a blog post, this skill loads automatically and applies all of those rules without you specifying any of them. What you stop doing manually: building outlines from scratch, remembering keyword density, writing meta data as a separate step.

Claude Skill 2: The AI Content Niche Skill

Among the two Claude skills, this one is the most editorial. It encodes identity — the things that make your content sound like yours rather than a generic AI blog post. It defines the site’s content pillars (agentic AI, model releases, LLM engineering, API updates), the audience (developers and engineers who build with AI), the tone (analytical and precise, not breathless), and the non-negotiable angle that every piece must answer: what does this mean for someone building with AI right now?

What separates this from other Claude skills is that it asks for your opinion before drafting anything. This is not a nice-to-have. It’s the difference between content that reflects genuine expertise and content that sounds like a confident summary of what already exists online. Two sentences from the author about their actual take on a topic changes the entire character of the output.

The skill also contains hard rules against the two patterns that make AI content identifiable: corrective antithesis (stating something and immediately softening it with “however” or “that said”) and staccato sentence sequences used as false momentum. Both are specified as things Claude must actively avoid. It’s worth noting that as you give Claude more autonomy through skills, understanding prompt injection risks becomes increasingly relevant — especially if your pipeline involves external content or URLs.

Building Claude Skills: What Goes Inside a SKILL.md

Every Claude skill is built around a SKILL.md file with two parts: YAML frontmatter between — markers, and markdown instructions below it.

The frontmatter is the most important part of the whole Claude skills system. It’s how Claude decides whether to load the skill at all. Claude reads only the name and description at startup, and decides whether the Claude skills are relevant based on that alone.

 A description that’s too generic means the skill never triggers. Too narrow and it misses cases where it would be useful. The description needs to include both what the skill does and specific phrases that would appear in a real request: “write a blog post”, “optimize this article”, “create an outline” so Claude recognizes when it’s relevant.

Below the frontmatter comes the actual instruction set: the workflow stages, the rules, the examples, and pointers to any reference files bundled alongside the skill.

Skills directory structure - Data Science Dojo
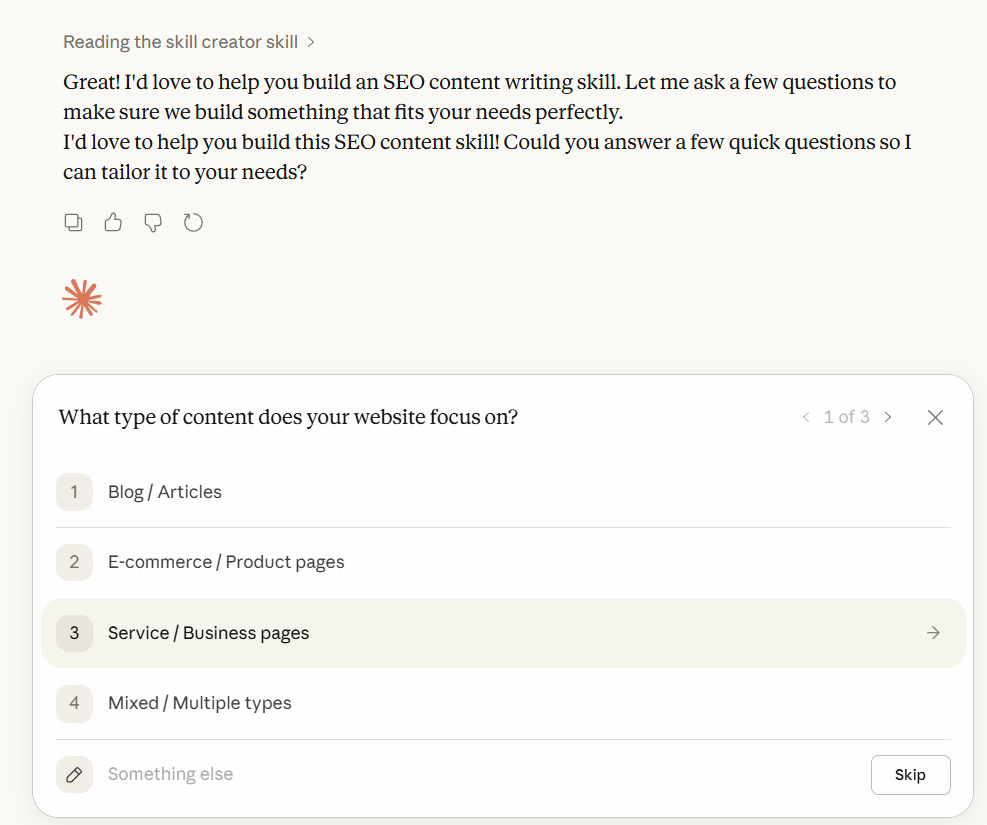
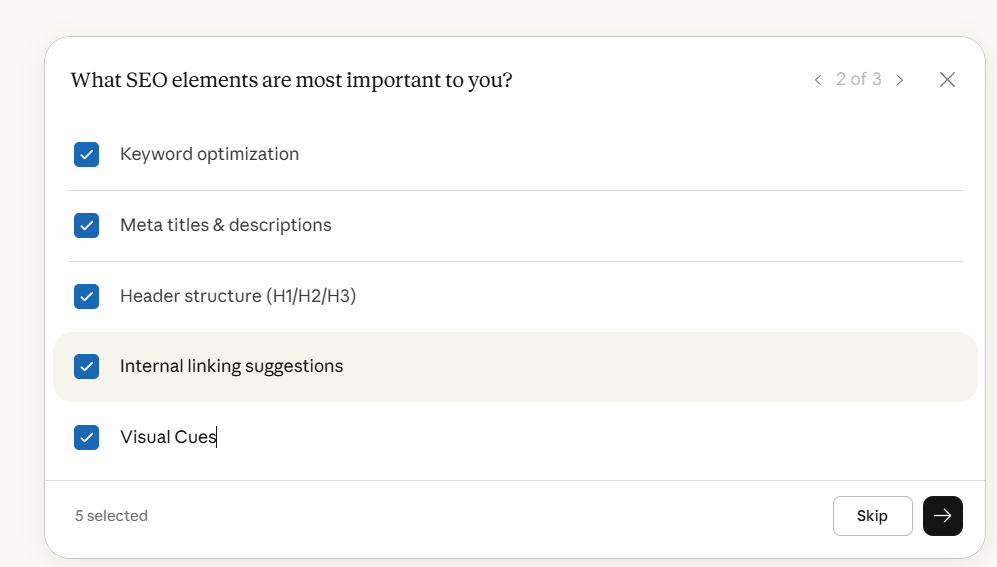
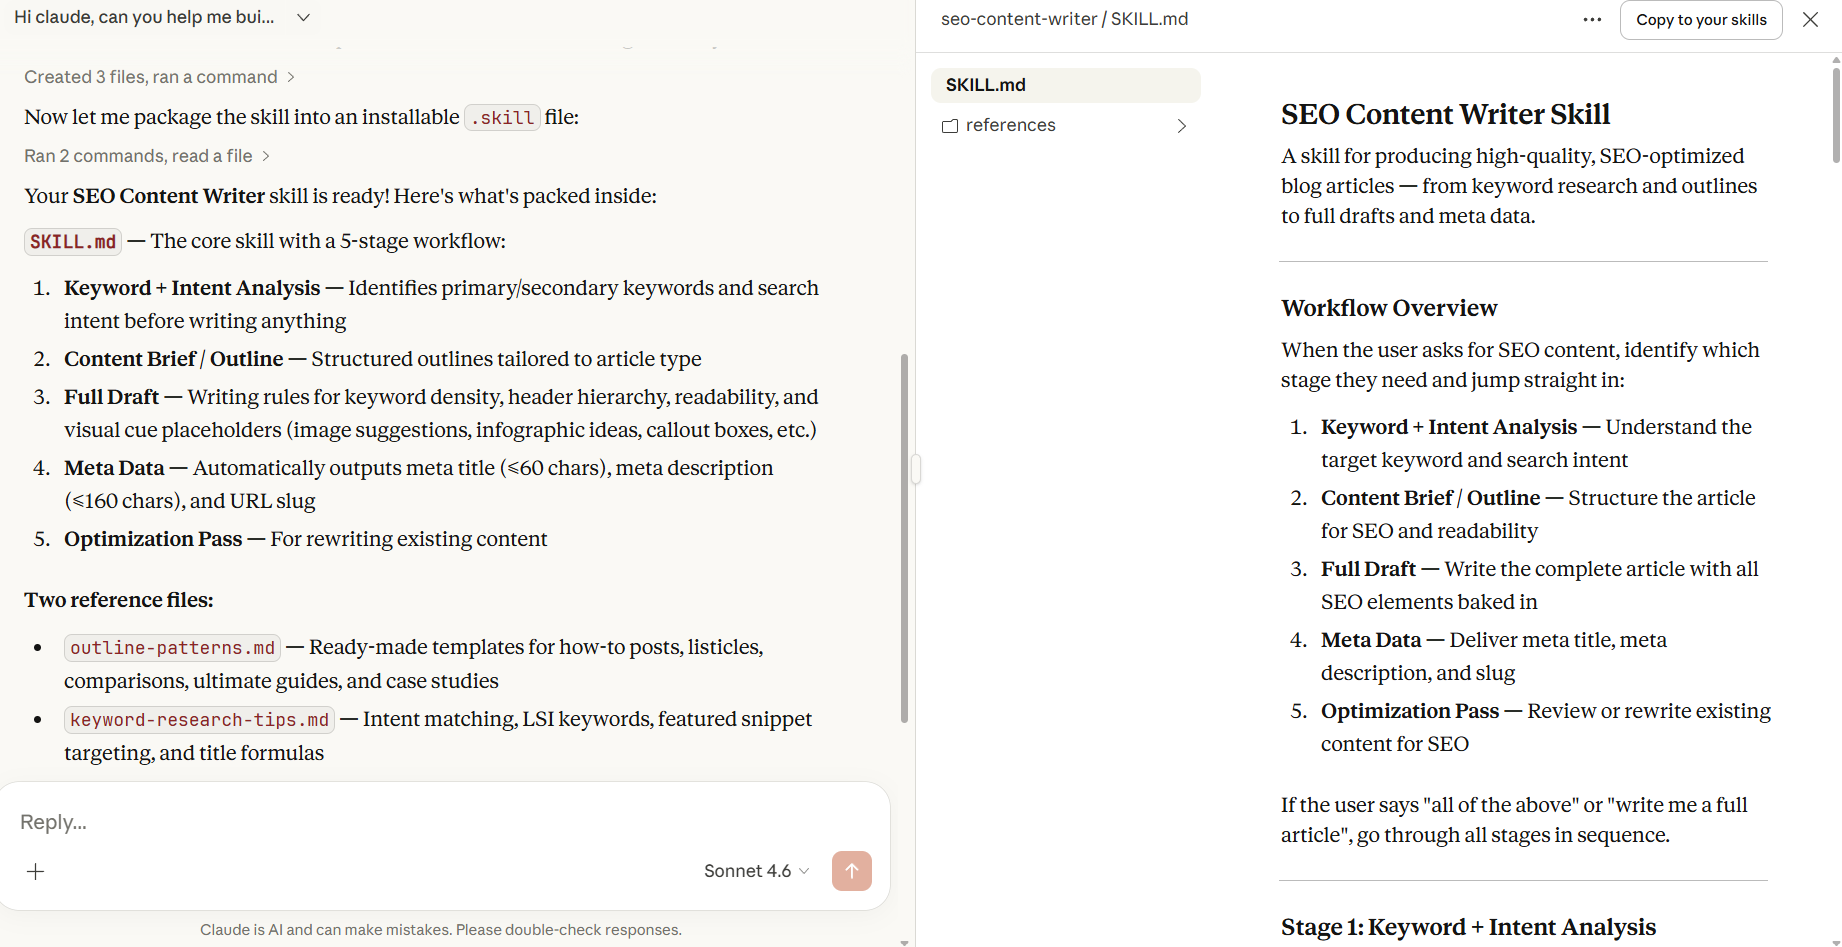
Reference files only load when Claude decides they're needed. This keeps the context window clean. Claude isn't loading a 500-line document for every message, only when the task actually calls for it.
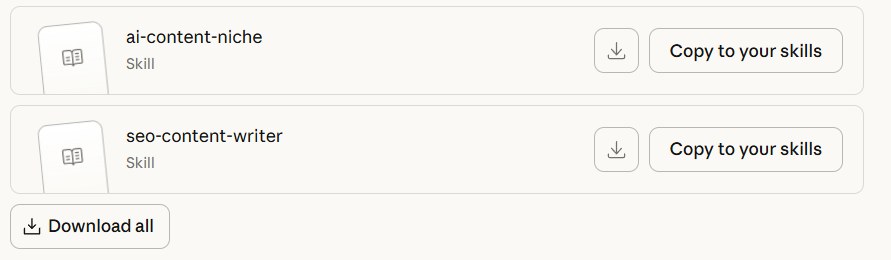
You can read more on how to create custom skills in this guide by Anthropic.

What If Writing a Claude Skill Sounds Too Technical?

Here’s the thing: you don’t have to write the Claude skill yourself.

The most practical way to build Claude skills is to have a conversation with Claude about what you need, let it ask you questions, and have it write the SKILL.md for you. That’s exactly how the three Claude skills in this pipeline were built — through a back-and-forth conversation where Claude asked about the audience, the content types, the voice, the things to avoid, and then produced the instruction files based on the answers.

Here’s a real example of how that conversation went for the SEO Content Writer skill:

The conversation started with a simple request:

How to use claude for building Claude Skills - Data Science Dojo

Claude asked three things upfront: what type of content (blog articles), which SEO elements mattered most (keyword optimization, meta data, headers, internal linking, visual cues), and whether the skill should handle full drafts, outlines, or optimization of existing content.

Building a Claude Skill with Claude - Data Science Dojo

Those three questions shaped the entire skill. The answers told Claude what stages to include in the workflow, what rules to encode, and what reference files to bundle alongside the main instruction file.

Building a Claude Skill with Claude - Data Science Dojo

Then it asked about voice and audience.

For the AI content niche skill, this was the more important conversation. Claude asked who the primary audience was, what the tone should be, and whether the content should always include a “so what for developers” angle. It also asked to see existing published posts from the blog — and used those to identify the actual writing patterns already present: fully developed paragraphs, context before conclusions, technical language used precisely, real-world grounding in named incidents.

Claude Skill

Once the conversation was done, getting the skill installed took one click. Claude has a built-in “Copy Skill” button that packages everything into a .skill file ready to upload directly into Claude’s settings.

Blog | Data Science Dojo

There was one hiccup along the way, a YAML formatting error in the frontmatter caused by special characters in the description field but Claude caught it, explained what broke, and fixed it in the same conversation. No external tools, no manual editing, no debugging a config file at 11pm.

YAML Malformed -Claude Skills

Malformed YAML in Claude Skills

The point is this: the conversation is the skill-building process. You don’t need to know how YAML works or what progressive disclosure means. You need to know what good output looks like for your specific workflow, and be willing to describe it and correct it when the first draft isn’t right.

If you want to replicate this for your own content workflow, start here:

 Claude will ask the right questions. The skill gets built in the conversation.

What the Pipeline Looks Like in Practice

Once the skills are installed, the workflow is a single conversation.

You drop in a topic and your angle — two sentences on what you actually think about it, which the niche skill explicitly asks for before drafting anything. Claude builds the outline using the SEO skill’s structure, drafts the full article in your voice with meta data and visual cue placeholders included, and then generates the LinkedIn post from the same piece using the short-form skill’s format rules.

Claude Skills

The output that used to require multiple separate sessions, write prompt, get generic draft, correct the voice, add the SEO layer, write the meta separately, figure out the LinkedIn angle, happens in one conversation because the standards are already encoded.

The claude skills handle the structure. The SEO rules. The meta data. The tone. The things that should be consistent across every piece but aren’t when you’re explaining them fresh every time. What’s left for you is the part that actually matters: having a point of view on the topic.

The One Thing Claude Skills Can’t Do

Claude skills don’t fix the input problem. If you don’t have an angle on the topic — a real take, something you’d push back on, something you find underrated or overrated — Claude skills cannot invent one for you. It can produce a well-structured, properly formatted, SEO-optimized article that reads like a confident summary of what already exists. That’s not the same thing as a piece that earns a developer’s attention.

Frequently Asked Questions

Do I need Claude Code to use skills?

No. Skills work in Claude.ai directly. You build or download the skill folder, zip it, and upload it through Settings → Capabilities → Skills. Claude Code has its own skills directory for terminal-based workflows, but the skills in this pipeline are built for Claude.ai.

Can I install Claude skills someone else built?

Yes. Claude skills are portable — they’re just folders with a SKILL.md file and optional reference files. Anyone can share them as a .skill file (a zipped folder), which you upload directly in settings. The three claude skills in this pipeline are available as downloadable files.

How many skills can I run at once?

Multiple skills can be active simultaneously. Claude loads only the ones relevant to the current task, so having several installed doesn’t mean all of them are loaded for every message. The progressive disclosure system keeps the context window clean.

Will skills work across different conversations?

Yes. Unlike instructions given in a conversation, which disappear when the session ends, skills persist across all conversations. That’s the core of what makes them different from prompts — you define the standard once and it applies everywhere going forward.

Conclusion

The content pipeline exists. The skills are built. What’s left is the part that was always the hard part: having something worth saying about the topic.

The developers and content teams getting the most out of Claude aren’t better prompters. They built their standards into skills once, and now the consistency, the structure, and the formatting happen automatically. The energy goes into the thinking — the angle, the opinion, the observation that only comes from someone who has actually worked with the thing they’re writing about. And if you want to take this even further, Claude Code can run the whole pipeline from your phone.

Most people are still having the same conversation with Claude every time. Claude skills are how you stop doing that.

Ready to build robust and scalable LLM Applications?
Explore our LLM Bootcamp and Agentic AI Bootcamp for hands-on training in building production-grade retrieval-augmented and agentic AI.

Graph rag is rapidly emerging as the gold standard for context-aware AI, transforming how large language models (LLMs) interact with knowledge. In this comprehensive guide, we’ll explore the technical foundations, architectures, use cases, and best practices of graph rag versus traditional RAG, helping you understand which approach is best for your enterprise AI, research, or product development needs.

Why Graph RAG Matters

Graph rag sits at the intersection of retrieval-augmented generation, knowledge graph engineering, and advanced context engineering. As organizations demand more accurate, explainable, and context-rich AI, graph rag is becoming essential for powering next-generation enterprise AI, agentic AI, and multi-hop reasoning systems.

Traditional RAG systems have revolutionized how LLMs access external knowledge, but they often fall short when queries require understanding relationships, context, or reasoning across multiple data points. Graph rag addresses these limitations by leveraging knowledge graphs—structured networks of entities and relationships—enabling LLMs to reason, traverse, and synthesize information in ways that mimic human cognition.

For organizations and professionals seeking to build robust, production-grade AI, understanding the nuances of graph rag is crucial. Data Science Dojo’s LLM Bootcamp and Agentic AI resources are excellent starting points for mastering these concepts.

Naive RAG vs Graph RAG illustrated

What is Retrieval-Augmented Generation (RAG)?

Retrieval-augmented generation (RAG) is a foundational technique in modern AI, especially for LLMs. It bridges the gap between static model knowledge and dynamic, up-to-date information by retrieving relevant data from external sources at inference time.

How RAG Works

  1. Indexing: Documents are chunked and embedded into a vector database.
  2. Retrieval: At query time, the system finds the most semantically relevant chunks using vector similarity search.
  3. Augmentation: Retrieved context is concatenated with the user’s prompt and fed to the LLM.
  4. Generation: The LLM produces a grounded, context-aware response.

Benefits of RAG:

  • Reduces hallucinations
  • Enables up-to-date, domain-specific answers
  • Provides source attribution
  • Scales to enterprise knowledge needs

For a hands-on walkthrough, see RAG in LLM – Elevate Your Large Language Models Experience and What is Context Engineering?.

What is Graph RAG?

entity relationship graph
source: Langchain

Graph rag is an advanced evolution of RAG that leverages knowledge graphs—structured representations of entities (nodes) and their relationships (edges). Instead of retrieving isolated text chunks, graph rag retrieves interconnected entities and their relationships, enabling multi-hop reasoning and deeper contextual understanding.

Key Features of Graph RAG

  • Multi-hop Reasoning: Answers complex queries by traversing relationships across multiple entities.
  • Contextual Depth: Retrieves not just facts, but the relationships and context connecting them.
  • Structured Data Integration: Ideal for enterprise data, scientific research, and compliance scenarios.
  • Explainability: Provides transparent reasoning paths, improving trust and auditability.

Learn more about advanced RAG techniques in the Large Language Models Bootcamp.

Technical Architecture: RAG vs Graph RAG

Traditional RAG Pipeline

  • Vector Database: Stores embeddings of text chunks.
  • Retriever: Finds top-k relevant chunks for a query using vector similarity.
  • LLM: Generates a response using retrieved context.

Limitations:

Traditional RAG is limited to single-hop retrieval and struggles with queries that require understanding relationships or synthesizing information across multiple documents.

Graph RAG Pipeline

  • Knowledge Graph: Stores entities and their relationships as nodes and edges.
  • Graph Retriever: Traverses the graph to find relevant nodes, paths, and multi-hop connections.
  • LLM: Synthesizes a response using both entities and their relationships, often providing reasoning chains.

Why Graph RAG Excels:

Graph rag enables LLMs to answer questions that require understanding of how concepts are connected, not just what is written in isolated paragraphs. For example, in healthcare, graph rag can connect symptoms, treatments, and patient history for more accurate recommendations.

For a technical deep dive, see Mastering LangChain and Retrieval Augmented Generation.

Key Differences and Comparative Analysis

GraohRAG vs RAG

Use Cases: When to Use RAG vs Graph RAG

Traditional RAG

  • Customer support chatbots
  • FAQ answering
  • Document summarization
  • News aggregation
  • Simple enterprise search

Graph RAG

  • Enterprise AI: Unified search across siloed databases, CRMs, and wikis.
  • Healthcare: Multi-hop reasoning over patient data, treatments, and research.
  • Finance: Compliance checks by tracing relationships between transactions and regulations.
  • Scientific Research: Discovering connections between genes, diseases, and drugs.
  • Personalization: Hyper-personalized recommendations by mapping user preferences to product graphs.
Vector Database vs Knowledge Graphs
source: AI Planet

Explore more enterprise applications in Data and Analytics Services.

Case Studies: Real-World Impact

Case Study 1: Healthcare Knowledge Assistant

A leading hospital implemented graph rag to power its clinical decision support system. By integrating patient records, drug databases, and medical literature into a knowledge graph, the assistant could answer complex queries such as:

  • “What is the recommended treatment for a diabetic patient with hypertension and a history of kidney disease?”

Impact:

  • Reduced diagnostic errors by 30%
  • Improved clinician trust due to transparent reasoning paths

Case Study 2: Financial Compliance

A global bank used graph rag to automate compliance checks. The system mapped transactions, regulations, and customer profiles in a knowledge graph, enabling multi-hop queries like:

  • “Which transactions are indirectly linked to sanctioned entities through intermediaries?”

Impact:

  • Detected 2x more suspicious patterns than traditional RAG
  • Streamlined audit trails for regulatory reporting

Case Study 3: Data Science Dojo’s LLM Bootcamp

Participants in the LLM Bootcamp built both RAG and graph rag pipelines. They observed that graph rag consistently outperformed RAG in tasks requiring reasoning across multiple data sources, such as legal document analysis and scientific literature review.

Best Practices for Implementation

Graph RAG implementation
source: infogain
  1. Start with RAG:

    Use traditional RAG for unstructured data and simple Q&A.

  2. Adopt Graph RAG for Complexity:

    When queries require multi-hop reasoning or relationship mapping, transition to graph rag.

  3. Leverage Hybrid Approaches:

    Combine vector search and graph traversal for maximum coverage.

  4. Monitor and Benchmark:

    Use hybrid scorecards to track both AI quality and engineering velocity.

  5. Iterate Relentlessly:

    Experiment with chunking, retrieval, and prompt formats for optimal results.

  6. Treat Context as a Product:

    Apply version control, quality checks, and continuous improvement to your context pipelines.

  7. Structure Prompts Clearly:

    Separate instructions, context, and queries for clarity.

  8. Leverage In-Context Learning:

    Provide high-quality examples in the prompt.

  9. Security and Compliance:

    Guard against prompt injection, data leakage, and unauthorized tool use.

  10. Ethics and Privacy:

    Ensure responsible use of interconnected personal or proprietary data.

For more, see What is Context Engineering?

Challenges, Limitations, and Future Trends

Challenges

  • Context Quality Paradox: More context isn’t always better—balance breadth and relevance.
  • Scalability: Graph rag can be resource-intensive; optimize graph size and traversal algorithms.
  • Security: Guard against data leakage and unauthorized access to sensitive relationships.
  • Ethics and Privacy: Ensure responsible use of interconnected personal or proprietary data.
  • Performance: Graph traversal can introduce latency compared to vector search.

Future Trends

  • Context-as-a-Service: Platforms offering dynamic context assembly and delivery.
  • Multimodal Context: Integrating text, audio, video, and structured data.
  • Agentic AI: Embedding graph rag in multi-step agent loops with planning, tool use, and reflection.
  • Automated Knowledge Graph Construction: Using LLMs and data pipelines to build and update knowledge graphs in real time.
  • Explainable AI: Graph rag’s reasoning chains will drive transparency and trust in enterprise AI.

Emerging trends include context-as-a-service platforms, multimodal context (text, audio, video), and contextual AI ethics frameworks. For more, see Agentic AI.

Frequently Asked Questions (FAQ)

Q1: What is the main advantage of graph rag over traditional RAG?

A: Graph rag enables multi-hop reasoning and richer, more accurate responses by leveraging relationships between entities, not just isolated facts.

Q2: When should I use graph rag?

A: Use graph rag when your queries require understanding of how concepts are connected—such as in enterprise search, compliance, or scientific discovery.

Q3: What frameworks support graph rag?

A: Popular frameworks include LangChain and LlamaIndex, which offer orchestration, memory management, and integration with vector databases and knowledge graphs.

Q4: How do I get started with RAG and graph rag?

A: Begin with Retrieval Augmented Generation and explore advanced techniques in the LLM Bootcamp.

Q5: Is graph rag slower than traditional RAG?

A: Graph rag can be slower due to graph traversal and reasoning, but it delivers superior accuracy and explainability for complex queries 1.

Q6: Can I combine RAG and graph rag in one system?

A: Yes! Many advanced systems use a hybrid approach, first retrieving relevant documents with RAG, then mapping entities and relationships with graph rag for deeper reasoning.

Conclusion & Next Steps

Graph rag is redefining what’s possible with retrieval-augmented generation. By enabling LLMs to reason over knowledge graphs, organizations can unlock new levels of accuracy, transparency, and insight in their AI systems. Whether you’re building enterprise AI, scientific discovery tools, or next-gen chatbots, understanding the difference between graph rag and traditional RAG is essential for staying ahead.

Ready to build smarter AI?

In the ever-evolving landscape of natural language processing (NLP), embedding techniques have played a pivotal role in enhancing the capabilities of language models.

The birth of Word Embeddings

Before venturing into the large number of embedding techniques that have emerged in the past few years, we must first understand the problem that led to the creation of such techniques.

Word embeddings were created to address the absence of efficient text representations for NLP models. Since NLP techniques operate on textual data, which inherently cannot be directly integrated into machine learning models designed to process numerical inputs, a fundamental question arose: how can we convert text into a format compatible with these models?

Lean more about Text Analytics


Basic approaches like one-hot encoding and Bag-of-Words (BoW) were employed in the initial phases of NLP development. However, these methods were eventually discarded due to their evident shortcomings in capturing the contextual and semantic nuances of language. Each word was treated as an isolated unit, without understanding its relationship with other words or its usage in different contexts.


embedding techniques
Popular word embedding techniques


Word2Vec 

In 2013, Google presented a new technique to overcome the shortcomings of the previous word embedding techniques, called Word2Vec. It represents words in a continuous vector space, better known as an embedding space, where semantically similar words are located close to each other.

This contrasted with traditional methods, like one-hot encoding, which represents words as sparse, high-dimensional vectors. The dense vector representations generated by Word2Vec had several advantages, including the ability to capture semantic relationships, support vector arithmetic (e.g., “king” – “man” + “woman” = “queen”), and improve the performance of various NLP tasks like language modeling, sentiment analysis, and machine translation.

Transition to GloVe and FastText

The success of Word2Vec paved the way for further innovations in the realm of word embeddings. The Global Vectors for Word Representation (GloVe) model, introduced by Stanford researchers in 2014, aimed to leverage global statistical information about word co-occurrences.

GloVe demonstrated improved performance over Word2Vec in capturing semantic relationships. Unlike Word2Vec, GloVe considers the entire corpus when learning word vectors, leading to a more global understanding of word relationships.

Fast forward to 2016, Facebook’s FastText introduced a significant shift by considering sub-word information. Unlike traditional word embeddings, FastText represented words as bags of character n-grams. This sub-word information allowed FastText to capture morphological and semantic relationships in a more detailed manner, especially for languages with rich morphology and complex word formations. This approach was particularly beneficial for handling out-of-vocabulary words and improving the representation of rare words.

The Rise of Transformer Models 

The real game-changer in the evolution of embedding techniques came with the advent of the Transformer architecture. Introduced by researchers at Google in the form of the Attention is All You Need paper in 2017, Transformers demonstrated remarkable efficiency in capturing long-range dependencies in sequences.

The architecture laid the foundation for state-of-the-art models like OpenAI’s GPT (Generative Pre-trained Transformer) series and BERT (Bidirectional Encoder Representations from Transformers). Hence, the traditional understanding of embedding techniques is revamped with new solutions.


LLM Bootcamp banner


Impact of Embedding Techniques on Language Models

The embedding techniques mentioned above have significantly impacted the performance and capabilities of LLMs. Pre-trained models like GPT-3 and BERT leverage these embeddings to understand natural language context, semantics, and syntactic structures. The ability to capture context allows these models to excel in a wide range of NLP tasks, including sentiment analysis, text summarization, and question-answering.

Imagine the sentence: “The movie was not what I expected, but the plot twist at the end made it incredible.”

Traditional models might struggle with the negation of “not what I expected.” Word embeddings could capture some sentiment but might miss the subtle shift in sentiment caused by the positive turn of events in the latter part of the sentence.

In contrast, LLMs with contextualized embeddings can consider the entire sentence and comprehend the nuanced interplay of positive and negative sentiments. They grasp that the initial negativity is later counteracted by the positive twist, resulting in a more accurate sentiment analysis.

Advantages of Embeddings in LLMs


Advantages of Embeddings in LLMs


  • Contextual Understanding: LLMs equipped with embeddings comprehend the context in which words appear, allowing for a more nuanced interpretation of sentiment in complex sentences.
  • Semantic Relationships: Word embeddings capture semantic relationships between words, enabling the model to understand the subtleties and nuances of language. 
  • Handling Ambiguity: Contextual embeddings help LLMs handle ambiguous language constructs, such as negations or sarcasm, contributing to improved accuracy in sentiment analysis.
  • Transfer Learning: The pre-training of LLMs with embeddings on vast datasets allows them to generalize well to various downstream tasks, including sentiment analysis, with minimal task-specific data.

To dive even deeper into embeddings and their role in LLMs, click here

How are Enterprises Using Embeddings in their LLM Processes?

In light of recent advancements, enterprises are keen on harnessing the robust capabilities of Large Language Models (LLMs) to construct comprehensive Software as a Service (SAAS) solutions. Nevertheless, LLMs come pre-trained on extensive datasets, and to tailor them to specific use cases, fine-tuning on proprietary data becomes essential.

This process can be laborious. To streamline this intricate task, the widely embraced Retrieval Augmented Generation (RAG) technique comes into play. RAG involves retrieving pertinent information from an external source, transforming it to a format suitable for LLM comprehension, and then inputting it into the LLM to generate textual output.

This innovative approach enables the fine-tuning of LLMs with knowledge beyond their original training scope. In this process, you need an efficient way to store, retrieve, and ingest data into your LLMs to use it accurately for your given use case.

One of the most common ways to store and search over unstructured data is to embed it and store the resulting embedding vectors, and then at query time to embed the unstructured query and retrieve the embedding vectors that are ‘most similar’ to the embedded query.  Hence, without embedding techniques, your RAG approach will be impossible.


How generative AI and LLMs work


Understanding the Creation of Embeddings

Much like a machine learning model, an embedding model undergoes training on extensive datasets. Various models available can generate embeddings for you, and each model is distinct. You can find the top embedding models here.

It is unclear what makes an embedding model perform better than others. However, a common way to select one for your use case is to evaluate how many words a model can take in without breaking down. There’s a limit to how many tokens a model can handle at once, so you’ll need to split your data into chunks that fit within the limit. Hence, choosing a suitable model is a good starting point for your use case.

Creating embeddings with Azure OpenAI is a matter of a few lines of code. To create embeddings of a simple sentence like The food was delicious and the waiter…, you can execute the following code blocks:

  • First, import AzureOpenAI from OpenAI


  • Load in your environment variables


  • Create your Azure OpenAI client.


  • Create your embeddings


And you’re done! It’s really that simple to generate embeddings for your data. If you want to generate embeddings for an entire dataset, you can follow along with the great notebook provided by OpenAI itself here.


To Sum It Up!

The evolution of embedding techniques has revolutionized natural language processing, empowering language models with a deeper understanding of context and semantics. From Word2Vec to Transformer models, each advancement has enriched LLM capabilities, enabling them to excel in various NLP tasks.

Enterprises leverage techniques like Retrieval Augmented Generation, facilitated by embeddings, to tailor LLMs for specific use cases. Platforms like Azure OpenAI offer straightforward solutions for generating embeddings, underscoring their importance in NLP development. As we forge ahead, embeddings will remain pivotal in driving innovation and expanding the horizons of language understanding.


Explore a hands-on curriculum that helps you build custom LLM applications!

Data erasure is a software-based process that involves data sanitization or, in plain words, ‘data wiping’ so that no traces of data remain recoverable. This helps with the prevention of data leakage and the protection of sensitive information like trade secrets, intellectual property, or customer information.


Data Science Bootcamp Banner


By 2025, it is estimated that data will grow up to 175 Zettabytes, and with great data comes great responsibility. Data plays a pivotal role in both personal and professional lives. May it be confidential records or family photos, data security is important and must always be endorsed.

As the volume of digital information continues to grow, so does the need for safeguarding and securing data. Key data breach statistics show that 21% of all folders in a typical company are open to everyone, leading to malicious attacks, indicating a rise in data leakage and 51% criminal incidents.


Data erasure explanation
Source: Dev.to

Understanding Data Erasure

Data erasure is a fundamental practice in the field of data security and privacy. It involves the permanent destruction of data from storage devices like hard disks, solid-state devices, or any other digital media through software or other means.


What is Big Data Ethics and controversial experiments in data science?

This practice ensures that data remains completely unrecoverable through any data recovery methods while the device remains reusable (in case software is being used). Data erasure works in regard to an individual person who is disposing of a personal device as well as organizations handling sensitive business information. It guarantees responsible technology disposal.

The science behind data erasure

Data erasure is also known as ‘overwriting’, it involves a process of writing on data with a series of 0s and 1s, making it unreadable and undiscoverable. The overwriting process varies in the number of passes and patterns used.

The type of overwriting depends on multiple factors like the nature of the storage device, the type of data at hand, and the level of security that is needed.


Data deletion vs data erasure
Data Erasure – Source: Medium


The ‘number of passes’ refers to the number of times the overwriting process is repeated for a certain storage device. Each pass essentially overwrites the old data with new data. The greater the number of passes, the more thorough the data erasure process is, making it increasingly difficult to recover the demolished data.

‘Patterns’ can make data recovery extremely challenging. This is the reason why different sequences and patterns are written to the data during each pass. In essence, the data erasure process can be customized to cater to different types of scenarios depending upon the sensitivity of the data being erased. Moreover, data erasure is also used to verify whether the erasure process was successful.


Read more on how to master data security in warehousing 

The Need for Data Erasure

Confidentiality of business data, prevention of data leakage, and regulation with compliance are some of the reasons we need methods like data erasure especially when someone is relocating, repurposing, or putting a device to rest.


How generative AI and LLMs work


Traditional methods like data deletion make the data unavailable to the user, but provide the privilege of recovering it through different software.  Likewise, the destruction of physical devices renders the device completely useless.

For this purpose, a software-based erasure method is required. Some crucial factors that drive the need are listed below:

Protection of sensitive information:

Protecting sensitive information from unauthorized access is one of the primary reasons for having data erasure. Data branches or leakage of confidential information like customer information, trade secrets, or proprietary information can lead to severe consequences.

Thus, when the amount of data begins to get unmanageable and enterprises look forward to disposing of a portion of it, it is always advisable to destroy the data in a way that it is not recoverable for misuse later. Proper data erasure techniques help to mitigate the risk associated with cybercrimes.


Read more about Data privacy and data anonymization techniques 


Data lifecycle management:

The data lifecycle management process includes secure storage and retrieval of data but alongside operational functionality, it is also necessary to dispose of the data properly. Data erasure is a crucial aspect of data lifecycle management and helps to responsibly remove data when it is no longer needed.

Effective data lifecycle management ensures compliance with legal and regulatory requirements while minimizing the risk of data breaches. Additionally, it optimizes storage resources and enhances data governance by maintaining data integrity throughout its lifecycle.


Review the relationship between data science and cybersecurity with the most common use cases.


Compliance with data protection regulations:

Data protection regulations in different countries require organizations to safeguard the privacy and security of an individual’s personal data. To avoid any legal consequences and potential damages from data theft, breach, or leakage, data erasure is a legal requirement to ensure compliance with the imposed regulations.

Additionally, adhering to these regulations helps build trust with stakeholders and demonstrates the organization’s commitment to responsible data handling practices.

Key Applications of Data Erasure in Key Industries


 Key Applications of Data Erasure


Data erasure is vital for businesses handling sensitive information, ensuring secure disposal, regulatory compliance, and protection against data breaches. Below are examples of its implementation across industries:

Corporate IT asset disposal:

When a company decides to retire its previous systems and upgrade to new hardware, it must ensure that any old data that belongs to the company is securely erased from the older devices before they can be sold, donated or recycled.

This prevents sensitive corporate information from falling into the wrong hands. The IT department can use certified data erasure software to securely wipe all sensitive company data, including financial reports, customer databases, and employee records, ensuring that none of this information can be recovered from the devices.

Healthcare data privacy:

Like the corporate industry, Healthcare organisations tend to store confidential patient information in their systems. Hospitals erase patient data, including medical histories and test results, using techniques like cryptographic wiping and degaussing.


Explore the role of Data science in Healthcare


If the need arises to upgrade these systems, they must ensure secure data erasure to protect patient confidentiality and to comply with healthcare data privacy regulations. This safeguards privacy and ensures compliance with HIPAA and GDPR, mitigating risks of breaches and identity theft.

Cloud services:

Cloud service providers often have data erasure procedures in place to securely erase customer data from their servers when requested by customers or when the service is terminated.

Cloud providers erase deleted or decommissioned data using logical sanitization, cryptographic erasure, and secure overwriting. Retired servers undergo physical destruction, ensuring no data recovery is possible.

Data center operations:

Data centres often have strict data erasure protocols in place to securely wipe data from hard drives, SSDs, and other storage devices when they are no longer in use. This ensures that customer data is not accessible after the equipment is decommissioned.

Data centers securely erase sensitive data from decommissioned storage devices using multipass overwriting and cryptographic erasure. Compliance with standards like NIST 800-88 ensures secure protocols and protection of client data.

Financial services:

In a situation where a stock brokerage firm needs to retire its older trading servers. These servers would indefinitely contain some form of sensitive financial transaction data and customer account information.


Discover the top 8 data science in the finance industry 


Prior to selling the servers, the firm would have to use hardware-based data erasure solutions to completely overwrite the data and render it irretrievable, ensuring client confidentiality and regulatory compliance.

Safeguard Your Business Data Today!

In the era where data is referred to as the ‘new oil’, safeguarding it has become paramount. Many times, individuals feel hesitant to dispose of their personal devices due to the possible misuse of data present in them.


Explore a hands-on curriculum that helps you build custom LLM applications!


The same applies to large organizations, when proper utilization of data has been done, standard measures should be taken to discard the data so that it does not result in unnecessary consequences. To ensure privacy and maintain integrity, data erasure was brought into practice. In an age where data is king, data erasure is the guardian of the digital realm.