Organizations increasingly rely on Linkedin to build brand presence, run campaigns, and engage with their professional community. While LinkedIn provides native dashboards, most companies want to bring Linkedin data into their data warehouse, such as Azure Synapse, for unified analytics alongside CRM, financial, and other marketing data.
This guide shows you how to:
Get Linkedin Community Management API access
Authenticate and fetch post statistics
Build an Azure Synapse pipeline to land data into ADLS as Parquet
LinkedIn is one of the most valuable platforms for B2B marketing, employer branding, and thought leadership. However, relying solely on LinkedIn’s native dashboards limits how deeply organizations can analyze their campaign and engagement data. Exporting this data into Azure Synapse unlocks richer insights and advanced analytics by enabling cross-platform comparisons and custom reporting.
Here’s why organizations extract LinkedIn data into Azure Synapse:
Understand What Works: Identify which posts, campaigns, or content types generate the highest impressions, clicks, and engagement rates over time.
Know Your Audience: Analyze audience demographics such as job titles, industries, and company sizes to better tailor your messaging.
Measure ROI: Combine campaign data with ad spend and lead metrics to calculate true marketing ROI.
Create Custom Dashboards: Go beyond LinkedIn’s standard analytics with Power BI visualizations that blend multiple data sources.
Connect the Dots: Integrate LinkedIn analytics with data from Google Ads, Facebook, HubSpot, or Salesforce for a unified marketing performance view.
Optimize Performance: Use machine learning and automation within Azure Synapse to predict engagement trends and optimize posting strategies.
By centralizing LinkedIn analytics in Azure Synapse, businesses move from reactive monitoring to proactive decision-making — enabling data-driven campaign planning, deeper audience insights, and unified performance tracking.
Let’s Get Started with the Tutorial
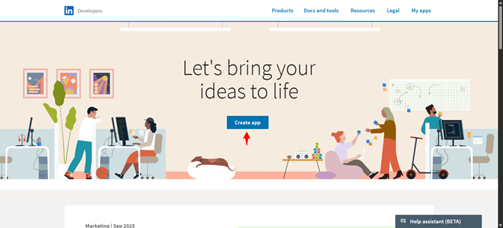
In this section, we’ll walk through the complete setup process, from creating a Linkedin app and generating API access tokens to configuring a REST connection and building a data pipeline in Azure Synapse. By the end, you’ll have an automated workflow that pulls your Linkedin Page analytics directly into your Azure Synapse workspace for unified reporting and analysis.
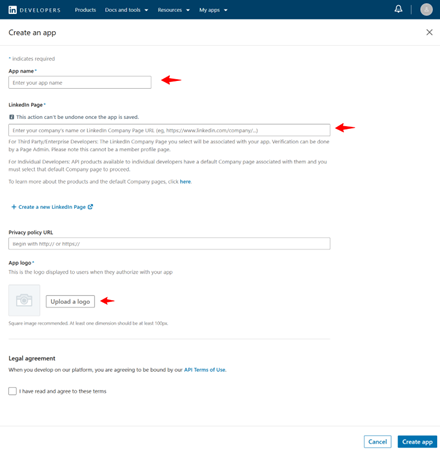
Fill in the required information, make sure you have a LinkedIn Page.
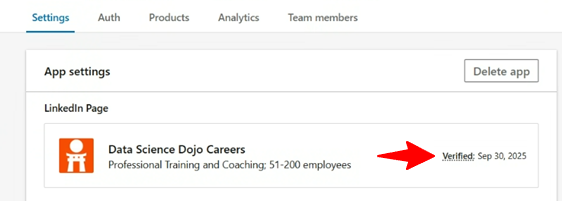
Go to the Settings tab and click the Verify button. Share the link with the administrator of your LinkedIn company page. The administrator must verify the app to grant it access to company data. Please, ensure that the app is verified.
Step 2: Request Access to the API & Generate Access Token
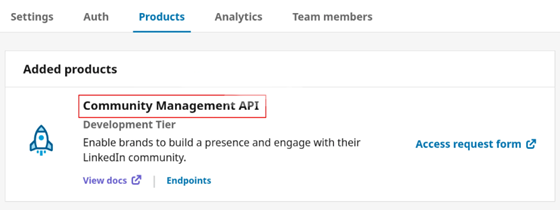
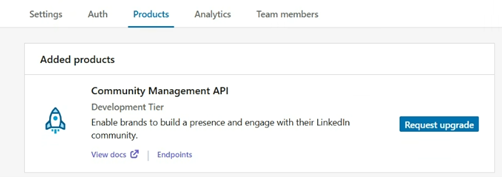
Once your app is verified, navigate to the Products tab and request access to the necessary APIs.
If you need access to LinkedIn Page data to work with organic content and page analytics, such as posts, followers, reactions, comments, shares, and engagement metrics, request access to Community Management API. The Community Management API enables developers to manage LinkedIn company pages on behalf of clients and access related account details (admins, roles, follower details) and analytics, including comments, reactions, and other page update activity.
Fill in the Access Request Form
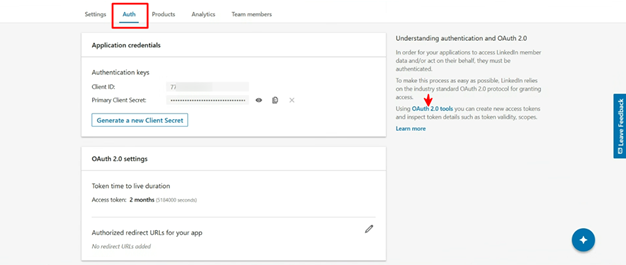
Once the application has been approved for the development tier you will then have to generate access token.
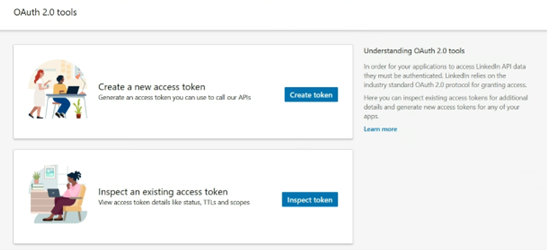
Click OAuth 2.0 tools on the right-hand side of the page under Auth.
Click the Create token button to begin the authorization process.
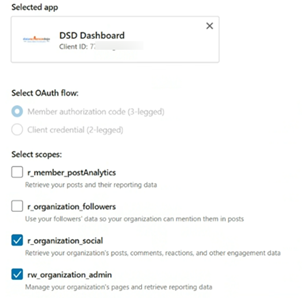
Select the required scopes for pages data access:
r_organization_social
rw_organization_admin
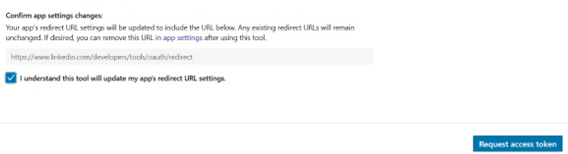
After selecting the appropriate scopes, click Request access token.
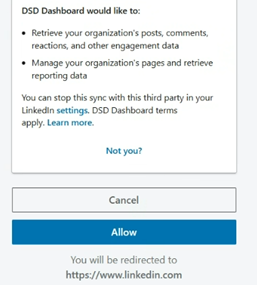
On the next screen, click Allow to authorize the app.
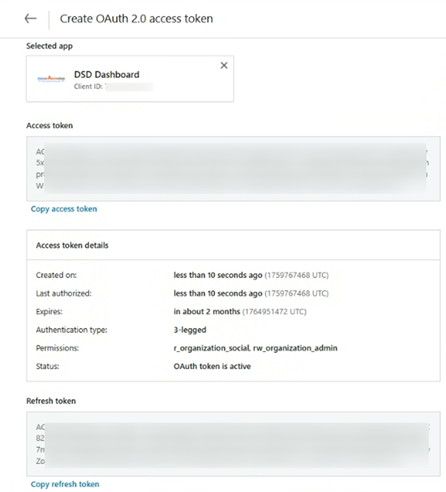
After the token is generated, copy and securely store your Access & Refresh Token.
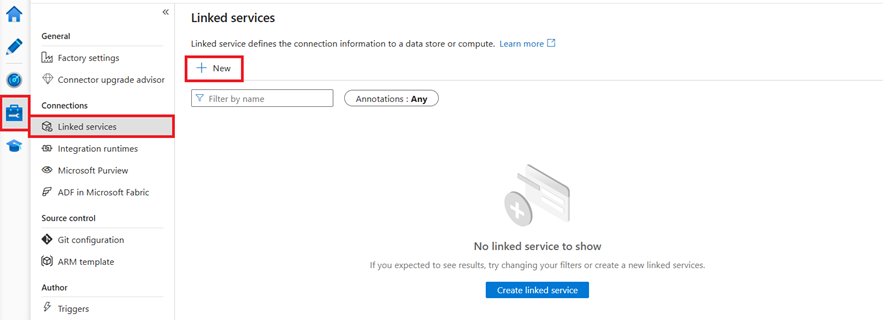
Step 3: Create a REST linked service in Azure Synapse or Data Factory using UI
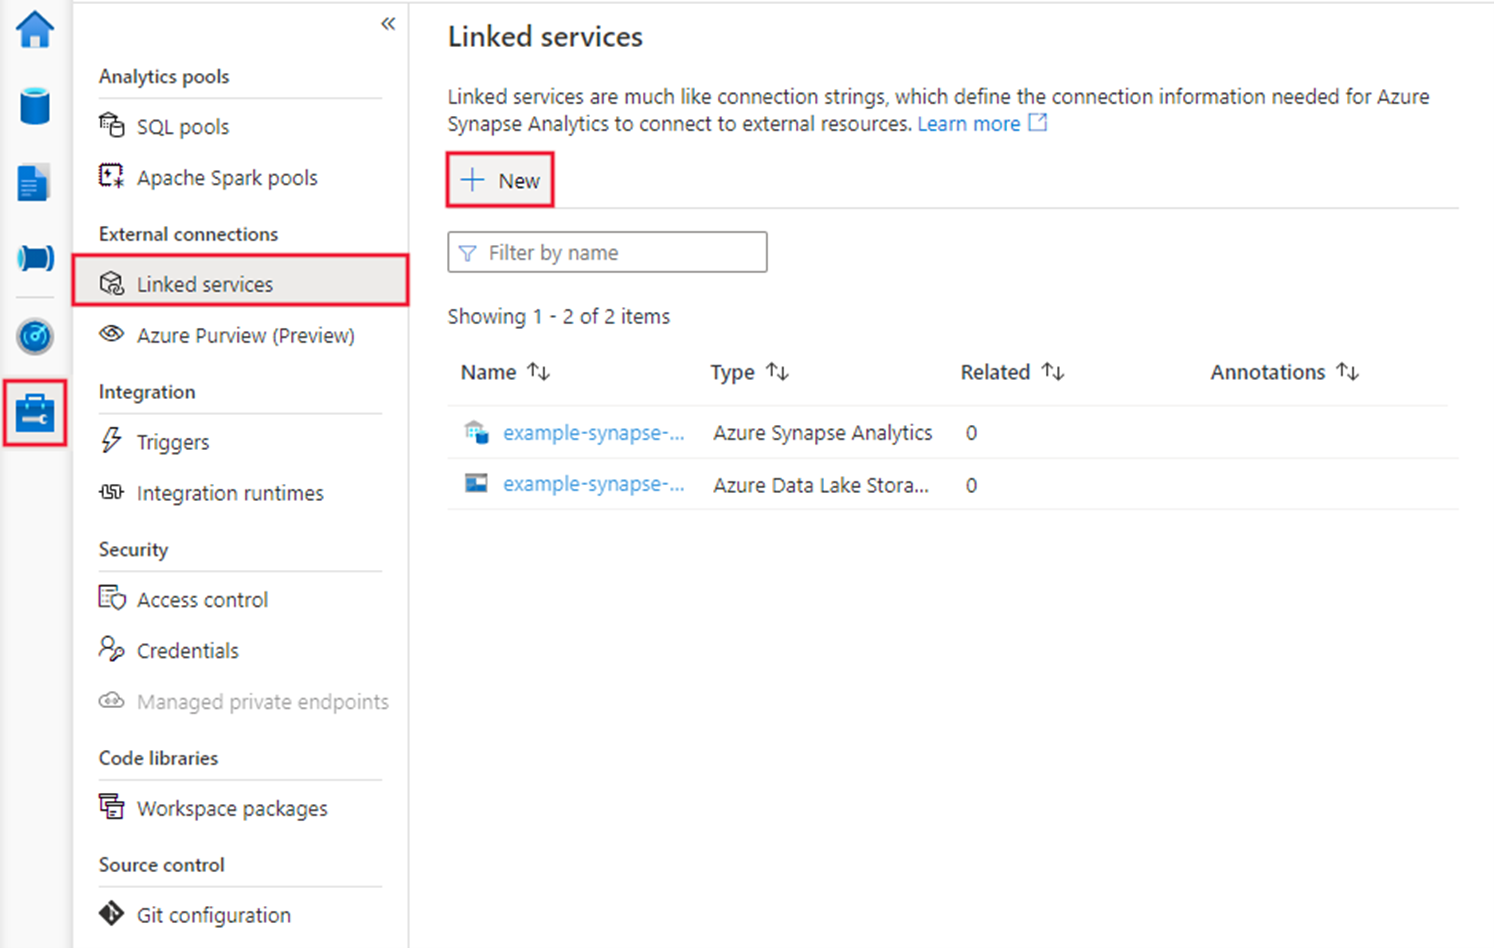
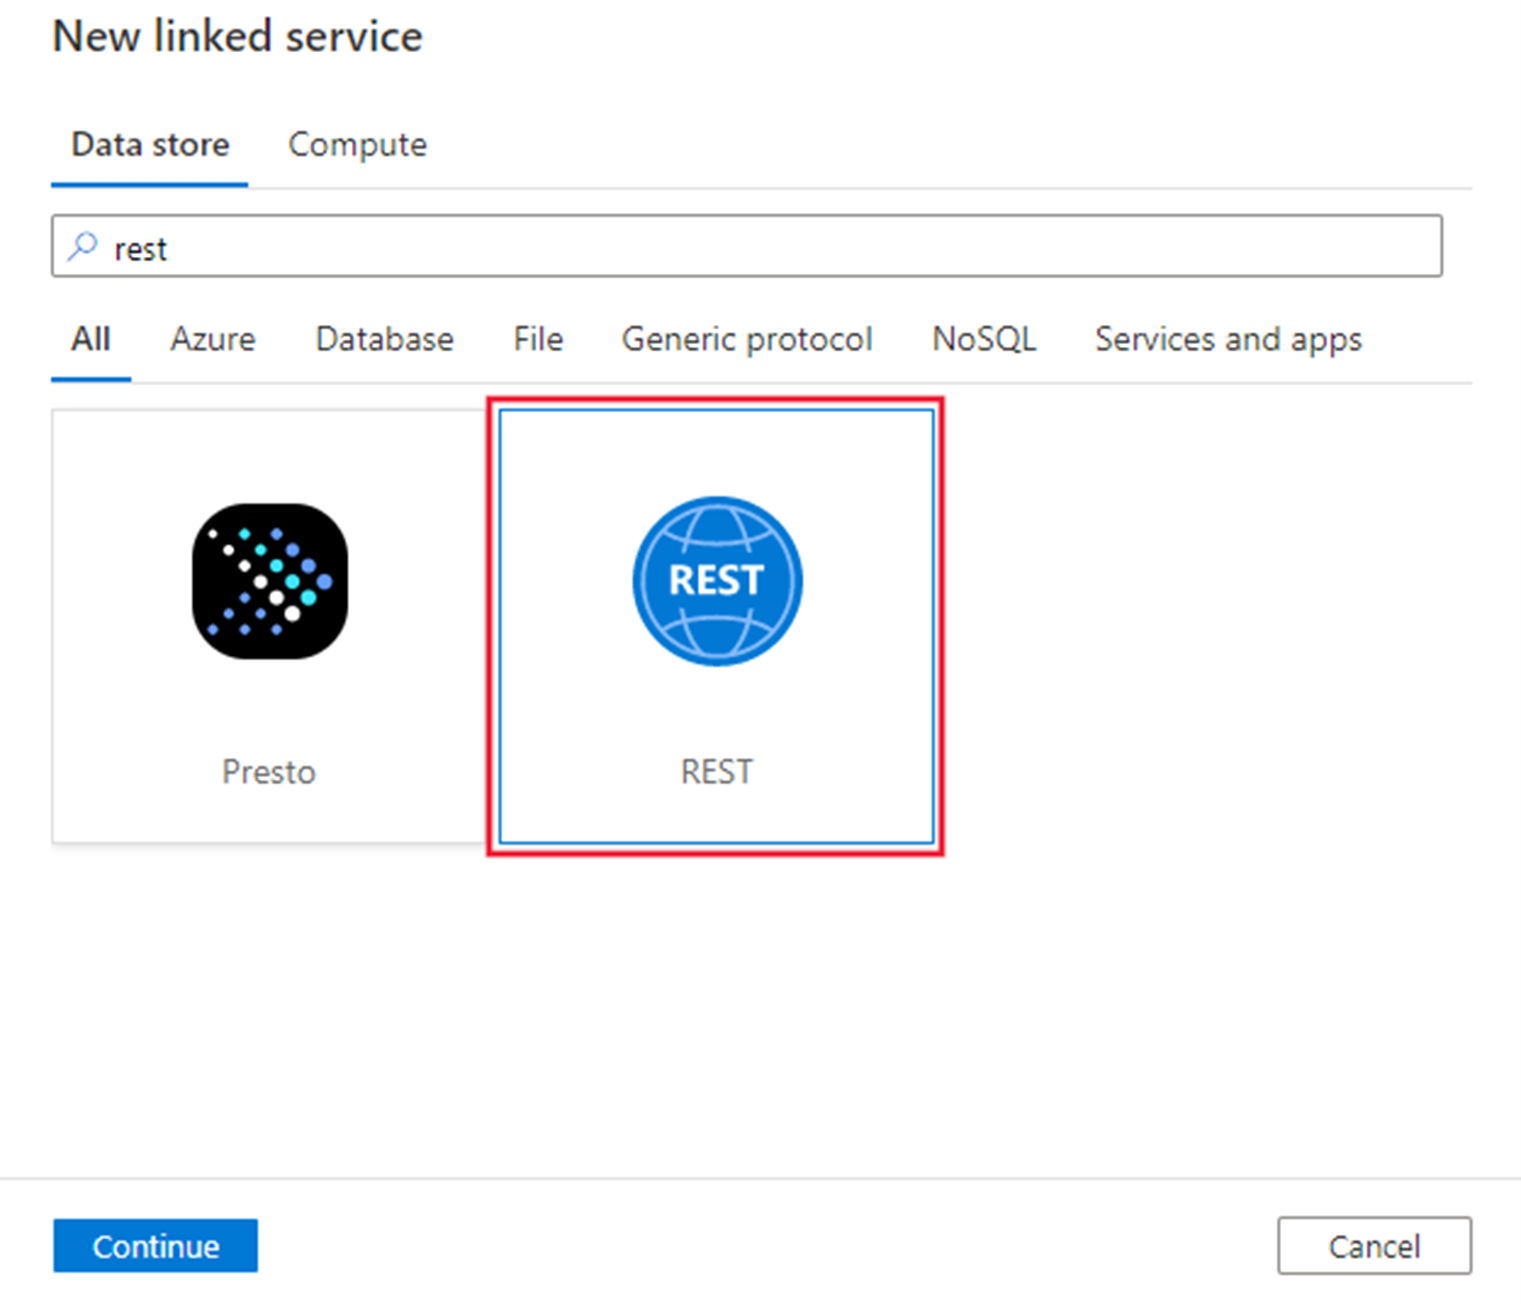
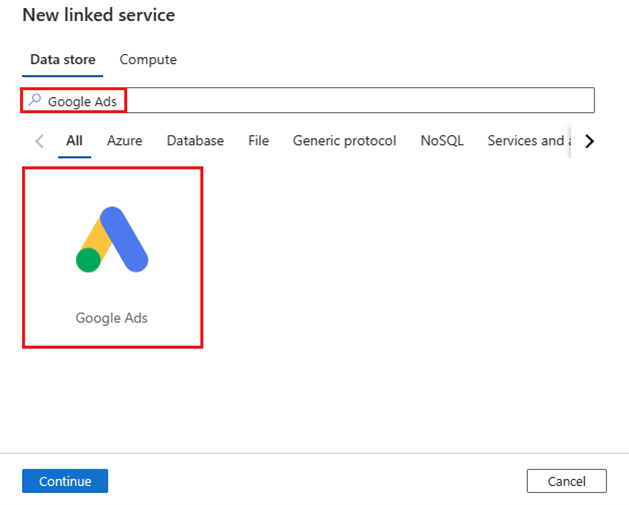
Browse to the Manage tab in your Azure Synapse or Data Factory workspace and select Linked Services, then select New:
Search for REST and select the REST connector.
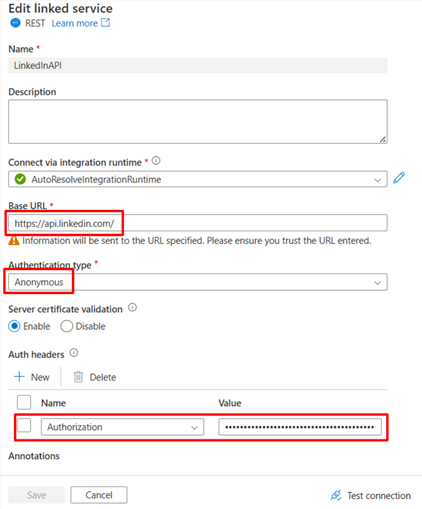
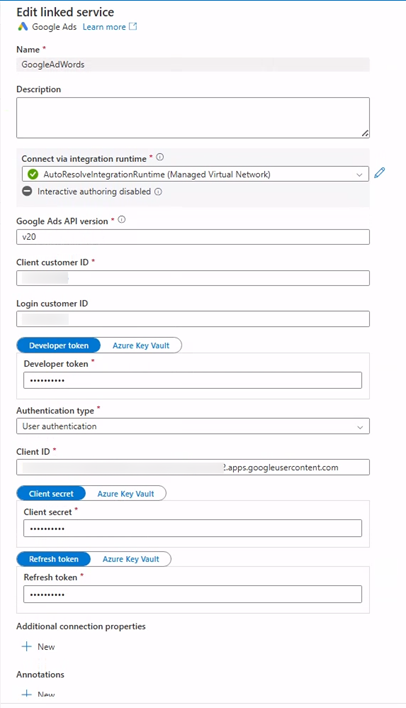
Configure the service details, test the connection, and create the new linked service.
Base URL: https://api.linkedin.com/
Authentication type: Anonymous
Under Auth headers, click + New and add:
Name: Authorization
Value: Bearer <your_access_token> (replace with the valid LinkedIn access token, not the refresh token).
Step 4:Add and Configure the Data Pipeline
Once your linked service is ready, it’s time to create the data pipeline that connects everything from LinkedIn API to your data lake.
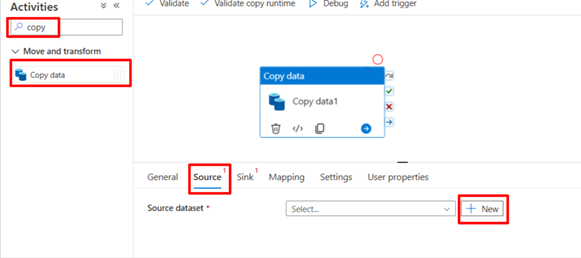
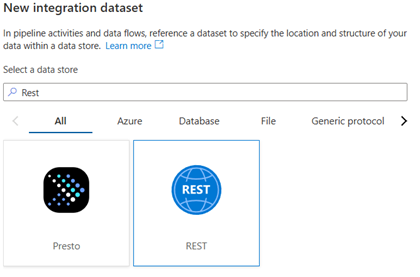
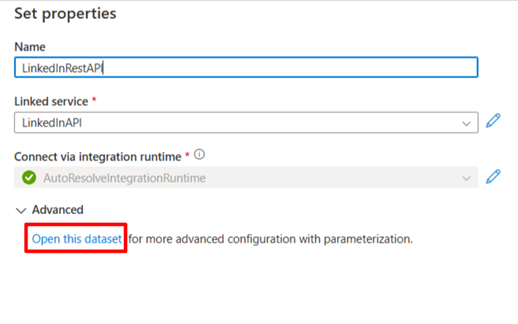
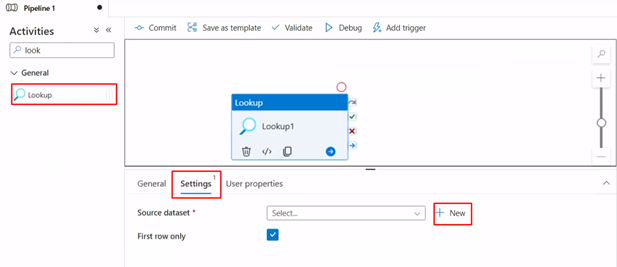
Add Copy Activity and Integration Dataset in Azure Synapse or Data Factory
Name the integration dataset, select the linked service and open the dataset
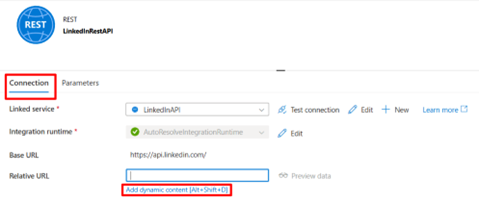
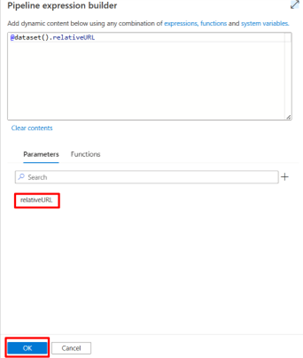
Under Parameters, add a new parameter to make the relative URL dynamic
Under Connection, add dynamic content for the Relative URL and select the newly added parameter
Commit/Save the integration dataset
Fetch Monthly Aggregated Post Statistics
We’ll use the organizationalEntityShareStatistics endpoint to extract post-level analytics (impressions, clicks, reactions, etc.) returns share(post) data only within the past 12 months, using a rolling 12-month window.
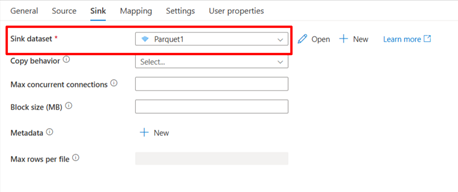
Under the Sink tab, select a Parquet integration dataset to store your LinkedIn data as Parquet files in ADLS.
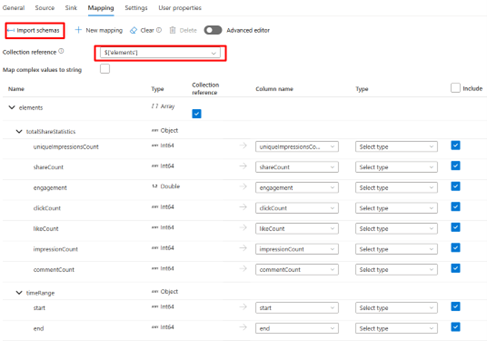
Go to the Mapping tab:
Click Import Schemas
Change the Collection reference to elements[]
Click Import Schemas again
Remove any paging objects and fix malformed column names
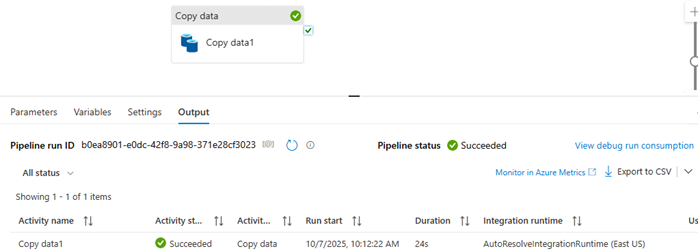
Step 5: Run and Validate
Debug the pipeline to execute your Copy Activity.
Verify the data output in your ADLS container.
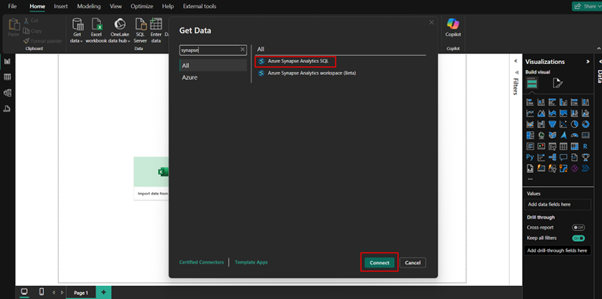
Optionally, create a view in Azure Synapse serverless SQL pool for Power BI to consume.
Summary
By connecting the LinkedIn Community Management API with Azure Synapse or Azure Data Factory, you can automate the ingestion and transformation of critical marketing metrics — including:
Post and share analytics
Follower growth and engagement trends
Page performance metrics
Social metadata and reactions
Video engagement and view-through analytics
This automated integration ensures that your LinkedIn data flows seamlessly into Azure Data Lake Storage (ADLS) in Parquet format, ready for querying, transformation, or visualization in Power BI.
Ultimately, this setup empowers your marketing and analytics teams to:
Access real-time campaign insights in a single, scalable data warehouse
Combine LinkedIn data with CRM, financial, and web analytics datasets
Track performance and ROI across all digital touchpoints
Build richer, more actionable marketing intelligence dashboards
In short, integrating LinkedIn data into Azure Synapse transforms fragmented platform metrics into a cohesive, analytics-ready data foundation, enabling smarter, faster, and more informed business decisions.
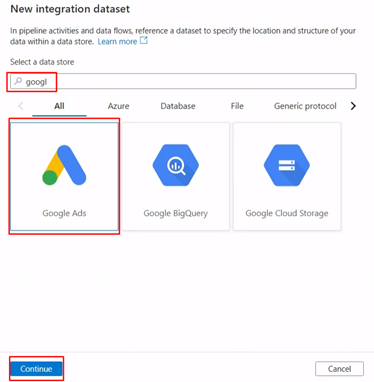
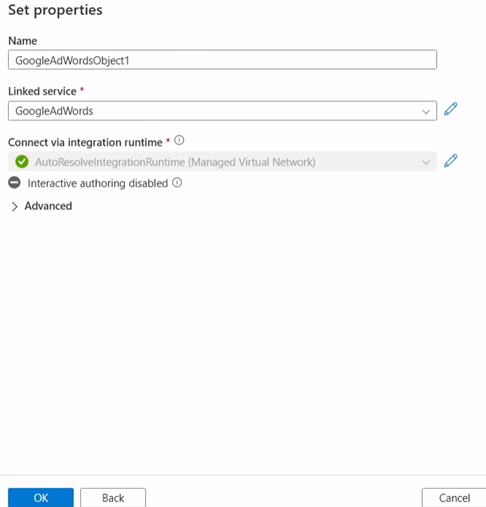
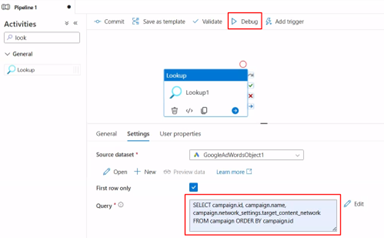
Modern marketing teams need to track digital ad performance quickly and accurately. If you are running Google Ads campaigns, integrating your data into Azure Synapse / Data Factory ensures you can analyze impressions, clicks, conversions, and spend alongside your other enterprise datasets.
In this step-by-step guide, we’ll walk you through:
Why Connect Google Ads with Azure Synapse / Data Factory?
By linking Google Ads data with Synapse or Data Factory, you can:
Automate the flow of paid search metrics into your data warehouse.
Build Power BI dashboards that provide real-time marketing performance insights.
Combine advertising spend data with sales, CRM, or other internal systems.
Eliminate manual exports and reduce reporting delays.
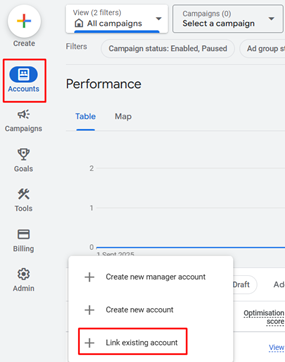
Pre-requisites: Create a Google Ads Manager Account (Optional)
A manager account is a Google Ads account that lets you easily view and manage multiple Google Ads accounts (including other manager accounts) from a single account.
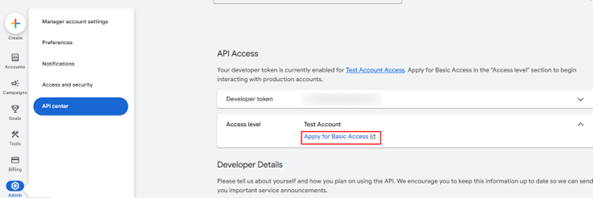
The Developer Token allows Synapse to call the Google Ads API.
Go to Google Ads API Center. Sign in to your Google Ads manager account if prompted.
Fill in the access form and accept the terms.
Ensure that your information is correct and your company’s website URL is functioning. If the website is not live, Google might not be able to process your application and reject it.
Ensure that the API contact email you provide leads to a regularly monitored inbox. Google’s API compliance team might reach out to this email address during the review process for clarifications. If you can’t be reached, Google might not continue with your application.
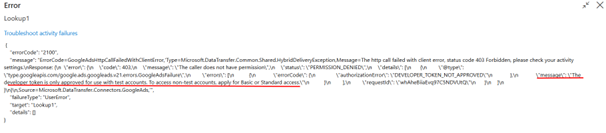
Your developer token now has Test Account Access level and you can start making API calls against test accounts (Optional).
Apply for basic API access (Google usually responds in ~3 working days).
While you wait for approval you can continue with the following steps, note the developer token value as you will require it when making your first API call.
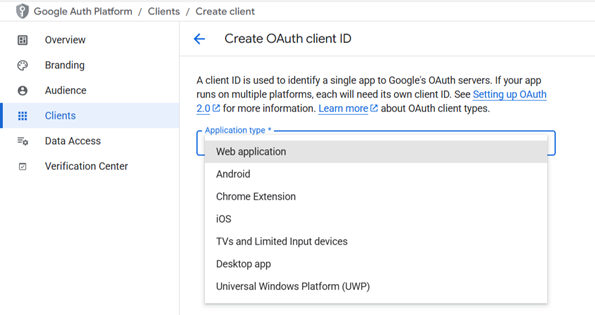
Create a new project under Menu > IAM & Admin > Create Project.
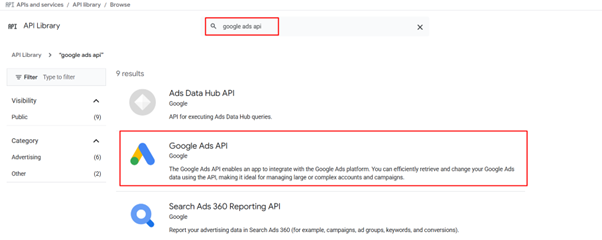
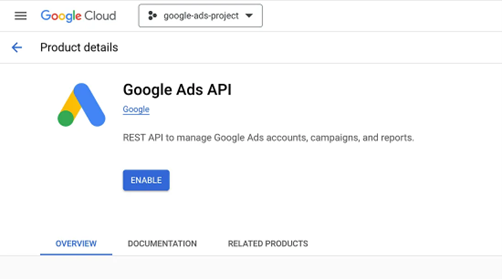
Enable the Google Ads API in your project.
Open the API Library in the Google API Console. If prompted, select your project or create a new one. The API Library lists all available APIs, grouped by product family and popularity.
Select the Google Ads API, then click the Enable button.
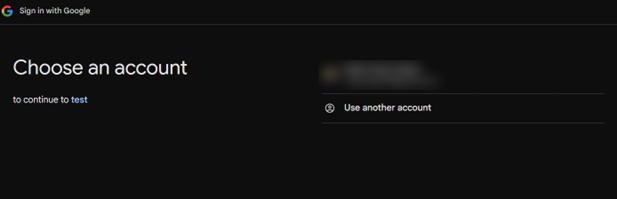
Step 7: Use Authorization Code to get the Refresh Token
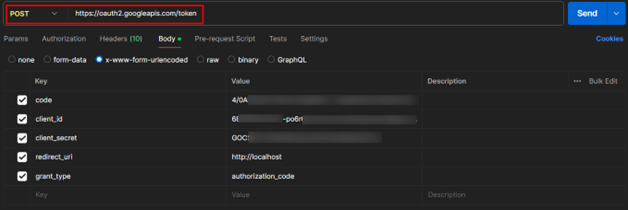
Since the authorization code expires quickly, use Postman (or curl) to get a Refresh Token.
Request URL:
https://oauth2.googleapis.com/token
Request Body (x-www-form-urlencoded):
code=AUTHORIZATION_CODE
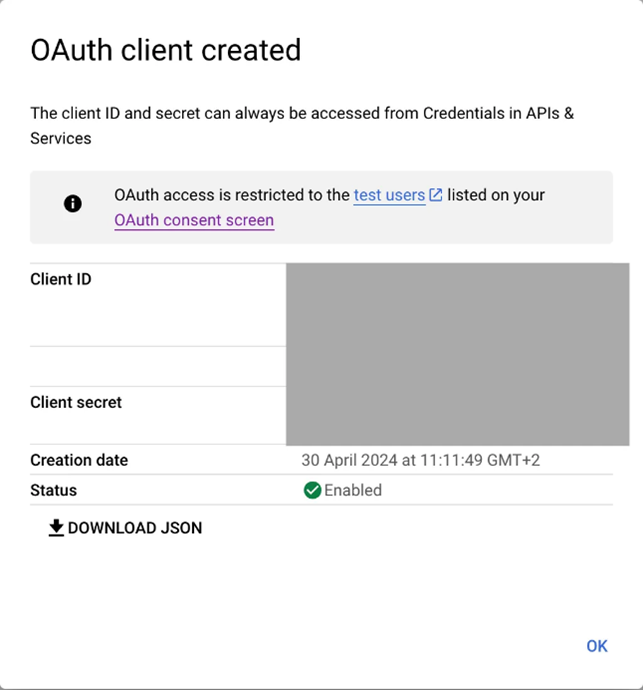
client_id=CLIENT_ID
client_secret=CLIENT_SECRET
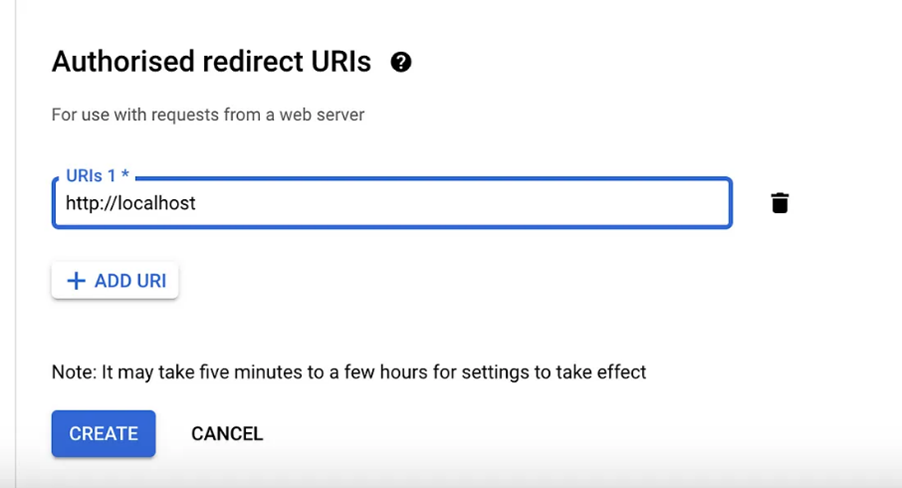
redirect_uri=http://localhost
grant_type=authorization_code
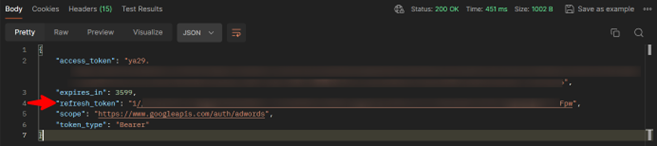
Response Example:
Save the Refresh Token. This will be used by Synapse / Data Factory.
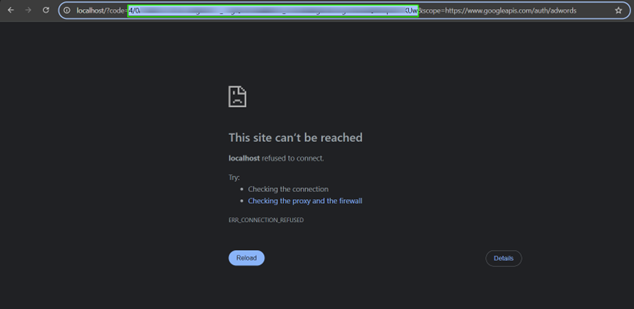
If you get the following error, it is most likely that the authorization code expired therefore you need to repeat the step 6 and then quickly jump to step 9!
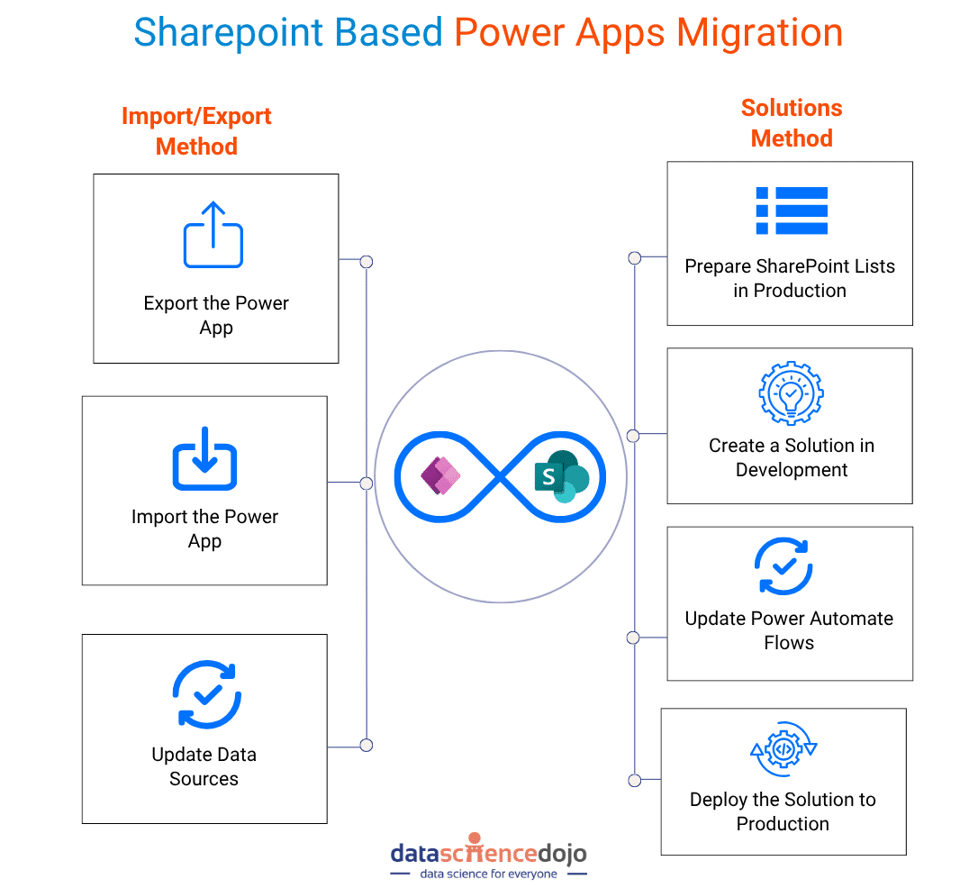
When building business apps in Power Apps with SharePoint lists as your backend, moving from a development to a production environment involves more than just copying a file. Ensuring your app continues to work seamlessly across environments, especially when using different SharePoint Lists, requires the right migration strategy.
This blog provides a detailed step-by-step guide on how to migrate Power Apps from a development environment to a production environment. It covers two primary methods: the Import/Export Method and the Solutions Method including their limitations and when to use each one, with an additional explanation of how Deployment Pipelines can be used to enhance the Solutions Method for faster and more efficient migrations.
This method involves exporting the Power App as a .zip file from the development environment and importing it into the production environment. It is a straightforward approach but has limitations, especially when dealing with different SharePoint sites for development and production.
Steps
Export the Power App:
Go to the Power Apps Studio in the development environment.
Select the app you want to migrate.
Click on File > Save As > Export this app.
Save the .zip file to your local machine.
Import the Power App:
Navigate to the Power Apps Studio in the production environment.
Click on Apps > Import canvas app.
Upload the .zip file exported from the development environment.
Update Data Sources:
If the SharePoint site in the production environment is different from the development environment:
Open the imported app in the Power Apps Studio.
Go to View > Data sources.
Remove the existing SharePoint data sources.
Add the new SharePoint data sources from the production environment.
If the SharePoint site is the same, no changes are needed.
Different SharePoint Sites: If the development and production environments use different SharePoint sites, you must manually update the data sources after importing the app.
Manual Effort: This method requires manual intervention, which can be error-prone and time-consuming.
When to Use The Import/Export Method
When the development and production environments use the same SharePoint site.
For quick, one-off migrations where manual updates are acceptable.
The Solutions Method is a more robust approach that leverages Power Platform solutions to package and migrate apps, flows, and related components. It is ideal for environments with separate SharePoint sites for development and production.
Steps
Step 1: Prepare SharePoint Lists in Production
Export SharePoint Lists from Development:
Go to the SharePoint site in the development environment.
Export each list as a .csv file with schema.
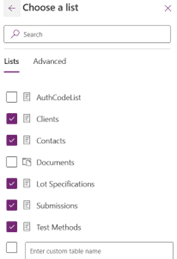
For lists with lookup columns (e.g., “Lot Specifications” list with a lookup to “Submissions” list), import the “Lot Specifications” list first. Then, import the “Submissions” list. After importing the data type of lookup column would have changed therefore, delete and re-add the ‘Submissions Lookup’ column in the “Lot Specifications” list to reference the ID field in the “Submissions” list.
Import SharePoint Lists into Production:
Go to the SharePoint site in the production environment.
Import each list using the .csv files exported from the development environment.
If there are lookup columns, ensure the referenced lists are imported first.
After importing, re-create any lookup columns manually if necessary.
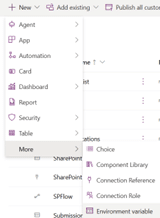
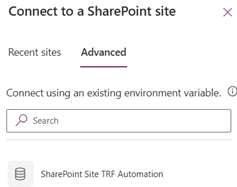
Add the SharePoint data source again, but this time use the environment variable for the site URL.
Select all the lists, in the background environment variables for selected Lists will get created.
Step 3: Deploy the Solution to Production
Create a Production Environment:
Go to the Power Platform Admin Center.
Create a new environment with the Production type.
Ensure Dataverse is enabled (required for solutions).
Deploy the Solution:
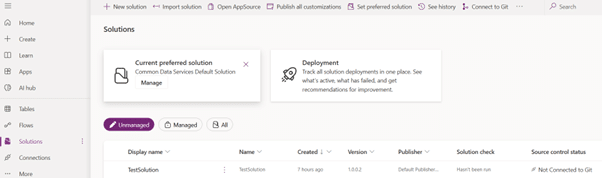
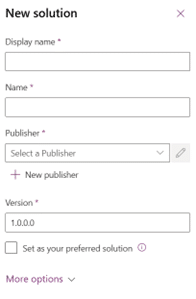
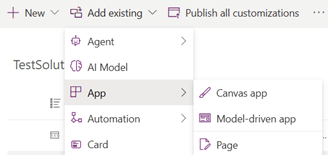
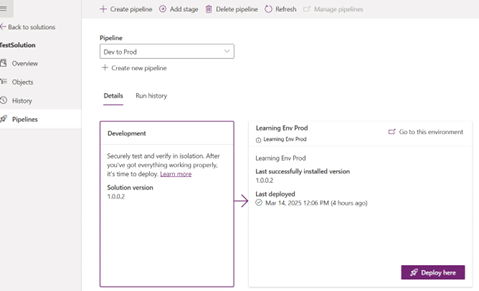
In the development environment, go to Solutions.
Select the Pipelines Tab and add new pipeline by selecting the Target environment.
Set up stages for development, testing, and production as needed.
Run the pipeline to deploy the solution from development to production.
Configure environment variables.
Monitor the deployment process for any issues and validate that the app functions correctly in the production environment.
Step 4: Update Power Automate Flows
Duplicate Flows for Production:
Go to Power Automate in the development environment.
Duplicate any flows associated with the app.
Update the SharePoint site and lists in the duplicated flows to point to the production environment.
Test the Flows:
Ensure the flows work correctly with the production data sources.
Advantages of The Solutions Method
Automated Deployment: Solutions allow for automated deployment of apps and components.
Environment Variables: Environment variables make it easier to manage different data sources across environments.
Scalability: Ideal for complex projects with multiple apps and flows.
When to Use The Solutions Method
When the development and production environments use different SharePoint sites.
For projects requiring repeatable and scalable deployment processes.
Final Thoughts
Migrating SharePoint-based Power Apps to production doesn’t have to be daunting. Whether you’re a solo maker or an enterprise team, there’s a method that fits your needs. The key is choosing the right one based on your environment structure, need for automation, and long-term maintainability.
Ready to take your skills to the next level?
Explore the hands-on LLM Bootcamp offered by Data Science Dojo to master the latest in AI and machine learning. For more expert insights and practical guides, don’t forget to read more blogs on Data Science Dojo. Empower your journey in data and automation today!
In many enterprise scenarios, SharePoint-hosted Excel files serve as the bridge between raw data and business operations. But keeping them up to date, especially when your data lives in Azure Synapse, can be surprisingly difficult due to limitations in native connectors.
In this guide, you’ll learn a step-by-step method to build a no-code/low-code Azure Synapse to SharePoint Excel automation using Power BI and Power Automate. This method ensures your data is always up-to-date, with zero manual refreshes.
The Business Problem
Recently, I faced a real-world challenge:
A client needed a solution that automatically updates an Excel workbook on SharePoint with data from an Azure Synapse pipeline, as the Excel file was being used as a data source for Smartsheet reports.
The critical requirement?
End-to-end automation with no manual intervention ever.
That meant the Excel workbook needed to be continuously and reliably updated with data from an Azure Synapse view, without anyone having to open or refresh the file manually.
Key Challenges
While the problem sounded simple, setting up direct integration between Azure Synapse and Excel on SharePoint revealed several roadblocks:
No SharePoint Excel connector in Azure Synapse.
Synapse lacks a native way to push or refresh data directly into an Excel file on SharePoint.
SharePoint Excel doesn’t support direct refresh from SQL Server or Synapse.
You can’t natively connect an Excel file on SharePoint to a SQL-based backend and have it auto-refresh.
Even if connected to a Power BI semantic model, Excel doesn’t auto-refresh.
SharePoint Excel can connect to a Power BI dataset (semantic model), but it won’t pull the latest data unless manually refreshed, a blocker for our automation goal.
To build a robust Azure Synapse to SharePoint Excel automation, I developed a no-code/low-code automation using a combination of:
Azure Synapse Analytics (as the data source)
Power BI Semantic Model (as the bridge)
Power Automate (to refresh Excel connections on SharePoint)
This approach keeps the SharePoint Excel workbook continuously in sync with Synapse, enabling downstream use in Smartsheet.
Step-by-Step Implementation
Here’s how you can replicate this approach:
Create a Power BI Semantic Model
In Power BI Desktop, create a dataset that pulls data from your Azure Synapse or SQL Server view/table.
This model will act as the source for the Excel file.
Publish the Model to Power BI Service
Publish the semantic model to your workspace in the Power BI Service.
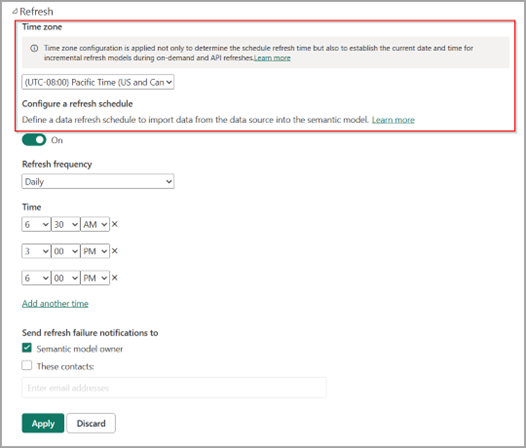
Set Up Power BI Semantic Model Refresh
Configure a Power BI Service to refresh the semantic model on a schedule (e.g., hourly/daily).
This ensures the model always reflects the latest data from Synapse.
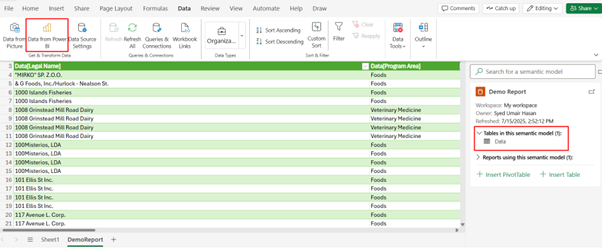
Create the Excel File in SharePoint
In the target SharePoint location, create or upload a new Excel workbook.
Inside the workbook, go to Data > Data from Power BI and connect to your semantic model.
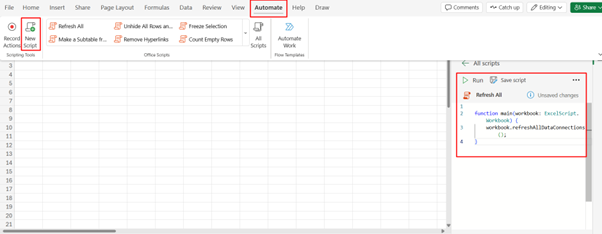
Add an Office Script to Refresh Connections
In Excel Online, go to Auomate Tab and create a new Office Script with the following code:
Name the script something like Refresh All.
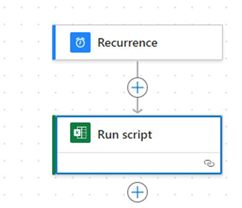
Automate It with Power Automate
Create a new Power Automate flow.
Add a Recurrence trigger to define how often it should run.
Add the “Run Script” action.
Specify the SharePoint file location and the Refresh All script you created.
Coordinating Refresh Timings and Triggers
Timing and synchronization are critical to avoid partial or stale data. Here’s how each component should be aligned:
Azure Synapse: Scheduled View/ETL Triggers
Use AzureSynapse Pipelines with scheduled triggers to refresh your views or underlying datasets.
If you’re using serverless SQL views, ensure the logic behind them is updated and ready before the Power BI gateway refresh runs.
Power BI Gateway: Semantic Model Refresh
Schedule your Power BI gateway refresh to run after your Synapse views have completed refreshing.
This ensures that the semantic model reflects the latest data before Excel attempts to pull it.
Power Automate: Excel Workbook Refresh
Schedule the Power Automate recurrence trigger to run after the Power BI semantic model refresh completes.
Important: Always provide a safe buffer time (e.g., 5–10 minutes) between Power BI refresh and the Excel refresh via Power Automate to avoid syncing stale or partially updated data.
Example Timing Setup:
Azure Synapse pipeline runs at 2:00 AM
Power BI semantic model refreshes at 2:15 AM
Power Automate script runs at 2:45 AM
This sequencing ensures data consistency across all layers.
What Happens End to End
Synapse updates or refreshes the data in the SQL views.
Power BI semantic model (connected to Azure Synapse) is refreshed via scheduled refresh.
SharePoint Excel workbook, connected to that semantic model, is refreshed by a scheduled Power Automate flow running an Office Script.
Smartsheet, connected to the Excel workbook, always sees the most up-to-date data, fully automated.
Example Use Case: Automating Sales Reporting for Smartsheet Dashboards
Scenario:
A sales operations team needs daily reports in Smartsheet, which relies on data pulled from an Excel workbook stored in SharePoint. This Excel file should reflect the latest sales transaction data from Azure Synapse Analytics.
Solution Implementation:
Sales data is stored in Synapse view, updated nightly via a Synapse pipeline.
A Power BI semantic model is created on top of this view and refreshed every morning.
The Excel workbook in SharePoint connects to the Power BI model.
A Power Automate flow runs an Office Script daily to refresh all data connections in Excel.
The updated Excel file feeds into Smartsheet automatically, keeping dashboards current, no manual work required.
This use case demonstrates how the automation flow ensures accurate, up-to-date reporting without any manual intervention, even though Synapse cannot natively write to SharePoint Excel.
Conclusion
If you’re trying to output Azure Synapse data into an Excel file stored in SharePoint, and need that file to stay in sync automatically, this is your workaround. While there’s no direct connector from Synapse to SharePoint Excel, Power BI + Power Automate fill the gap with a reliable and reusable pattern.
When diving into the world of Language Model usage, one often encounters barriers such as the necessity for a paid API or the need for a robust computing system when working with open-source LLMs. Eager to overcome these constraints, I embarked on a journey to develop a Gradio App using open-source tools completely.
Harnessing the power of the free Colab T4 GPU and an open-source LLM, this blog will guide you through the process, empowering you to effortlessly chat with your own CSV data and break free from the traditional limitations associated with LLMs.
Explore a step-by-step journey in crafting dynamic chatbot experiences tailored to your CSV data using Gradio, LLAMA2, and Hugging Face on Google Colab.
Prequisites to Chat with Your CSV Files
A Hugging Face account to access open-source Llama 2 and embedding models (free sign-up available if you don’t have one).
Access to LLAMA2 models, obtainable through this form (access is typically granted within a few hours).
A Google account for using Google Colab.
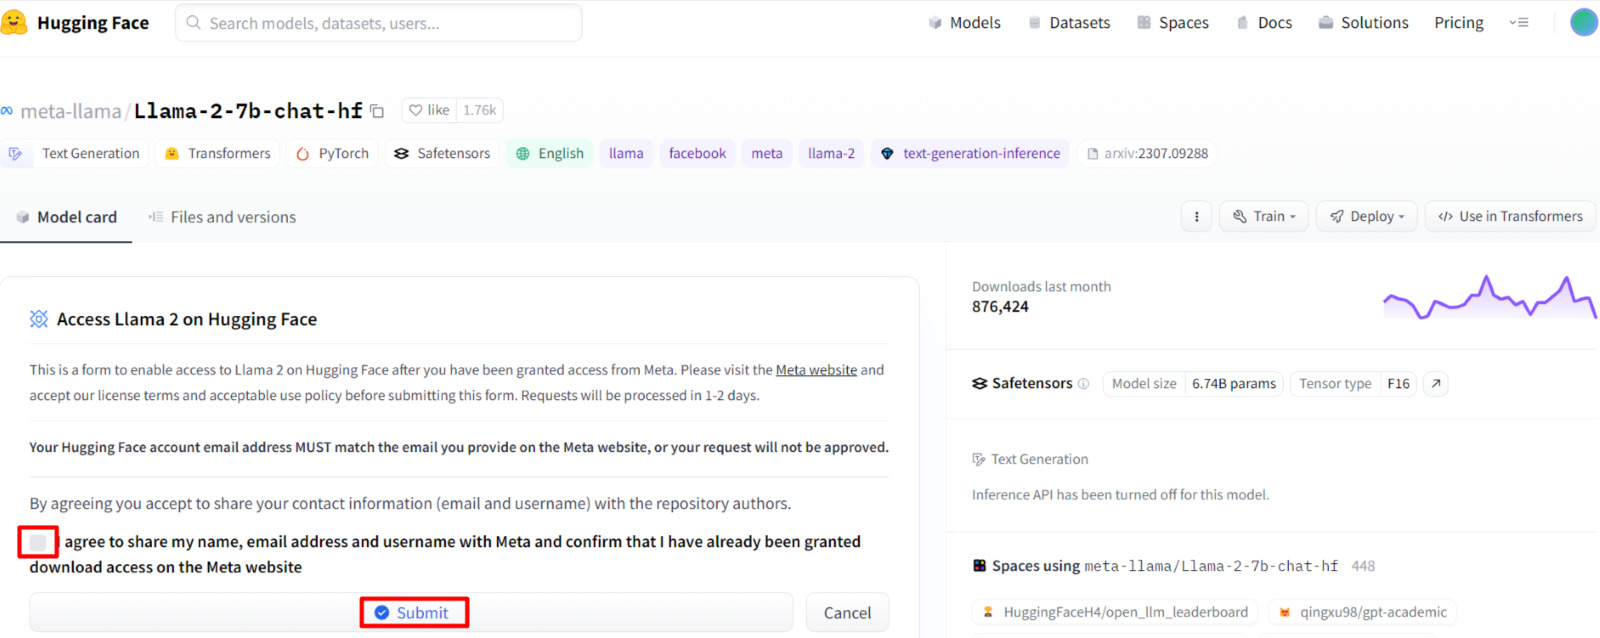
Once you have been granted access to Llama 2 models, visit the following link and select the checkbox shown in the image below and hit ‘Submit. ’
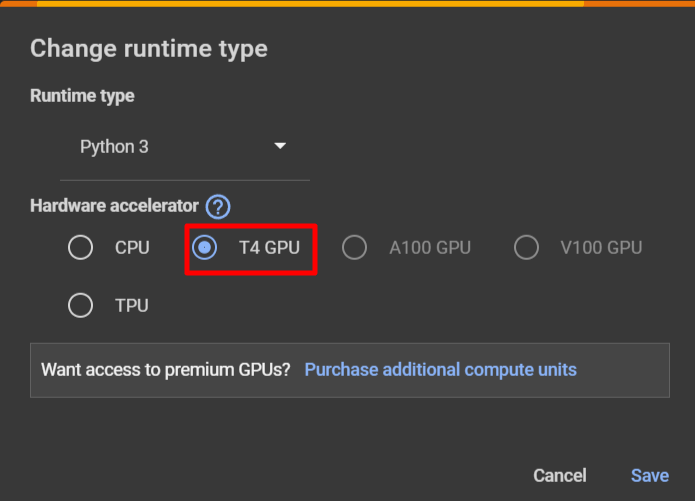
Setting Up a Google Colab Environment
If running on Google Colab, you go to **Runtime > Change runtime type > Hardware accelerator > GPU > GPU type > T4. Our code will require ~15GB of GPU RAM.
Installing Necessary Libraries and Dependencies
The following snippet streamlines the installation process, ensuring that all necessary components are readily available for our project
Authenticating with HuggingFace
To integrate your Hugging Face token into Colab’s environment, follow these steps.
Execute the following code in a Colab cell:
After running the cell, a prompt will appear, requesting your Hugging Face token.
Obtain your Hugging Face token by navigating to the Hugging Face settings. Look for the “Access Token” tab, where you can easily copy your token.
Import Relevant Libraries
Initializing the HuggingFace Pipeline
The first thing we need to do is initialize a text-generation pipeline with Hugging Face transformers. The Pipeline requires three things that we must initialize first:
An LLM, in this case, will be meta-llama/Llama-2-7b-chat-hf.
The respective tokenizer for the model.
We initialize the model and move it to our CUDA-enabled GPU. Using Colab, this can take 2-5 minutes to download and initialize the model.
Load HuggingFace Open-Source Embeddings Models
Embeddings are crucial for language models because they transform words or tokens into numerical vectors, enabling the model to understand and process them mathematically. In the context of LLMs:
Semantic Representation: Embeddings encode semantic relationships, placing similar words close in vector space for the model to understand nuanced language context.
Numerical Input for Models: Transforming words into numerical vectors, embeddings provide a mathematical foundation for neural networks, ensuring effective processing within the model.
Dimensionality Reduction: Embeddings condense high-dimensional word representations, enhancing computational efficiency while preserving essential linguistic features.
Transfer Learning: Pre-trained embeddings capture general language patterns, facilitating knowledge transfer to specific tasks, boosting model performance on diverse datasets.
Contextual Information: Embeddings, considering adjacent words, capture contextual nuances, enabling Language Models to generate coherent and contextually relevant language.
Load CSV Data Using LangChain CSV Loader
The LangChain CSV loader loads CSV data in a single row per document. For this demo, we are using an employee sample data CSV file, which is uploaded in Colab’s environment.
Creating Vectorstore
For this demonstration, we are going to use FAISS vectorstore. Facebook AI Similarity Search (Faiss) is a library for efficient similarity search and clustering of dense vectors. It contains algorithms that search in sets of vectors of any size, up to ones that possibly do not fit in RAM. It also contains supporting code for evaluation and parameter tuning.
Initializing Retrieval QA Chain and Testing Sample Query
We are now going to use the Retrieval QA chain of LangChain, which combines vector store with a question answering chain to do question answering.
The above code utilizes the RetrievalQA module to answer a specific query about the annual salary of Sophie Silva, including the retrieval of source documents. The result is then formatted for better readability by wrapping the text to a maximum width of 500 characters.
Now, we are going to merge the above code snippets to create a gradio application
Function Definitions
main: Takes a dataset and a question as input, initializes a RetrievalQA chain, retrieves the answer, and formats it for display.
dataset_change: Changes in the dataset trigger this function, loading the dataset, creating an FAISS vector store, and returning the first 5 rows of the dataset.
Gradio Interface Setup
with gr.Blocks() as demo: Initializes a Gradio interface block.
with gr.Row(): and with gr.Column(): Defines the layout of the interface with file input, text input for the question, a button to submit the question, and a text box to display the answer.
with gr.Row(): and dataframe = gr.Dataframe(): Includes a row for displaying the first 5 rows of the dataset.
submit_btn.click(main, inputs=[data, qs], outputs=[answer]): Associates the main function with the click event of the submit button, taking inputs from the file and question input and updating the answer text box.
data.change(fn=dataset_change,inputs=data,outputs=[dataframe]): Calls the dataset_change function when the dataset changes, updating the dataframe display accordingly.
gr.Examples([[“What is the Annual Salary of Theodore Dinh?”], [“What is the Department of Parker James?”]], inputs=[qs]): Provides example questions for users to input.
Launching the Gradio Interface
demo.launch(debug=True): Launches the Gradio interface in debug mode.
In summary, this code creates a user-friendly Gradio interface for interacting with a question-answering system. Users can input a CSV dataset, ask questions about the data, and receive answers displayed in real time. The interface also showcases a sample dataset and questions for user guidance.
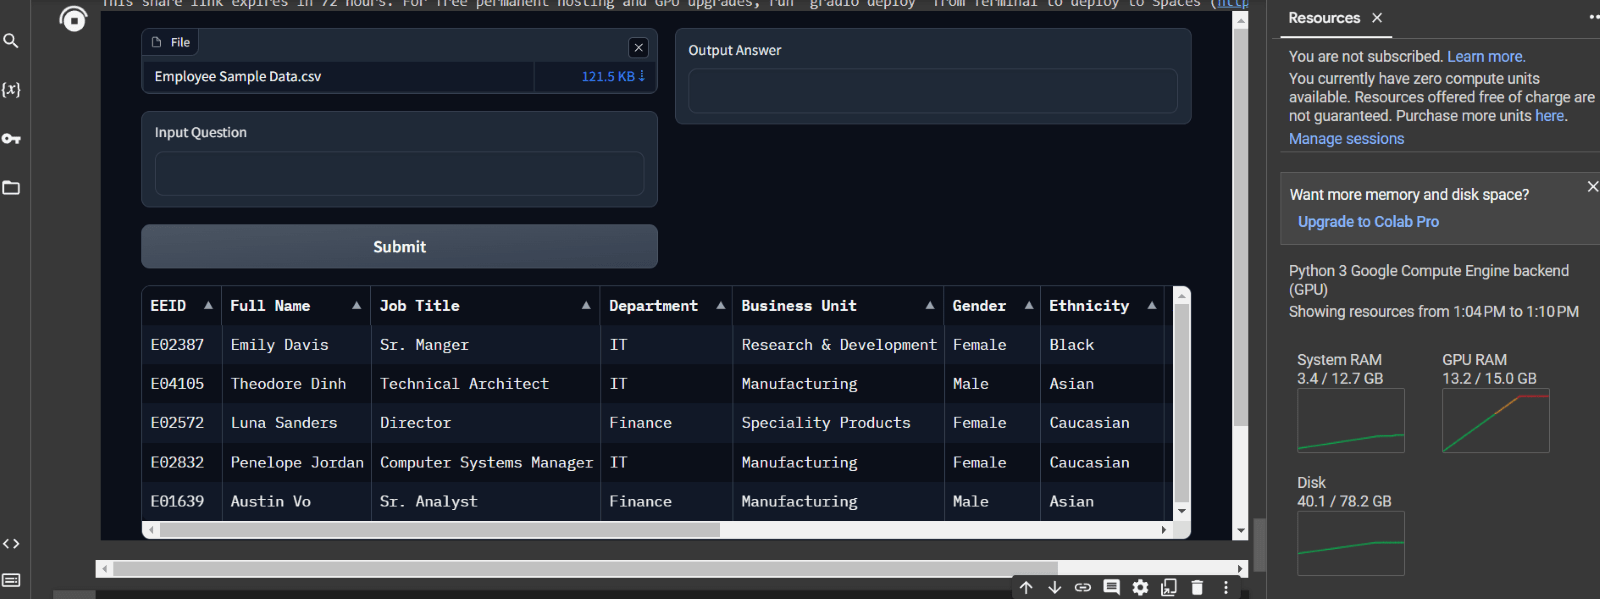
Output
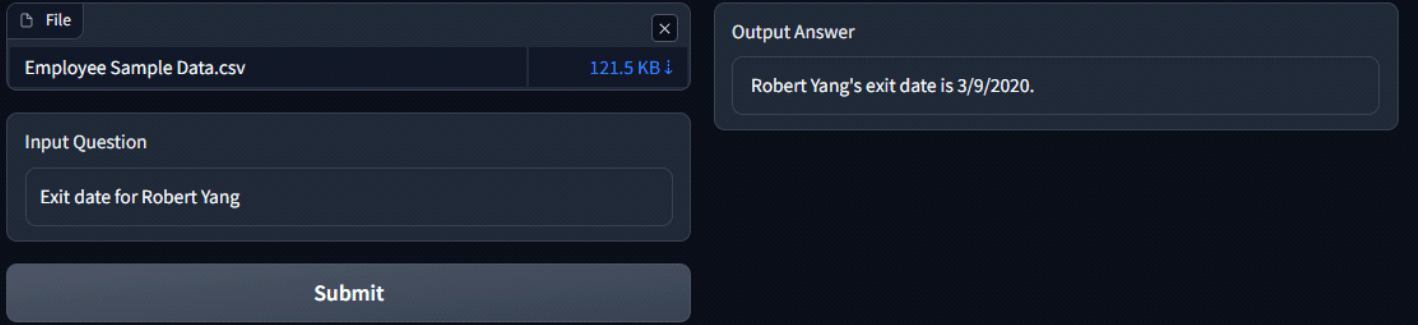
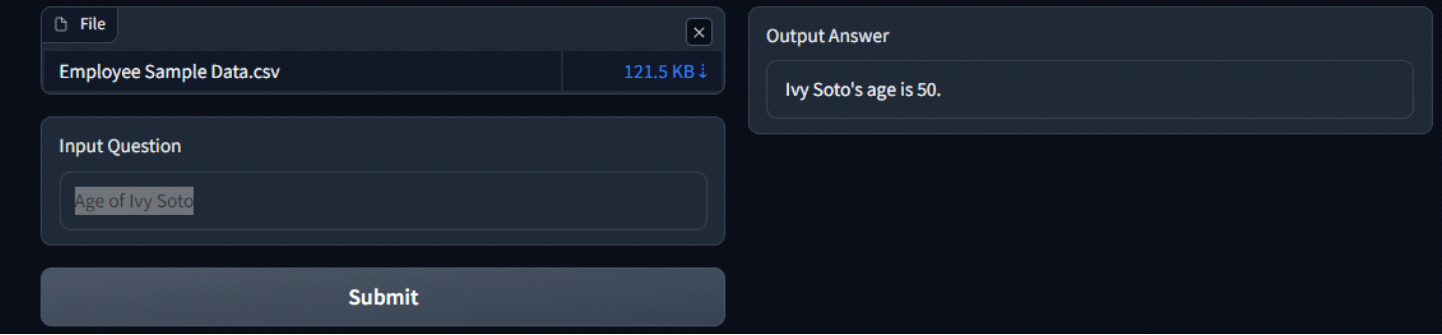
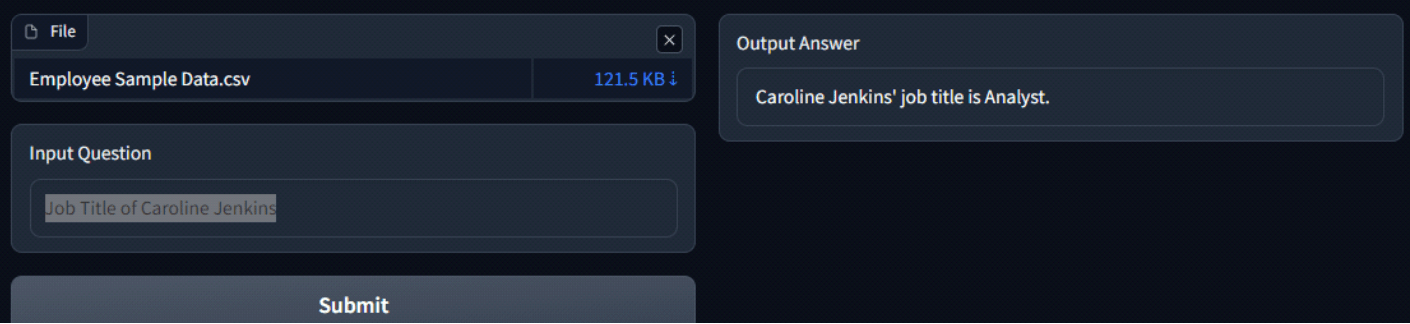
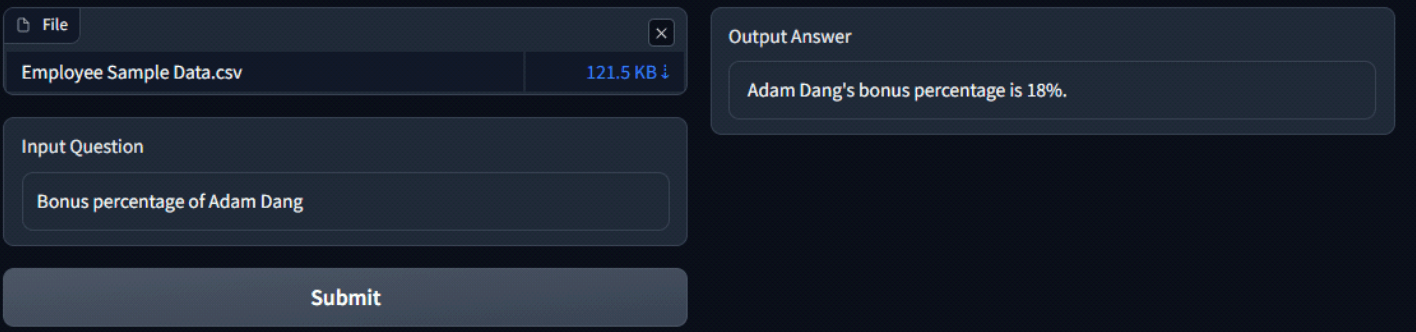
Attached below are some screenshots of the app and the responses of LLM. The process kicks off by uploading a CSV file, which is then passed through the embeddings model to generate embeddings. Once this process is done, the first 5 rows of the file are displayed for preview.
Now the user can input the question and Hit ‘Submit’ to generate an answer.
Conclusion
In conclusion, this blog has demonstrated the empowerment of language models through the integration of LLAMA2, Gradio, and Hugging Face on Google Colab.
By overcoming the limitations of paid APIs and compute-intensive open-source models, we’ve successfully created a dynamic Gradio app for personalized interactions with CSV data. Leveraging LangChain question-answering chains and Hugging Face’s model integration, this hands-on guide enables users to build chatbots that comprehend and respond to their own datasets.
As technology evolves, this blog encourages readers to explore, experiment, and continue pushing the boundaries of what can be achieved in the realm of natural language processing.
Converse with Your Data: Chatting with CSV Files Using Open-Source Tools
Explore a step-by-step journey in crafting dynamic chatbot experiences tailored to your CSV data using Gradio, LLAMA2, and Hugging Face on Google Colab
“When diving into the world of Language Model usage, one often encounters barriers such as the necessity for a paid API or the need for a robust computing system when working with open-source Language Models (LLMs). Eager to overcome these constraints, I embarked on a journey to develop a Gradio App using open-source tools completely. Harnessing the power of the free Colab T4 GPU and an open-source LLM, this blog will guide you through the process, empowering you to effortlessly chat with your own CSV data, breaking free from the traditional limitations associated with LLMs.”
PREREQUISITES
A Hugging Face account to access open-source Llama 2 and embedding models (free sign up available if you don’t have one).
Access to LLAMA2 models, obtainable through this form (access is typically granted within a few hours).
A Google account for using Google Colab.
Once you have been granted access to Llama 2 models visit the following link and select the checkbox shown in the image below and hit ‘Submit’.
SETTING UP GOOGLE COLAB ENVIRONMENT
If running on Google Colab you go to **Runtime > Change runtime type > Hardware accelerator > GPU > GPU type > T4. Our code will require ~15GB of GPU RAM.
INSTALLING NECESSARY LIBRARIES AND DEPENDENCIES
The following snippet streamlines the installation process, ensuring that all necessary components are readily available for our project
To integrate your Hugging Face token into Colab’s environment, follow these steps.
Execute the following code in a Colab cell:
!huggingface–cli login
After running the cell, a prompt will appear, requesting your Hugging Face token.
Obtain your Hugging Face token by navigating to the Hugging Face settings. Look for the “Access Token” tab, where you can easily copy your token.
IMPORTING RELEVANT LIBRARIES
from langchain import HuggingFacePipeline
from transformers import AutoTokenizer
from langchain.embeddings import HuggingFaceEmbeddings
from langchain.document_loaders.csv_loader import CSVLoader
from langchain.vectorstores import FAISS
from langchain.chains import RetrievalQA
importtransformers
importtorch
importgradio
importtextwrap
INITIALIZING THE HUGGING FACE PIPELINE
The first thing we need to do is initialize a text-generation pipeline with Hugging Face transformers. The Pipeline requires three things that we must initialize first, those are:
An LLM, in this case it will be meta-llama/Llama-2-7b-chat-hf.
The respective tokenizer for the model.
We initialize the model and move it to our CUDA-enabled GPU. Using Colab this can take 2-5 minutes to download and initialize the model.
Embeddings are crucial for Language Model (LM) because they transform words or tokens into numerical vectors, enabling the model to understand and process them mathematically. In the context of LLMs:
Semantic Representation: Embeddings encode semantic relationships, placing similar words close in vector space for the model to understand nuanced language context.
Numerical Input for Models: Transforming words into numerical vectors, embeddings provide a mathematical foundation for neural networks, ensuring effective processing within the model.
Dimensionality Reduction: Embeddings condense high-dimensional word representations, enhancing computational efficiency while preserving essential linguistic features.
Transfer Learning: Pre-trained embeddings capture general language patterns, facilitating knowledge transfer to specific tasks, boosting model performance on diverse datasets.
Contextual Information: Embeddings, considering adjacent words, capture contextual nuances, enabling Language Models to generate coherent and contextually relevant language.
LangChain CSV loader loads csv data with a single row per document. For this demo we are using employee sample data csv file which is uploaded in colab’s environment.
For this demonstration, we are going to use FAISS vectorstore. Facebook AI Similarity Search (Faiss) is a library for efficient similarity search and clustering of dense vectors. It contains algorithms that search in sets of vectors of any size, up to ones that possibly do not fit in RAM. It also contains supporting code for evaluation and parameter tuning.
The above code utilizes the RetrievalQA module to answer a specific query about the annual salary of Sophie Silva, including the retrieval of source documents. The result is then formatted for better readability by wrapping the text to a maximum width of 500 characters.
BUILDING A GRADIO APP
Now we are going to merge the above code snippets to create a gradio application
gr.Examples([[“What is the Annual Salary of Theodore Dinh?”], [“What is the Department of Parker James?”]], inputs=[qs])
demo.launch(debug=True)
The above code sets up a Gradio interface on Colab for a question-answering application using LLAMA2 and FAISS. Here’s a brief overview:
Function Definitions:
main: Takes a dataset and a question as input, initializes a RetrievalQA chain, retrieves the answer, and formats it for display.
dataset_change: Changes in the dataset trigger this function, loading the dataset, creating a FAISS vector store, and returning the first 5 rows of the dataset.
Gradio Interface Setup:
with gr.Blocks() as demo: Initializes a Gradio interface block.
with gr.Row(): and with gr.Column():: Defines the layout of the interface with file input, text input for the question, a button to submit the question, and a text box to display the answer.
with gr.Row(): and dataframe = gr.Dataframe(): Includes a row for displaying the first 5 rows of the dataset.
submit_btn.click(main, inputs=[data,qs], outputs=[answer]): Associates the main function with the click event of the submit button, taking inputs from the file and question input and updating the answer text box.
data.change(fn=dataset_change,inputs=data,outputs=[dataframe]): Calls the dataset_change function when the dataset changes, updating the dataframe display accordingly.
gr.Examples([[“What is the Annual Salary of Theodore Dinh?”], [“What is the Department of Parker James?”]], inputs=[qs]): Provides example questions for users to input.
Launching the Gradio Interface:
demo.launch(debug=True): Launches the Gradio interface in debug mode.
In summary, this code creates a user-friendly Gradio interface for interacting with a question-answering system. Users can input a CSV dataset, ask questions about the data, and receive answers displayed in real-time. The interface also showcases a sample dataset and questions for user guidance.
OUTPUT
Attached below are some screenshots of the app and the responses of LLM. The process kicks off by uploading a csv file, which is then passed through the embeddings model to generate embeddings. Once this process is done the first 5 rows of the file are displayed for preview. Now the user can input the question and Hit ‘Submit’ to generate answer.
CONCLUSION
In conclusion, this blog has demonstrated the empowerment of language models through the integration of LLAMA2, Gradio, and Hugging Face on Google Colab. By overcoming the limitations of paid APIs and compute-intensive open-source models, we’ve successfully created a dynamic Gradio app for personalized interactions with CSV data. Leveraging LangChain question-answering chains and Hugging Face’s model integration, this hands-on guide enables users to build chatbots that comprehend and respond to their own datasets.
As technology evolves, this blog encourages readers to explore, experiment, and continue pushing the boundaries of what can be achieved in the realm of natural language processing.
In this step-by-step guide, learn how to deploy a web app for Gradio on Azure with Docker. This blog covers everything from Azure Container Registry to Azure Web Apps, with a step-by-step tutorial for beginners.
‘I was searching for ways to deploy a Gradio application on Azure, but there wasn’t much information to be found online. After some digging, I realized that I could use Docker to deploy custom Python web applications, which was perfect since I had neither the time nor the expertise to go through the “code” option on Azure.
The process of deploying a web app begins by creating a Docker image, which contains all of the application’s code and its dependencies. This allows the application to be packaged and pushed to the Azure Container Registry, where it can be stored until needed.
From there, it can be deployed to the Azure App Service, where it is run as a container and can be managed from the Azure Portal. In this portal, users can adjust the settings of their app, as well as grant access to roles and services when needed.
Once everything is set and the necessary permissions have been granted, the web app should be able to properly run on Azure. Deploying a web app on Azure using Docker is an easy and efficient way to create and deploy applications, and can be a great solution for those who lack the necessary coding skills to create a web app from scratch!’
Comprehensive overview of creating a web app for Gradio
Gradio application
Gradio is a Python library that allows users to create interactive demos and share them with others. It provides a high-level abstraction through the Interface class, while the Blocks API is used for designing web applications.
Blocks provide features like multiple data flows and demos, control over where components appear on the page, handling complex data flows, and the ability to update properties and visibility of components based on user interaction. With Gradio, users can create a web application that allows their users to interact with their machine learning model, API, or data science workflow.
The two primary files in a Gradio Application are:
App.py: This file contains the source code for the application.
Requirements.txt: This file lists the Python libraries required for the source code to function properly.
Docker
Docker is an open-source platform for automating the deployment, scaling, and management of applications, as containers. It uses a container-based approach to package software, which enables applications to be isolated from each other, making it easier to deploy, run, and manage them in a variety of environments.
A Docker container is a lightweight, standalone, and executable software package that includes everything needed to run a specific application, including the code, runtime, system tools, libraries, and settings. Containers are isolated from each other and the host operating system, making them ideal for deploying microservices and applications that have multiple components or dependencies.
Docker also provides a centralized way to manage containers and share images, making it easier to collaborate on application development, testing, and deployment. With its growing ecosystem and user-friendly tools, Docker has become a popular choice for developers, system administrators, and organizations of all sizes.
Azure Container Registry
Azure Container Registry (ACR) is a fully managed, private Docker registry service provided by Microsoft as part of its Azure cloud platform. It allows you to store, manage, and deploy Docker containers in a secure and scalable way, making it an important tool for modern application development and deployment.
With ACR, you can store your own custom images and use them in your applications, as well as manage and control access to them with role-based access control. Additionally, ACR integrates with other Azure services, such as Azure Kubernetes Service (AKS) and Azure DevOps, making it easy to deploy containers to production environments and manage the entire application lifecycle.
ACR also provides features such as image signing and scanning, which helps ensure the security and compliance of your containers. You can also store multiple versions of images, allowing you to roll back to a previous version if necessary.
Azure Web App
Azure Web Apps is a fully managed platform for building, deploying, and scaling web applications and services. It is part of the Azure App Service, which is a collection of integrated services for building, deploying, and scaling modern web and mobile applications.
With Azure Web Apps, you can host web applications written in a variety of programming languages, such as .NET, Java, PHP, Node.js, and Python. The platform automatically manages the infrastructure, including server resources, security, and availability, so that you can focus on writing code and delivering value to your customers.
Azure Web Apps supports a variety of deployment options, including direct Git deployment, continuous integration and deployment with Visual Studio Team Services or GitHub, and deployment from Docker containers. It also provides built-in features such as custom domains, SSL certificates, and automatic scaling, making it easy to deliver high-performing, secure, and scalable web applications.
A step-by-step guide to deploying a Gradio application on Azure using Docker
This guide assumes a foundational understanding of Azure and the presence of Docker on your desktop. Refer to the instructions for getting started on Mac, Windows , or Linux for Docker.
Step 1: Create an Azure Container Registry resource
Go to Azure Marketplace, search for ‘container registry’, and hit ‘Create’.
STEP 1: Create an Azure Container Registry resource
Under the “Basics” tab, complete the required information and leave the other settings as the default. Then, click “Review + Create.”
Web App for Gradio Step 1A
Step 2: Create a Web App resource in Azure
In Azure Marketplace, search for “Web App”, select the appropriate resource as depicted in the image, and then click “Create”.
Create a Web App resource in Azure
Under the “Basics” tab, complete the required information, choose the appropriate pricing plan, and leave the other settings as the default. Then, click “Review + Create.”
Web App for Gradio Step 2B
Web App for Gradio Step 2c
Upon completion of all deployments, the following three resources will be in your resource group.
Web App for Gradio Step 2D
Step 3: Create a folder containing the “App.py” file and its corresponding “requirements.txt” file
Step 4: Launch Visual Studio Code and open the folder
Step 4: Launch Visual Studio Code and open the folder.
Step 5: Launch Docker Desktop to start Docker.
STEP 5: Launch Docker Desktop to start Docker.
Step 6: Create a Dockerfile
A Dockerfile is a script that contains instructions to build a Docker image. This file automates the process of setting up an environment, installing dependencies, copying files, and defining how to run the application. With a Dockerfile, developers can easily package their application and its dependencies into a Docker image, which can then be run as a container on any host with Docker installed. This makes it easy to distribute and run the application consistently in different environments. The following contents should be utilized in the Dockerfile:
DOCKERFILE
STEP 6: Create a Dockerfile
Step 7: Build and run a local Docker image
Run the following commands in the VS Code terminal.
1. docker build -t demo-gradio-app
The “docker build” command builds a Docker image from a Docker file.
The “-t demo-gradio-app” option specifies the name and optionally a tag to the name of the image in the “name:tag” format.
The final “.” specifies the build context, which is the current directory where the Dockerfile is located.
2. docker run -it -d –name my-app -p 7000:7000 demo-gradio-app
The “docker run” command starts a new container based on a specified image.
The “-it” option opens an interactive terminal in the container and keeps the standard input attached to the terminal.
The “-d” option runs the container in the background as a daemon process.
The “–name my-app” option assigns a name to the container for easier management.
The “-p 7000:7000” option maps a port on the host to a port inside the container, in this case, mapping the host’s port 7000 to the container’s port 7000.
The “demo-gradio-app” is the name of the image to be used for the container.
This command will start a new container with the name “my-app” from the “demo-gradio-app” image in the background, with an interactive terminal attached, and port 7000 on the host mapped to port 7000 in the container.
Web App for Gradio Step 7A
Web App for Gradio Step 7B
To view your local app, navigate to the Containers tab in Docker Desktop, and click on link under Port.
Web App for Gradio Step 7C
Step 8: Tag & Push the Image to Azure Container Registry
First, enable ‘Admin user’ from the ‘Access Keys’ tab in Azure Container Registry.
Tag & Push Images to Azure Container Registry
Login to your container registry using the following command, login server, username, and password can be accessed from the above step.
docker login gradioappdemos.azurecr.io
Web App for Gradio Step 8B
Tag the image for uploading to your registry using the following command.
docker tag demo-gradio-app gradioappdemos.azurecr.io/demo-gradio-app
The command “docker tag demo-gradio-app gradioappdemos.azurecr.io/demo-gradio-app” is used to tag a Docker image.
“docker tag” is the command used to create a new tag for a Docker image.
“demo-gradio-app” is the source image name that you want to tag.
“gradioappdemos.azurecr.io/demo-gradio-app” is the new image name with a repository name and optionally a tag in the “repository:tag” format.
This command will create a new tag “gradioappdemos.azurecr.io/demo-gradio-app” for the “demo-gradio-app” image. This new tag can be used to reference the image in future Docker commands.
“docker push” is the command used to upload a Docker image to a registry.
“gradioappdemos.azurecr.io/demo-gradio-app” is the name of the image with the repository name and tag to be pushed.
This command will push the Docker image “gradioappdemos.azurecr.io/demo-gradio-app” to the registry specified by the repository name. The registry is typically a place where Docker images are stored and distributed to others.
Web App for Gradio Step 8C
In the Repository tab, you can observe the image that has been pushed.
Web App for Gradio Step 8B
Step 9: Configure the Web App
Under the ‘Deployment Center’ tab, fill in the registry settings then hit ‘Save’.
Configure the Web App
In the Configuration tab, create a new application setting for the website port 7000, as specified in the app.py file and the hit ‘Save’.
Web App for Gradio Step 9BWeb App for Gradio Step 9C
Web App for Gradio Step 9D
In the Configuration tab, create a new application setting for the website port 7000, as specified in the app.py file and the hit ‘Save’.
Web App for Gradio Step 9E
After the image extraction is complete, you can view the web app URL from the Overview page.
Web App for Gradio Step 9F
Web App for Gradio Step 9G
Step 1O: Pushing Image to Docker Hub (Optional)
Here are the steps to push a local Docker image to Docker Hub:
Login to your Docker Hub account using the following command:
docker login
Tag the local image using the following command, replacing [username] with your Docker Hub username and [image_name] with the desired image name:
docker tag [image_name] [username]/[image_name]
Push the image to Docker Hub using the following command:
docker push [username]/[image_name]
Verify that the image is now available in your Docker Hub repository by visiting https://hub.docker.com/ and checking your repositories.
Web App for Gradio Step 10A
Web App for Gradio Step 10B
Wrapping it up
In conclusion, deploying a web application using Docker on Azure is an easy and efficient way to create and deploy applications. This method is suitable for those who lack the necessary coding skills to create a web app from scratch. Docker is an open-source platform for automating the deployment, scaling, and management of applications, as containers.
Azure Container Registry is a fully managed, private Docker registry service provided by Microsoft as part of its Azure cloud platform. Azure Web Apps is a fully managed platform for building, deploying, and scaling web applications and services. By following the step-by-step guide provided in this article, users can deploy a Gradio application on Azure using Docker.