

Are you geared to create a sales dashboard on Power BI and track key performance indicators to drive sales success? This step-by-step guide will show you through connecting to the data source, build the dashboard, and add interactivity and filters.
Creating a sales dashboard in Power BI is a straightforward process that can help your sales team to track key performance indicators (KPIs) and make data-driven decisions. Here’s a step-by-step guide on how to create a sales dashboard using the above-mentioned KPIs in Power BI:
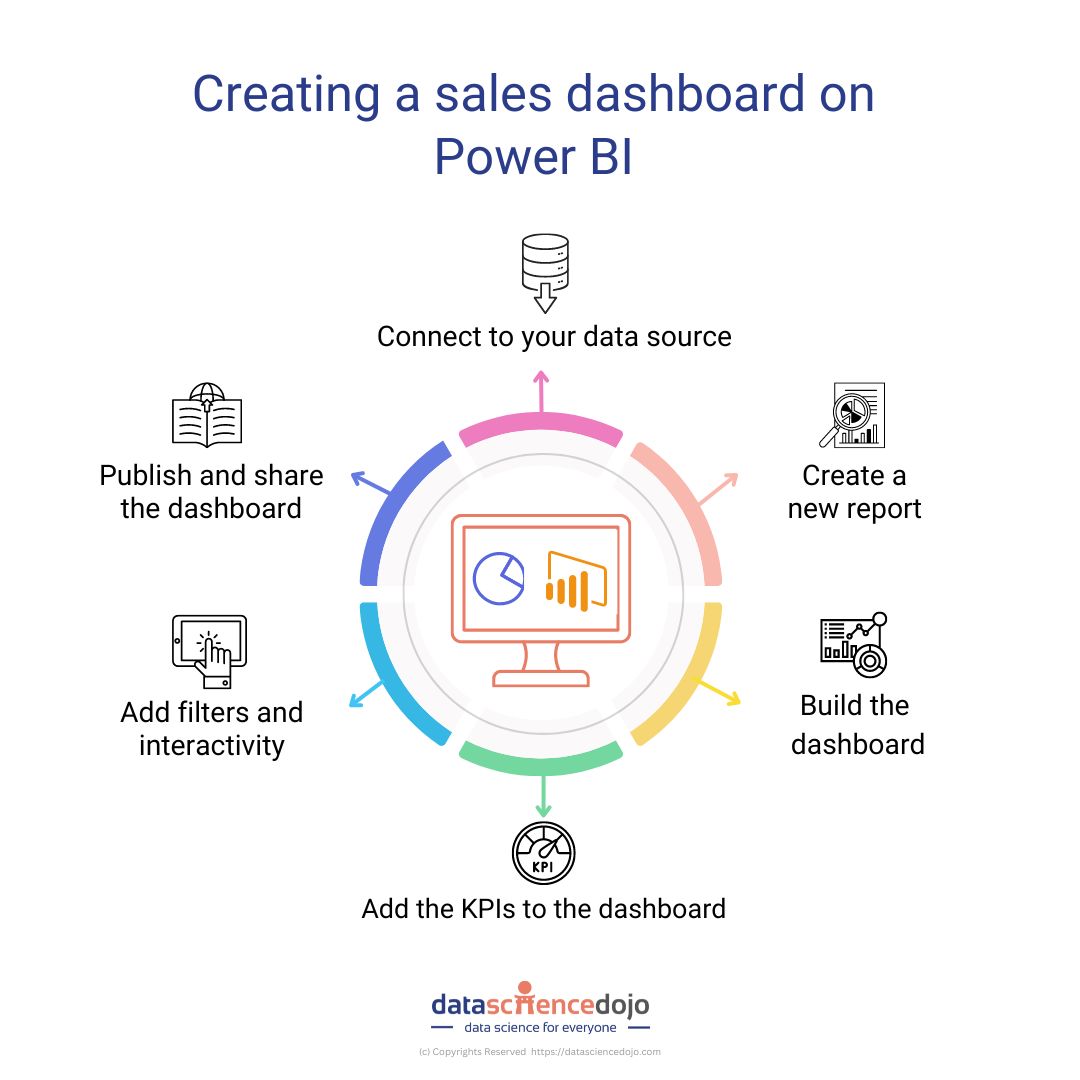
Step 1: Connect to your data source
The first step is to connect to your data source in Power BI. This can be done by clicking on the “Get Data” button in the Home ribbon, and then selecting the appropriate connection type (e.g., Excel, SQL Server, etc.). Once you have connected to your data source, you can import the data into Power BI for analysis.
Step 2: Create a new report
Once you have connected to your data source, you can create a new report by clicking on the “File” menu and selecting “New” -> “Report.” This will open a new report canvas where you can begin to build your dashboard.
Step 3: Build the dashboard
To build the dashboard, you will need to add visualizations to the report canvas. You can do this by clicking on the “Visualizations” pane on the right-hand side of the screen, and then selecting the appropriate visualization type (e.g., bar chart, line chart, etc.).
Once you have added a visualization to the report canvas, you can use the “Fields” pane on the right-hand side to add data to the visualization.
Read more about maximizing sales success with dashboards by clicking on this link.
Step 4: Add the KPIs to the dashboard
To add the KPIs to the dashboard, you will need to create a new card visualization for each KPI. Then, use the “Fields” pane on the right-hand side of the screen to add the appropriate data to each card.
Sales Revenue:
To add this KPI, you’ll need to create a card visualization and add the “Total Sales Revenue” column from your data source.
Sales Quota Attainment:
To add this KPI, you’ll need to create a card visualization and add the “Sales Quota Attainment” column from your data source.
Lead Conversion Rate:
To add this KPI, you’ll need to create a card visualization and add the “Lead Conversion Rate” column from your data source.
Customer Retention Rate:
To add this KPI, you’ll need to create a card visualization and add the “Customer Retention Rate” column from your data source.
Average Order Value:
To add this KPI, you’ll need to create a card visualization and add the “Average Order Value” column from your data source.
Step 5: Add filters and interactivity
Once you have added all the KPIs to the dashboard, you can add filters and interactivity to the visualizations. You can do this by clicking on the “Visualizations” pane on the right-hand side of the screen and selecting the appropriate filter or interactivity option.
For example, you can add a time filter to your chart to show sales data over a specific period, or you can add a hover interaction to your diagram to show more data when the user moves their mouse over a specific point.
Check out this course and learn Power BI today!
Step 6: Publish and share the dashboard
Once you’ve completed your dashboard, you can publish it to the web or share it with specific users. To do this, click on the “File” menu and select “Publish” -> “Publish to Web” (or “Share” -> “Share with specific users” if you are sharing the dashboard with specific users).
This will generate a link that can be shared with your team, or you can also publish the dashboard to the Power BI service where it can be accessed by your sales team from anywhere, at any time. You can also set up automated refresh schedules so that the dashboard is updated with the latest data from your data source.

Ready to transform your sales strategy with a custom dashboard in Power BI?
By creating a sales dashboard in Power BI, you can bring all your sales data together in one place, making it easier for your team to track key performance indicators and make informed decisions. The process is simple and straightforward, and the end result is a custom dashboard that can be customized to fit the specific needs of your sales team.
Whether you are looking to track sales revenue, sales quota attainment, lead conversion rate, customer retention rate, or average order value, Power BI has you covered. So why wait? Get started today and see how Power BI can help you drive growth and success for your sales team!