Key takeaways:
- Cursor launched Cursor Router on July 22, 2026, an automatic model-selection layer for Teams and Enterprise plans that classifies each coding request and routes it to the cheapest model capable of handling it.
- Cursor’s own online A/B test across millions of requests reports 60% lower cost with no measured quality drop versus routing everything to Opus 4.8, though the company’s more conservative figure for early-access, high-volume customers is 30-50%.
- Router ships three modes – Intelligence, Balance, and Cost – and Cursor’s own per-commit cost comparison puts Balance mode at $4.63 versus $7.34 for Opus 4.8 alone on the same work.
Cursor released Cursor Router on July 22, 2026, a classifier that reads each coding request and automatically sends it to the model best suited for the job, rather than leaving that choice to whichever model the developer happened to have selected. Cursor says the router was trained on more than 600,000 live requests and validated in an online A/B test spanning millions of production requests, and that it delivers frontier-quality output at 60% lower cost than sending everything to Opus 4.8. The launch lands the same week OpenAI rolled out hard spending limits across all API accounts, part of a broader shift toward cost control becoming a default feature of AI coding tools rather than something developers manage by hand.
What Router Actually Does
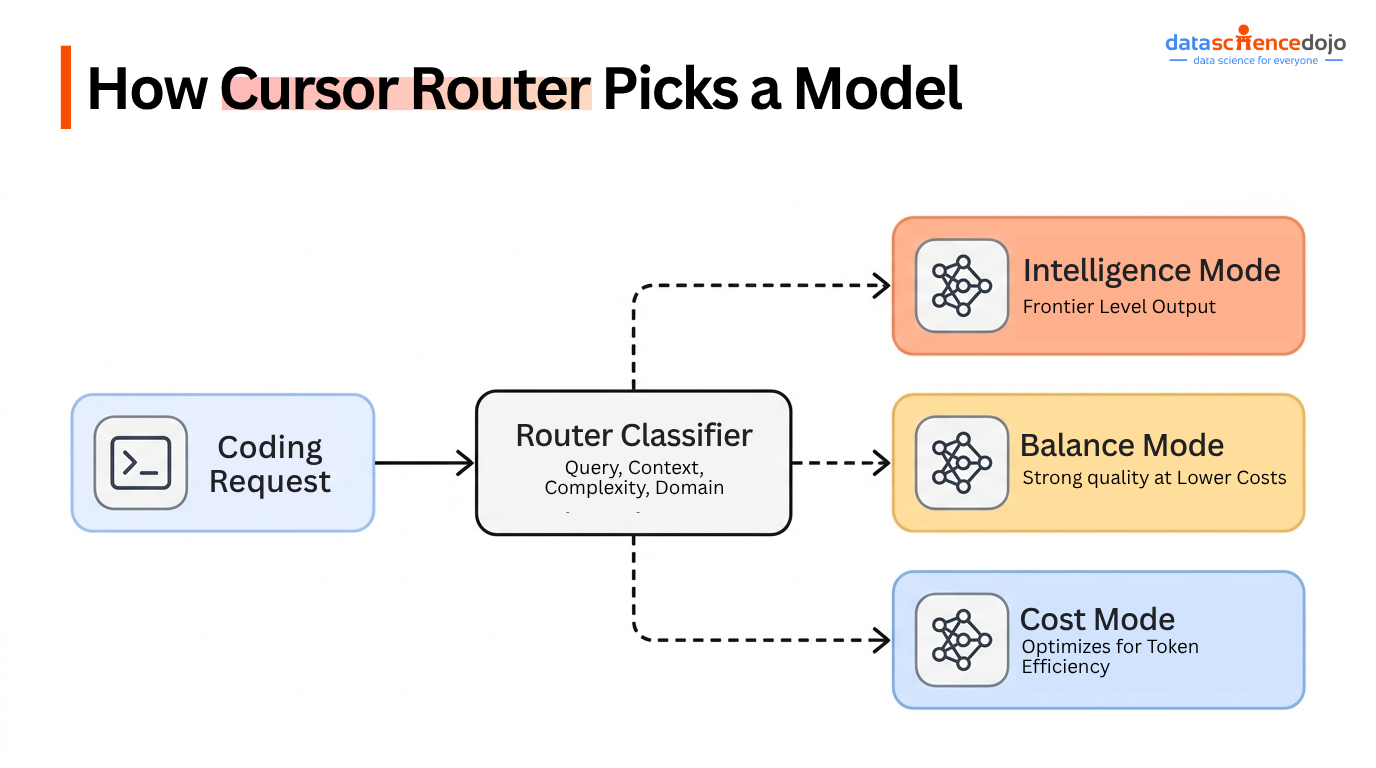
Cursor Router sits inside the existing model picker as an “Auto” mode rather than a separate product. Once selected, it classifies each incoming request by query content, surrounding code context, task complexity, and domain, then matches that against a working model of what each available model is actually good at. It has three modes currently:
- Intelligence mode: optimizes for frontier-quality output, routing demanding work to top-tier models
- Balance mode: targets strong quality at meaningfully lower cost
- Cost mode: optimizes for token efficiency on routine work
| Mode | Best for | Cost profile | Quality tradeoff |
|---|---|---|---|
| Intelligence | Complex refactors, security-sensitive code, architecture decisions | Highest of the three, closest to running a single top-tier model | Lowest risk of a downgraded result |
| Balance | Day-to-day feature work, most pull requests | Meaningfully lower than Intelligence, based on Cursor’s $4.63 vs $7.34 per-commit figure | Small risk on edge-case requests |
| Cost | Boilerplate, formatting, simple bug fixes, routine documentation | Lowest of the three | Higher risk if a routine-looking request turns out to need more reasoning than expected |
Administrators on Team and Enterprise plans control the rollout: which modes are available to a team, what the default is, and whether a model allowlist restricts routing to an approved set. Balance mode is the one most teams will land on by default. It targets the bulk of everyday coding work, where the gap between a frontier model and a cheaper one rarely shows up in the final output. Intelligence mode exists for the requests where that gap does show up, and Cost mode exists for the requests where no gap exists at all.
Related: Top 10 Open Source Tools for Agentic AI Development
The Training and Evaluation Behind It
Cursor built the classifier on 600k+ live coding requests and says it ran an online A/B test across millions of production requests, optimizing for measured user satisfaction rather than a static benchmark. The system is cache-aware, meaning it accounts for cache misses in both training and the cost figures it reports, which matters because cache hit rates can swing real-world API cost by a wide margin independent of which model handled the request.
How a Routing Classifier Actually Works
Router’s classifier is doing a specific job each time a request comes in: predicting which available model will produce an acceptable result at the lowest cost, before that model ever runs.
A few things determine that prediction:
- Query content: the literal text of the request, including keywords that signal difficulty, like “refactor across five files” versus “fix this typo”
- Code context: how much surrounding code the model needs to read to answer correctly, since larger context windows cost more regardless of which model handles them
- Task complexity: whether the request needs multi-step reasoning or a single direct edit
- Domain: whether the task touches a specialized area (security, concurrency, infrastructure) where a cheaper model is more likely to get it wrong
Training on 600,000 live requests means the classifier learned these patterns from real developer behavior rather than synthetic examples. The online A/B test across millions of requests then checked whether the classifier’s routing choices held up against actual user satisfaction, not just a benchmark score.
The cache-aware part matters more than it sounds. When a model has already seen part of a prompt in a recent request, providers charge less for that repeated context. A routing system that ignores cache hits will overstate savings for teams with high cache reuse and understate them for teams with low reuse. Building cache awareness into both training and the published cost figures is what makes Cursor’s numbers comparable across different team setups.
The Cost Numbers, and Where They Disagree With Each Other
Cursor’s headline figure is 60% lower cost, drawn from the online A/B test across millions of requests. But Cursor’s own reporting on early-access customers gives a narrower range: high-volume teams in early access saw 30% to 50% lower costs, not 60%. Cursor also published specific per-commit comparisons that back the more modest end of that range:
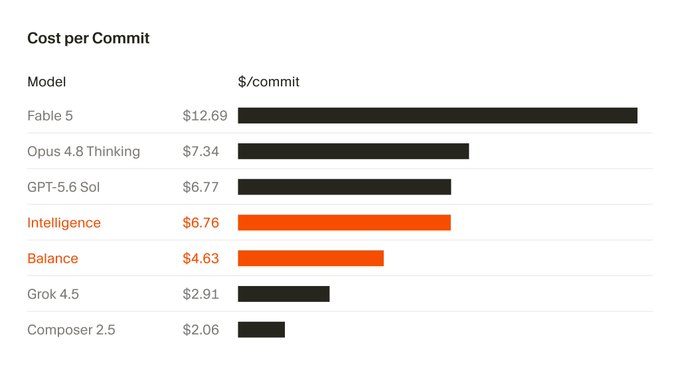
Both of those specific comparisons land closer to 40-47% savings than 60%. The 60% figure is real, but it describes an aggregate result across a huge, mixed request volume in a controlled test, not a number every team should expect on its own bill. Treat 30-50% as the range worth planning around, and 60% as a ceiling under ideal conditions.
Related: Claude Sonnet 5: Anthropic’s Most Agentic Sonnet Yet And Its Hidden Cost
Why This Is Happening Now
Cursor Router did not launch in isolation. The same week, OpenAI added hard spend limits to every API account by default. Neither company has said the timing was coordinated, but both moves point at the same underlying shift: AI coding and agent workloads have gotten expensive enough at scale that cost control is becoming a default product feature rather than something a developer configures by hand after the bill arrives.
Cursor itself noted that roughly 60% of developers pick one model as their primary choice and stick with it. That habit likely means routine requests, like formatting a function or renaming variables, get sent to the same expensive model as a genuinely hard refactor. A router removes that decision from the developer entirely.
This fits a broader pattern in how agentic tools are being built. Instead of one model handling every step of a task from start to finish, more systems now use an orchestration layer that decides which model, tool, or step should run next. Agentic LLMs covers this shift in more detail, including why orchestration is becoming a separate design problem from model selection itself.
What This Means for Practitioners
- Teams on Cursor Teams or Enterprise plans: turning on Auto mode costs nothing to try, and Cost or Balance mode is a reasonable default for routine work like boilerplate, refactors, and simple bug fixes.
- Teams with strict output-quality requirements: start with Intelligence mode and compare its cost and output quality against your current single-model setup before dropping to Balance.
- Anyone budgeting AI coding spend: plan around the 30-50% range from Cursor’s own early-access data, not the 60% ceiling figure, and verify against your own bill after a week of real usage.
If you are evaluating whether a router-based approach beats manually picking a single model for your team, our breakdown of AI code generation tools and guide to Replit’s cloud IDE covers how competing tools handle the same model-selection problem.
What to Watch Next
Worth tracking: whether Cursor extends Router to individual or Pro plans beyond Teams and Enterprise, and whether competitors follow with their own routing layers now that OpenAI’s spend limits and Cursor Router have both shipped in the same week. If routing becomes standard across coding tools the way autocomplete did, the next competitive axis will be how accurately each vendor’s classifier avoids downgrading a request that actually needed the expensive model.
Frequently Asked Questions
Is Cursor Router available on the free or Pro plan?
No. As of launch, Router is available only on Cursor’s Teams and Enterprise plans, across desktop, web, iOS, CLI, and SDK.
How much will Cursor Router actually save on my bill?
Cursor’s own early-access data for high-volume customers shows 30% to 50% lower cost. The 60% figure comes from an aggregate online A/B test across millions of mixed requests and represents a ceiling under ideal conditions rather than a typical result.
Does using Cursor Router mean lower-quality code output?
Cursor reports no measured quality drop in its A/B test when using Auto mode compared to routing every request to Opus 4.8, though results will vary by task type and the mode selected (Intelligence, Balance, or Cost).
What data was Cursor Router trained on?
Cursor says Cursor Router’s classifier was trained on more than 600,000 live coding requests and validated through an online A/B test spanning millions of production requests, optimizing for measured user satisfaction.
Can admins restrict which models Cursor Router is allowed to use?
Yes. Team and Enterprise admins can set a model allowlist for Cursor Router, choose which modes are available, and set team-wide defaults.
Why did OpenAI add spend limits the same week?
The two launches are not directly connected, but both reflect the same trend: AI coding and agent workloads have gotten expensive enough at scale that cost controls are becoming default product features rather than something developers configure manually after the fact.