

When building business apps in Power Apps with SharePoint lists as your backend, moving from a development to a production environment involves more than just copying a file. Ensuring your app continues to work seamlessly across environments, especially when using different SharePoint Lists, requires the right migration strategy.
This blog provides a detailed step-by-step guide on how to migrate Power Apps from a development environment to a production environment. It covers two primary methods: the Import/Export Method and the Solutions Method including their limitations and when to use each one, with an additional explanation of how Deployment Pipelines can be used to enhance the Solutions Method for faster and more efficient migrations.
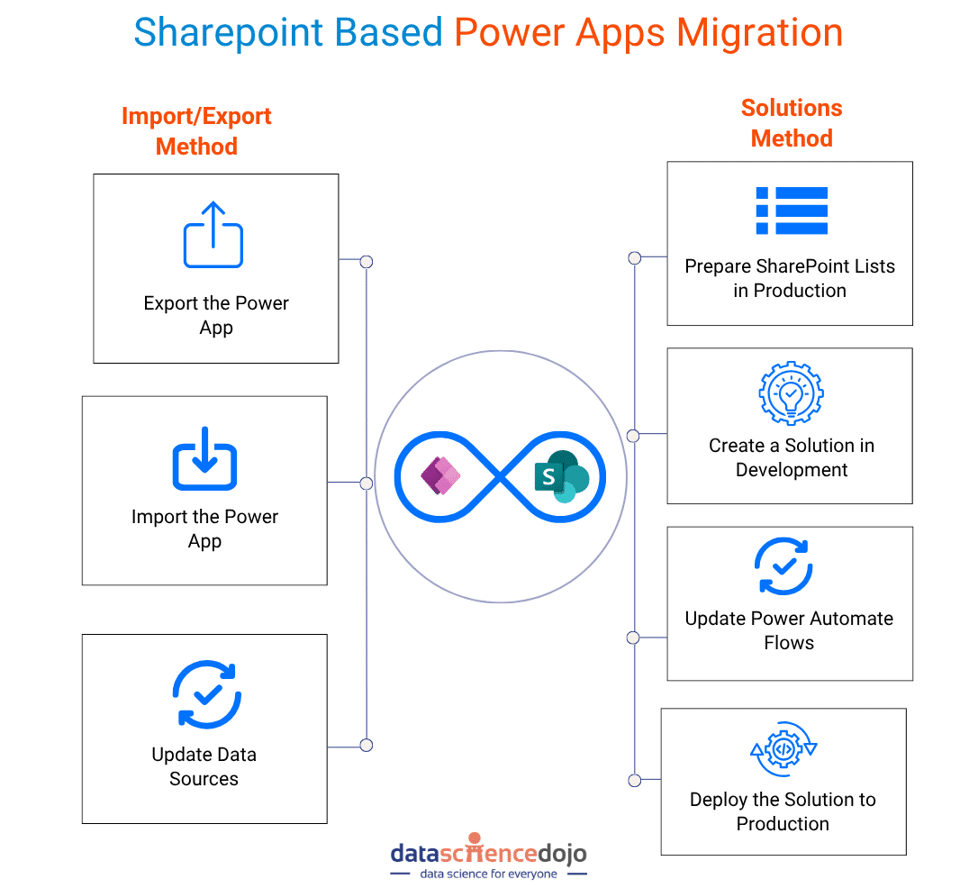
Import/Export Method
Overview
This method involves exporting the Power App as a .zip file from the development environment and importing it into the production environment. It is a straightforward approach but has limitations, especially when dealing with different SharePoint sites for development and production.
Steps
Export the Power App:
- Go to the Power Apps Studio in the development environment.
- Select the app you want to migrate.
- Click on File > Save As > Export this app.
- Save the .zip file to your local machine.
Import the Power App:
- Navigate to the Power Apps Studio in the production environment.
- Click on Apps > Import canvas app.
- Upload the .zip file exported from the development environment.
Update Data Sources:
- If the SharePoint site in the production environment is different from the development environment:
- Open the imported app in the Power Apps Studio.
- Go to View > Data sources.
- Remove the existing SharePoint data sources.
- Add the new SharePoint data sources from the production environment.
- If the SharePoint site is the same, no changes are needed.
Limitations of the Import/Export Method
- Different SharePoint Sites: If the development and production environments use different SharePoint sites, you must manually update the data sources after importing the app.
- Manual Effort: This method requires manual intervention, which can be error-prone and time-consuming.
When to Use The Import/Export Method
- When the development and production environments use the same SharePoint site.
- For quick, one-off migrations where manual updates are acceptable.
Solutions Method
Overview
The Solutions Method is a more robust approach that leverages Power Platform solutions to package and migrate apps, flows, and related components. It is ideal for environments with separate SharePoint sites for development and production.
Steps
Step 1: Prepare SharePoint Lists in Production
Export SharePoint Lists from Development:
- Go to the SharePoint site in the development environment.
- Export each list as a .csv file with schema.
- For lists with lookup columns (e.g., “Lot Specifications” list with a lookup to “Submissions” list), import the “Lot Specifications” list first. Then, import the “Submissions” list. After importing the data type of lookup column would have changed therefore, delete and re-add the ‘Submissions Lookup’ column in the “Lot Specifications” list to reference the ID field in the “Submissions” list.
Import SharePoint Lists into Production:
- Go to the SharePoint site in the production environment.
- Import each list using the .csv files exported from the development environment.
- If there are lookup columns, ensure the referenced lists are imported first.
- After importing, re-create any lookup columns manually if necessary.
Empower your analytics journey with guides and tips on self-service business intelligence solutions.
Step 2: Create a Solution in Development
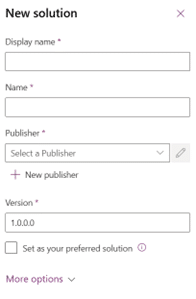
Create a New Solution:
- Go to the Power Apps Studio in the development environment.
- Navigate to Solutions > New Solution.
- Provide a name and publisher for the solution.
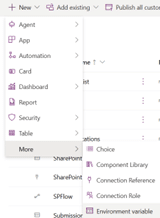
Add the Canvas App to the Solution:
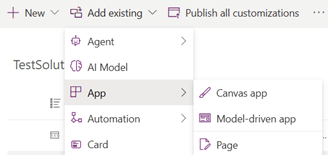
- In the solution, click Add Existing >App> Canvas App.
- Select the app you want to migrate.
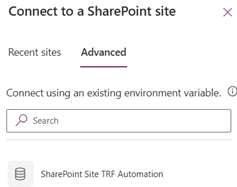
Create Environment Variables:
- In the solution, click New > Environment Variable.
- Set the data type to Data Source and the connector to SharePoint.
- Use personal or service account (recommended) for the connection.
- Set the parameter type to Site and provide the SharePoint site URL for the development environment.
Unlock best practices and automation strategies for advanced Excel reporting and data visualization.
Update Data Sources in the App:
- Open the app within the solution.
- Remove the existing SharePoint data sources.
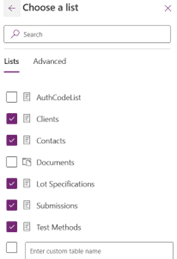
- Add the SharePoint data source again, but this time use the environment variable for the site URL.
- Select all the lists, in the background environment variables for selected Lists will get created.
Step 3: Deploy the Solution to Production
Create a Production Environment:
- Go to the Power Platform Admin Center.
- Create a new environment with the Production type.
- Ensure Dataverse is enabled (required for solutions).
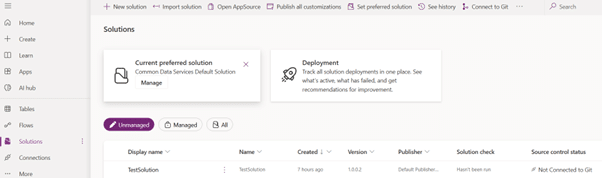
Deploy the Solution:
- In the development environment, go to Solutions.
- Select the Pipelines Tab and add new pipeline by selecting the Target environment.
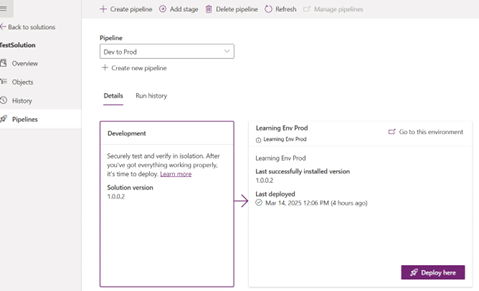
- Set up stages for development, testing, and production as needed.
- Run the pipeline to deploy the solution from development to production.
- Configure environment variables.
- Monitor the deployment process for any issues and validate that the app functions correctly in the production environment.
Step 4: Update Power Automate Flows
Duplicate Flows for Production:
- Go to Power Automate in the development environment.
- Duplicate any flows associated with the app.
- Update the SharePoint site and lists in the duplicated flows to point to the production environment.
Test the Flows:
- Ensure the flows work correctly with the production data sources.
Advantages of The Solutions Method
- Automated Deployment: Solutions allow for automated deployment of apps and components.
- Environment Variables: Environment variables make it easier to manage different data sources across environments.
- Scalability: Ideal for complex projects with multiple apps and flows.
When to Use The Solutions Method
- When the development and production environments use different SharePoint sites.
- For projects requiring repeatable and scalable deployment processes.
Final Thoughts
Migrating SharePoint-based Power Apps to production doesn’t have to be daunting. Whether you’re a solo maker or an enterprise team, there’s a method that fits your needs. The key is choosing the right one based on your environment structure, need for automation, and long-term maintainability.
Ready to take your skills to the next level?
Explore the hands-on LLM Bootcamp offered by Data Science Dojo to master the latest in AI and machine learning. For more expert insights and practical guides, don’t forget to read more blogs on Data Science Dojo. Empower your journey in data and automation today!